2-26
1P124-2306
Console w/Clutch Control
Tractor Installation - Optional
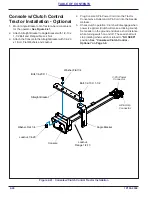
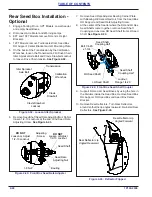
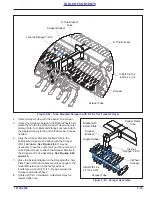
1. Mount Angle Bracket onto Tractor where convenient
for the operator.
2. Attach Straight Bracket to Angle Bracket with 1/2-13 x
1-1/2 Bolt and Flanged Ny-Lok Nut.
3. Attach the Console to the Straight Bracket with 1/4-20
x 1 Bolt, Flat Washers and Locknut.
4. Plug Console 3-Pin Power Cord into the Tractor
Convenience Outlet and 9-Pin Cord into the Seeder
Harness.
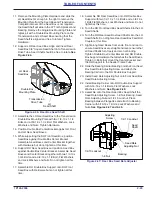
5. Check clutch operation: Clutch will disengage when
power is applied. (Clutch will make a clicking sound).
Set seeder on the ground and drive a short distance
while turning switch on and off. The seed shaft will
stop rotating when switch is turned to
"NO SEED"
position.
See “Console w/Clutch Control -
Figure 2-41: Console w/Clutch Control Tractor Installation
Bolt,1/2-13 X 1-1/2
Angle Bracket
Straight Bracket
Console
Locknut,1/4-20
Washer,Flat 1/4
Bolt,1/4-20 X 1
Washer,Flat 1/4
Locknut,
Flange 1/2-13
SSP16 Monitor
3-Pin Power
Connector
9-Pin Amp
Connector
Summary of Contents for Brillion Turfmaker III Series
Page 4: ......
Page 14: ...1 6 1P124 2306 TABLE OF CONTENTS Figure 1 4 Decal Placement Hitch SL2 HitchDecals 1 9 1 9 3...
Page 18: ...1 10 1P124 2306 TABLE OF CONTENTS Table provided for general use NOTES...
Page 45: ...1P124 2306 2 27 TABLE OF CONTENTS Table provided for general use NOTES...
Page 49: ...1P124 2306 2 31 TABLE OF CONTENTS Table provided for general use NOTES...
Page 57: ...1P124 2306 2 39 TABLE OF CONTENTS Table provided for general use NOTES...
Page 74: ...3 14 1P124 2306 TABLE OF CONTENTS Table provided for general use NOTES...
Page 102: ...6 4 1P124 2306 TABLE OF CONTENTS Table provided for general use NOTES...

