background image

HYDRAULIC SYSTEM (CONTINUED)


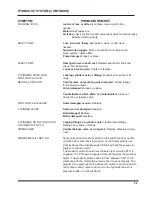
SYMPTOM 

PROBLEM: REMEDY


FOAMING OF OIL 

Incorrect, low, or dirty oil: 

replace, clean or add oil as


needed.


Water in oil: 

replace oil


Air leaks: 

check suction line and component seals for suction leaks.

Replace defective parts.


NOISY PUMP 

Low, incorrect, foamy oil: 

replace, clean, or add oil as


needed.


Suction line plugged: 

clean out obstruction or replace line.


Flush system, replace filter.


Pump damaged: 

repair or place.


LEAKY PUMP 

Damaged or worn shaft seal: 

Replace seal and/or shaft and


check for misalignment.


Loose or broken parts: 

Tighten or replace.


CYLINDERS MOVE WITH 

Leaking cylinder seals or fittings: 

Replace worn seals or fit-


CONTROL VALVE IN 

 tings.


NEUTRAL POSITION 

Control valve not centering when released: 

Check linkage


for binding and repair.


Valve damaged: 

Repair or replace. 

Counterbalance Valve Worn or Contaminated: 

Clean out 

obstruction or replace valve. 

CONTROL VALVE LEAKS 

Seals damaged or worn: 

Replace.


CYLINDER LEAKS 

Seals worn or damaged: 

Replace.


Rod damaged: 

Replace.


Barrel damaged: 

Replace.


CYLINDERS DO NOT FUNCTION, 

Leaking fittings or cylinder seals: 

Tighten loose fittings.


OR CREEP WITH PTO 

Replace worn seals or fittings.


DISENGAGED  


Counterbalance valve or o-ring leak: 

Replace defective compo-


                                                                  nent. 

SUBFRAME WILL NOT TILT

    Some units have a proximity switch so the subframe does not tilt 

      until the bed is slide back far enough, so that metal plate is not 

       directly above the proximity switch. Slide bed back far enough so 

              plate is not above switch.  

          The proximity switch should have indicator light on when PTO is      


engaged. The PTO wire engages a relay that powers the proximity 


switch. The proximity switch needs to have between 1/32” to 1/4” 


clearance with the metal plate at rear of bed to work properly. The 


magnet in the proximity switch allows the switch to send a signal to 

   the hydraulic dump valve to dump oil to the hydraulic tank so no       


pressure builds up to tilt subframe. 

.


5-

3

Summary of Contents for LOADOLL II

Page 1: ...F 1036 0519 05 2019 to Present LANDOLL CORPORATION 1900 North Street Marysville Kansas 66508 785 562 5381 800 428 5655 WWW LANDOLL COM LOADOLL II Operators Manual ...

Page 2: ......

Page 3: ... 3 1 Bed Slide Control 3 4 Winch Controls Basic Controls 3 5 Special Hitch Control Option 3 5 Power Take off PTO 3 5 Bed Loading 3 6 Bed Unloading 3 7 Load Placement 3 7 Securing Loads to Bed 3 7 Hitch Operation Option 3 8 Cold Weather Operation 3 11 Hot Weather Operation 3 11 MAINTENANCE and LUBRICATION Maintenance Schedule Maintenance Procedures Frame and Deck Hydraulic System Electrical System ...

Page 4: ...H IF NOT AVOIDED WILL RESULT IN DEATH OR SERIOUS INJURY WARNING WARNING INDICATES A POTENTIALLY HAZARDOUS SITUA TION WHICH IF NOT AVOIDED COULD RESULT IN DEATH OR SERIOUS INJURY CAUTION CAUTION INDICATES A POTENTIALLY HAZARDOUS SITUA TION WHICH IF NOT AVOIDED MAY RESULT IN MINOR OR MODERATE INJURY CAUTION CAUTION USED WITHOUT THE SAFETY ALERT SYMBOL INDI CATES A POTENTIALLY HAZARDOUS SITUATION WHI...

Page 5: ...d a lubrication schedule Improper maintenance will void your warranty IF YOU HAVE ANY QUESTIONS CONTACT LANDOLL CORPORATION 1900 NORTH STREET MARYSVILLE KANSAS 66508 PHONE 785 562 5381 or 800 428 5655 OR FAX 888 527 3909 CHAPTER 5 is a troubleshooting guide to aid in diagnosing and solving problems with the trailer PARTS MANUAL is a separate manual showing the various assemblies subassemblies and ...

Page 6: ......

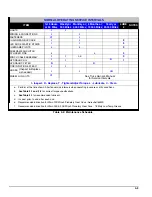
Page 7: ...0 HITCH EXTENDED BACK 1 FOOT 3000 HITCH EXTENDED BACK 2 FEET 2000 HITCH EXTENDED BACK 3 FEET full extension 1500 HORIZONTAL LOADING UP TO TOWING not extended back 16 000 GVWR UNIT HITCH EXTENDED BACK 1 FOOT 16 000 GVWR UNIT HITCH EXTENDED BACK 2 FEET 13 000 GVWR UNIT HITCH EXTENDED BACK 3 FEET 10 000 GVWR UNIT CHAIN DRIVE CONTINOUS POWER LOAD SYSTEM 12 000 WINCH WARN 20 000 HYDRAULIC RESERVOIR CAP...

Page 8: ... 65 81 90 112 9 16 12 55 62 80 100 110 137 9 16 18 60 75 90 112 130 162 5 8 11 75 94 110 137 170 212 5 8 18 85 106 130 162 180 225 3 4 10 130 162 200 250 280 350 3 4 16 150 188 220 275 320 400 7 8 9 125 156 320 400 460 575 7 8 14 140 175 360 450 500 625 1 8 190 237 408 506 680 850 1 14 210 263 540 675 760 950 1 1 8 7 270 337 600 750 960 1200 1 1 8 12 300 375 660 825 1080 1350 1 1 4 7 380 475 840 1...

Page 9: ... 146 75 85 16 115 125 202 218 109 121 20 160 180 248 272 213 237 24 185 215 303 327 238 262 32 250 290 310 340 LANDOLL CORPORATION HYDRAULIC FITTING TORQUE SPECIFICATIONS 37o JIC ORS ORB REV 10 97 THIS CHART PROVIDES TIGHTENING TORQUES FOR HYDRAULIC FITTING APPLICATIONS WHEN SPECIAL TORQUES ARE NOT SPECIFIED ON PROCESS OR DRAWING ASSEMBLY TORQUES APPLY TO PLATED CARBON STEEL AND STAINLESS STEEL FI...

Page 10: ...Table provided for general use NOTES ...

Page 11: ...ONAL INJURY DAMAGE TO YOUR SEMI TRAILER AND CARGO AND CAUSE TIME CONSUMING BREAKDOWNS DANGER SERIOUS INJURY OR DEATH MAY RE SULT IF A PERSON IS UNDER IN FRONT OF OR BEHIND THE BED SUBFRAME REAR BUMPER OR CHASSIS AT ANY TIME DURING OP ERATION OF THE LOADOLL THE SUBFRAME CAN SWING UP AND THE BED CAN TRAVEL BACK 108 INCHES FOR 22 BEDS AND 117 INCHES FOR 28 BEDS ANY OBJECT IN THE SAME AREAS MAY BE DAM...

Page 12: ...Figure 3 1 Decal for Control Operation 3 2 ...

Page 13: ...TO LEAVE AT LEAST FIVE WINCH CABLE WRAPS ON THE WINCH CABLE SPOOL COULD ALLOW THE CABLE TO COME OFF THE SPOOL RESULTING IN SERIOUS PERSONAL INJURY OR DEATH OR CHAIN DRIVE FREE SPOOL CLUTCH OPERATION WARN WINCH Warn Series XL winches are equipped with air operated free spool clutch 1 The air free spool clutch is operated by application of air pressure to the fitting supplied on the winch gearbox hou...

Page 14: ... by the Winch Hydraulic Lever CAUTION A MINIMUM OF 5 WRAPS OF CABLE MUST BE LEFT ON THE WINCH DRUM SEE FIGURE 3 3 3 3 2 The HYDRAULIC WINCH CONTROL LEVER is the second lever from the front of the Figure 3 1 This control reels the winch cable IN in the IN position and OUT in the OUT position IN In this position the winch reels the winchcable in NEUTRAL This is the neutral position This position has...

Page 15: ...IS TRANSMISSION PTO UNIT HYDRAULIC PUMP AND OTHER COMPONENTS The PTO control is located in the chassis cab When the PTO is engaged engine powers a high pressure hydraulic pump thus providing power to the hydraulic controls 3 3 BED SLIDE CONTROL The BED SLIDE CONTROL is the third control from the front of the truck It is designated on the decal as BED See Figure 3 1 Operating the control as shown o...

Page 16: ...er PTO is engaged turn the clearance lights on Slide bed back enough so that bed comes out of bed hold downs using the bed slide bed controls 3 7 6 Tilt the bed up using the BED TILT TRUCK controls to about 10 degree angle See Section 3 1 for proper operation of the control 3 7 7 Slide the bed back using the BED SLIDE BED control until the bed is slid all the way back See Section 3 2 for proper op...

Page 17: ... item from moving by blocking it or setting the parking brake 3 8 14 Remove winch line and secure in stow ing position This would entail anchoring to any bed load anchor location and removing any slack in the cable 3 8 18 If the load is a container Steps 3 8 1 through 3 8 9 will be the same 3 8 19 If the container is over hanging the bed the rear of the container will be touching the ground If the...

Page 18: ...CONTROL OVER THE LOA DOLL IS EXPERIENCED DANGER NEVER CRAWL UNDER THE TRUCK OR TOWED VEHICLE DURING OPERATIONS NEVER CRAWL UNDER THE HITCH AT ANY TIME FAILURE TO COMPLY MAY RESULT IN SERIOUS PERSONAL INJURY OR DEATH WARNING NEVER STAND BETWEEN THE TRUCK AND THE TOWED VEHICLE STAND ING BETWEEN THE TRUCK AND THE TOWED VEHICLE MAY RESULT IN SERIOUS PERSONAL INJURY 3 11 1 Vehicle Towing a Back the Loa...

Page 19: ...roll d e h Move the Loadoll forward if there is not enough room to lift the hitch Raise the to a horizontal position making sure that the rear lights of the Loadoll are not obstructed 3 9 Check to make sure the towed vehicle is ready to be towed such as lifting support jacks and removing wheel chocks Retract the hitch as much as possible leaving enough clearance between the truck and the towed veh...

Page 20: ...nds to a proper function or a fault 4 SYNCHRONIZING TRANSMITTER TO RECEIVER a Power cycle the receiver OFF and then ON b On the Transmitter press and hold the Red OFF button At the same time press and hold the Green ON button for approximately 10 seconds c The synchronizing sequence must be done within 10 seconds or the process will need repeated d The wireless activity LED indicator should flash ...

Page 21: ...3 12 5 tion with cold Do not over tighten Tire inflation de creases when the temperature decreases Periodically check drain holes in the stor age compartments They must be open at all times to avoid moisture entrapment 3 13 1 Hot weather operation can cause ex pansion of parts resulting in tightening of bearings fasteners and moving parts Fail ure of gaskets or seals can occur HOT WEATHER OPERATION...

Page 22: ...Table provided for general use NOTES ...

Page 23: ... service with minimal mainte nance However proper maintenance is important for durability and safe operation and is an owner user responsibility DANGER OPERATING THE VEHICLE WITH DE FECTIVE BROKEN OR MISSING PARTS MAY RESULT IN SERIOUS IN JURY OR DEATH DAMAGE TO THE VEHICLE ITS CARGO OR PROPERTY IN ITS PATH DANGER SERIOUS INJURY OR DEATH MAY RE SULT IF A PERSON IS UNDER IN FRONT OF OR BEHIND THE B...

Page 24: ...ions of the vehicle if lubricants are found to be fouled with dirt or sand those parts should be cleaned with paint thinner dried and relubricated immediately Dirt in a lubricant forms an abrasive compound that will wear parts rapidly WARNING PAINT THINNER AND OTHER SOL VENTS ARE FLAMMABLE AND TOXIC TO EYES SKIN AND RESPIRATORY TRACT AVOID SKIN AND EYE CON TACT GOOD GENERAL VENTILATION IS NORMALLY...

Page 25: ...vice intervals when operating in severe or dirty conditions b See Table 2 1 and 2 2 for correct torque specifications c See Table 4 1 for recommended lubricant d Inspect prior to and after each use CHAIN GEAR BOX CASE BED SLIDE PLASTIC STRIPS SUBFRAME PIVOTS SUBFRAME AND HITCH CYLINDER PINS WINCH CABLE ASSEMBLY HYDRAULIC OIL HYDRAULIC FILTER WHEEL LUG NUTS I T See Truck Owner s Manual for Service I...

Page 26: ...REMEDY according to right hand column of Troubleshooting Guide See Section 5 4 3 FRAME AND DECK 4 3 1 Repairing Structural Defects If any structural defect is found the fault must be corrected before further use of the vehicle To continue usage could endanger the vehicle its load personnel traffic and properties Inspect the deck daily for broken or missing attachments Re place any defective parts p...

Page 27: ...Table provided for general use NOTES ...

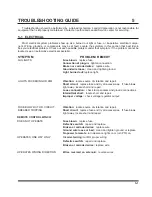
Page 28: ...out replace light LIGHTS FLICKERING OR DIM FUSE BLOW OUT OR CIRCUIT BREAKER TRIPPING Vibration locate source of vibration and repair Short circuit replace fuse and try all accessories If fuse blows right away locate short and repair Vibration locate source of vibration and repair Short circuit replace fuse and try all accessories If fuse blows right away locate short and repair Loose connection ch...

Page 29: ...ed components clean or repair as needed Restriction in filters or lines clean and or replace filter or lines Not enough oil in system fill and check for leaks SYSTEM OPERATES SLOWLY Oil viscosity too high or cold oil Allow oil to warm up before operating Low pump drive speed increase engine speed check pump own ers manual for specifications Low oil level check reservoir and add oil as necessary Air in...

Page 30: ...struction or replace valve CONTROL VALVE LEAKS Seals damaged or worn Replace CYLINDER LEAKS Seals worn or damaged Replace Rod damaged Replace Barrel damaged Replace CYLINDERS DO NOT FUNCTION Leaking fittings or cylinder seals Tighten loose fittings OR CREEP WITH PTO Replace worn seals or fittings DISENGAGED Counterbalance valve or o ring leak Replace defective compo nent SUBFRAME WILL NOT TILT Some u...

Page 31: ...lve set too low Weak pump This may be the problem if one cylinder is at the normal pressure and the other is at a lower pressure This may be the problem if both cylinders show the same pressure TEST 3 Run the tilt cylinder until the bumper almost touches the ground Return the cylinder to the transport position Check pressures while the bed is tilting From 1000 to 2500 psi NORMAL Greater than 2500 ...

Page 32: ...ight loads and or rough road conditions check weight limitations and adjust driving style to road conditions BED SLIDE STRIPS EXCESSIVE WEAR Lubricated with heavy grease remove grease and use dry silicone or other non dirt and grit collecting lubricant Rough slide tubes on subframe smooth tubes 5 5 lubricate lubricant WORN NYLATRON SLIDES When Nylatron wears enough that screws heads are rubbing on...

Page 33: ...Table provided for general use NOTES ...

Page 34: ......

Page 35: ...ties Loadoll II Operator s Manual Re Order Part Number F 1036 0519 LANDOLL CORPORATION 1900 North Street Marysville Kansas 66508 785 562 5381 800 428 5655 WWW LANDOLL COM F 1036 0519 05 2019 to Present Copyright 2014 Landoll Corporation All rights reserved including the right to reproduce this material or portions thereof in any form ...

Reviews: