025-FIS18_Smart_GATEWAY
4
3
4
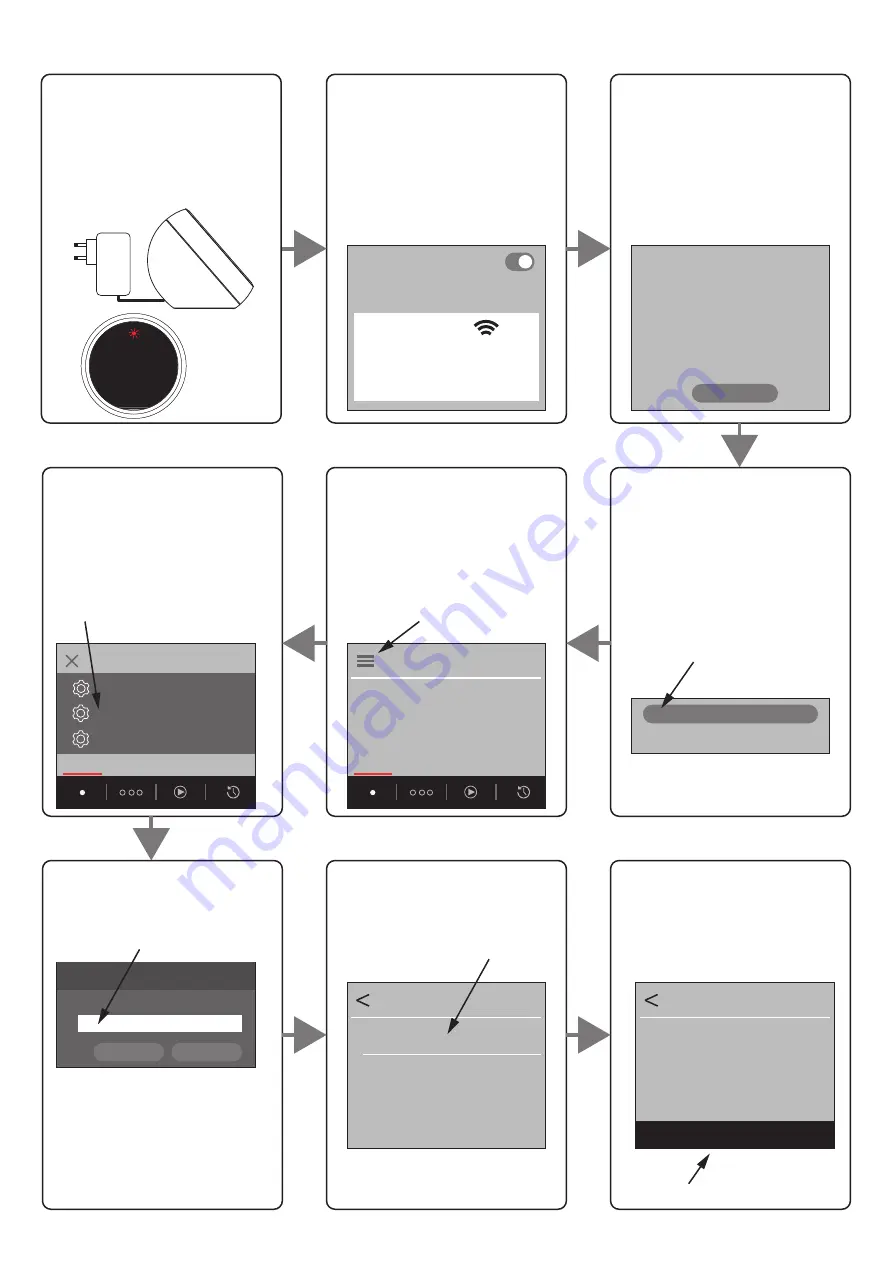
STEP1
Power ON the hub.
Red/green/blue lights turn on in
sequence. After the LED will flash
red during this phase (about 1
minute): the hub is generating the
Wi-Fi hotspot
2.2
PROCEDURE FOR USING A HOTSPOT CONNECTION
STEP3*
To connect to this network, insert
the default password:
"12345678"
NOTE: when connected to this
network, connections to other
networks will be disabled and
access to the internet is
unavailable
STEP2*
The LED switch ON and remain
fixed on green:
use your own device (e.g.: Smar-
tphone) and search available
networks for "Hub Smart Control",
the hotspot generated by the hub.
STEP4*
You are now connected to the
hotspot generated by the hub.
Next, type the default name of the
hub, "http://hub100.", in the
address bar of the browser on
your device.
STEP5
The user interface window will
open. Click on "menu".
STEP6
Click on "Configure network"
NOTE: this operation is not
necessary for usage, but it makes
the hub more secure and blocks
unwanted access to the system.
STEP7*
You will be requested to enter a
password; the default password
is: “1234”.
STEP8
Click on "configure network"
STEP9
The current setting will be
displayed; click on "edit"
Hub Smart Control
ENTER PASSWORD
12345678
Access
Type a website address
Confirm
Cancel
Password
Enter password
http://hub100.
Edit
Hub hotspot
Save
menu
lampeggia rosso
Devices
Settings
CONFIGURE NETWORK
Configure network
Devices
Settings
Configure network
Configure system
1234
configure network
Configure network
Configure current network
Type of access : Hub hotspot
SSID : Hub Smart Control
Edit network
Select connection type
Hub hotspot
Wi-Fi network
Edit
STEP10
Click on "Hub hotspot"
STEP11
Fill in all fields with the connection data for the hotspot you wish to create.
Network name (SSID):
the name of the hotspot generated by the hub.
See step 2 of this procedure (default: Hub Smart Control)
Current password:
the existing password required to connect to the
hotspot used in step 3 of this procedure (default: 12345678)
New password:
the new password which will be used in step 3.
It is recommended to set a new password for security reasons.
System name:
the name to enter in the address bar of step 4 of this
procedure. The name cannot contain spaces.
NOTE: when entering the name in the address bar, it must always end with
a full stop (.)
EXAMPLE:
system name:
“hubcasa”
address to enter:
“http://hubcasa.”
ATTENTION:
To access the system with another device (mobile phone, PC, etc.) once
the system has been configured, simply follow step 14.
The IP address to connect to is visible on the configure network page in
the settings menu of a device which has already been configured
STEP12
After filling in all the fields, click on
"Save" at the bottom of the page.
STEP13
The hub will restart to activate the new settings;
the LED will flash red while creating the hotspot
(about 1 minute).
The personal device will disconnect from the hub’s
hotspot network.
STEP14
To use the system, reconnect to the hub’s Wi-Fi
network (steps 2, 3 and 4 of this procedure) using the
new data entered during step 11.
NOTE: it is recommended to create an icon on the
homepage of the personal device so you can quickly
access the commands; see paragraph 6.1
NOTE:
it is important to remember the infor-
mation entered as it is required in order
to use the hub with your own device
and to connect more devices at a later
time.
If the data are lost, the system must be
reset by following the procedure in
paragraph 7.1.
Edit network
Select connection type
Hub hotspot
Network wifi
Hub hotspot conection
Network name (ssid)
Current password
New password
Confirm
password
System
System Name
Save
Network name (ssid)
Current password
New password
Confirm
password
System
System Name
Save
Wi-Fi Activated
CHOOSE A NETWORK...
Hub Smart Control
*NOTE:
In steps 2, 3, 4 and 7 of
this procedure, the default
values to be used will be
suggested. If these were modi-
fied previously, the system must
be reset; see
paragraph 7.1.


