


5. Extension Cord - Make sure your extension cord is in good condition. When using an
extension cord, be sure to use one heavy enough to carry the current your product will
draw. An undersized extension cord will cause a drop in line voltage resulting in loss of
power and overheating.
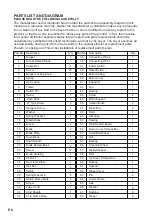
Extension Cord Size
The following table shows the correct cord size to use depending on cord length and
nameplate ampere rating. If in doubt, use the next heavier gauge. The smaller the gauge
number, the heavier the cord.
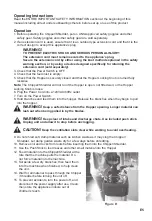
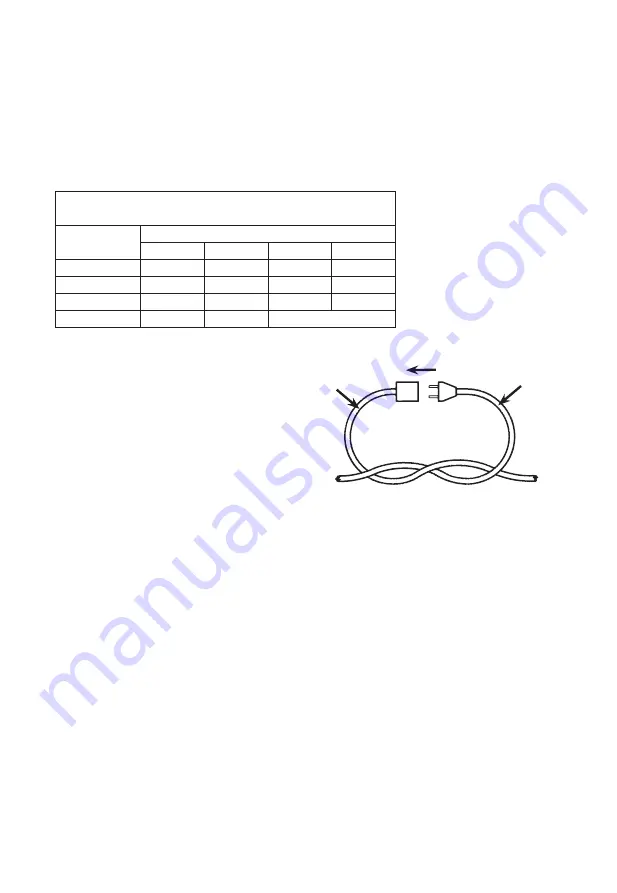
Connecting Cords
To reduce the risk of the cords pulling apart
during operation, do one of the following:
a. Make a knot as shown below
then connect the cords:
b. Or, use a plug-receptacle retaining
strap or connector designed to hold
extension cords to appliance cords.
Personal Safety
1. Dress Properly - Do not wear loose clothing or jewelry. They can be caught in moving parts.
Use of rubber gloves and substantial footwear is recommended when working outdoors.
Wear protective hair covering to contain long hair.
2. Wear ANSI-approved safety goggles and heavy-duty work gloves. Use face or dust mask if
operation is dusty.
3. Avoid Unintentional Starting - Do not carry plugged-in appliance with finger on switch. Be
sure switch is off when plugging in.
4. Do not Overreach - Keep proper footing and balance at all times.
5. Stay Alert - Watch what you are doing. Use common sense. Do not operate appliance when
you are tired.
6. People with pacemakers should consult their physician(s) before use. Electromagnetic fields
in close proximity to heart pacemaker could cause pacemaker interference or pacemaker
failure. In addition, people with pacemakers should:
• Avoid operating alone.
• Don’t use with power switch locked on.
• Properly maintain and inspect to avoid electrical shock.
• Any power cord must be properly grounded. Ground Fault Circuit Interrupter (GFCI)
should also be implemented – it prevents sustained electrical shock.
E2
0 – 6
6 – 10
10 – 12
12 – 16
EXTENSION CORD LENGTH
25'
18
18
16
14
50'
16
16
16
12
100'
16
14
14
150'
14
12
12
TABLE A – MINIMUM WIRE GAUGE FOR
EXTENSION CORDS (120 VOLT)
Not recommended
Ampere Rating
(at full load)
Extension
Cord
Appliance
Cord
1
2
Summary of Contents for GUO023
Page 11: ...E9...