


Gardening Appliance Use and Care
1. Avoid Dangerous Environment - Do not use appliances in damp or wet locations.
2. Do not use in rain.
3. Keep Children Away - All visitors should be kept at a distance from work area.
4. When servicing use only identical replacement parts.
5. Before Starting the Chipper/Shredder, make sure that the hopper inlet is empty.
6. Keep your face and body away from the Hopper opening.
7. Stay clear of the discharge area. Keep body and hands away from the discharge chute.
8. Do not put your hands into the hopper opening while the unit is running. Use the paddle to
push objects into the hopper.
9. Before feeding material into the shredder, remove any metal, rocks, bottles, cans or other
foreign objects that may damage blades.
10. Use Right Appliance - Do not use appliance for any job except that for which it is intended.
11. Do not Force Appliance - It will do the job better and with less likelihood of injury at the rate
for which it was designed.
12. Store Idle Appliances Indoors - When not in use, appliances should be stored indoors in
dry, and high or locked-up place - out of reach of children.
13. Maintain Appliance With Care - Keep cutting edge sharp and clean for best performance
and to reduce the risk of injury. Follow instructions for lubricating and changing accesso-
ries. Inspect appliance cord periodically, and if damaged, have it repaired by an authorized
service facility. Inspect extension cords periodically and replace if damaged. Keep handles
dry, clean, and free from oil and grease.
14. Check Damaged Parts - Before further use of the appliance, a guard or other part that is
damaged should be carefully checked to determine that it will operate properly and perform
its intended function. Check for alignment of moving parts, binding of moving parts,
breakage of parts, mounting, and any other condition that may affect its operation. A guard
or other part that is damaged should be properly repaired or replaced by a qualified
technician unless indicated elsewhere in this manual.
15. Disconnect Appliance - Disconnect the appliance from the power supply when not in use,
before servicing, when changing accessories such as blades, and the like.
16. Keep guards in place and in working order.
17. Keep blades sharp.
18. Keep clear of intake and discharge chute. Use included push stick. Unplug unit and allow it
to stop before unclogging.
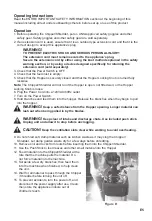
Set Up Instructions
Read the ENTIRE IMPORTANT SAFETY INSTRUCTIONS section at the beginning of this
manual including all text under subheadings therein before set up or use of this
product.
WARNING
TO PREVENT SERIOUS INJURY FROM ACCIDENTAL OPERATION:
Turn the Power Switch of the appliance to its “OFF” position and unplug the
appliance from its electrical outlet before assembling or making any adjustments.
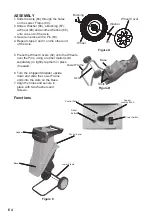
Note:
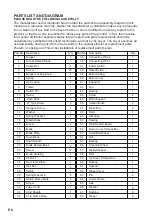
For additional information regarding the parts listed in the following pages, refer to the
Assembly Diagram near the end of this manual.
E3
Summary of Contents for GUO023
Page 11: ...E9...