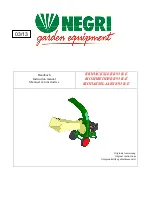


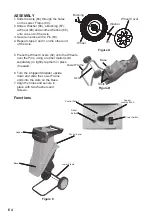


ASSEMBLY
1. Slide the Axle (65) through the holes
on the Lower Frame (64).
2. Slide a Washer (66), a Bushing (67),
a Wheel (68) and another Washer (66)
onto one end of the Axle.
3. Secure in place with a Pin (63).
4. Repeat steps 2 and 3 on the other end
of the Axle.
5. Press the Wheel Covers (62) onto the Wheels,
over the Pins, using a rubber mallet (sold
separately) to lightly tap them in place
if needed.
6. Turn the Chipper/Shredder upside
down and slide the Lower Frame
ends into the slots on the Base.
7. Align the holes and secure in
place with two Washers and
Screws.
Functions
E4
Slots
Base
Lower Frame
Axle
Figure B
Figure A
Bushing
W
asher
Wheel
Pin
Wheel Cover
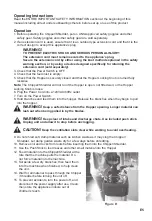
Control Panel
Power Switch
Reset
Button
Hopper
Locking Knob
Hopper
Base
Control Panel
Lower Frame
Figure C
Summary of Contents for GUO023
Page 11: ...E9...