background image

1. Read these instructions. 

4. Follow all instructions.

8. Do not install near any heat sources such as radiators, heat registers, stoves or other apparatus (including  amplifiers) that produce heat.

WARNING:  When using electrical products, basic cautions should always be followed, including the following:

3. Heed all warnings.

2. Keep these instructions safe.

5. Do not use this apparatus near water. 
6. Clean only with a dry cloth.
7. Do not block any of the ventilation openings. Install in accordance with manufacturer’s instructions. 

9. An apparatus with Class I construction shall be connected to a mains socket outlet with a protective connection. Do not defeat the safety 

purpose of the polarized or grounding-type plug.  A polarized plug has two blades with one wider than the other. A grounding type plug has 
two blades and a third grounding prong. The wide blade or third prong is provided for your safety. If the provided plug does not fit into your 
outlet, consult an electrician for replacement of the obsolete outlet. 

11. Only use attachments/accessories provided by the manufacturer.
12. Use only with a cart, stand, tripod, bracket, or table specified by the manufacturer, or sold with the apparatus. When a cart is used, use caution 

when moving the cart/apparatus combination to avoid injury from tip-over.

13. The mains plug or appliance coupler is used as the disconnect device and shall remain readily operable. The user should allow easy access to 

any mains plug, mains coupler and mains switch used in conjunction with this unit thus making it readily operable. Unplug this apparatus 
during lightning storms or when unused for long periods of time.

14. Refer all servicing to qualified service personnel. Servicing is required when the apparatus has been damaged in any way, such as when power-

supply cord or plug is damaged, liquid has been spilled or objects have fallen into the apparatus, the apparatus has been exposed to rain or 
moisture, does not operate normally, or has been dropped.

    b) The wire that is coloured blue must be connected to the terminal that is marked with the letter N or the colour black.
    c) The wire that is coloured brown must be connected to the terminal that is marked with the letter L or the colour red.

19. Exposure to extremely high noise levels may cause a permanent hearing loss. Individuals vary considerably in 

susceptibility to noise-induced hearing loss, but nearly everyone will lose some hearing if exposed to 
sufficiently intense noise for a sufficient time.

Intended to alert the user to the presence of high ‘Dangerous Voltage’ within the products enclosure that may be sufficient to 

constitute a risk of electrical shock to persons.

20. Symbols & nomenclature used on the product and in the product manuals,  intended to alert the operator to areas where extra caution may 

be necessary, are as follows:

    a) The wire that is coloured green and yellow must be connected to the terminal that is marked by the letter E‚ the earth symbol‚ coloured 

green or

16. If this product is to be mounted in an equipment rack, rear support should be provided.

10. Protect the power cord from being walked on or pinched, particularly at plugs, convenience receptacles, and the point they exit from the 

apparatus.

17. Note for UK only: If the colours of the wires in the mains lead of this unit do not correspond with the terminals in your plug‚ proceed as 

follows:

         coloured green and yellow.

18.This electrical apparatus should not be exposed to dripping or splashing and care should be taken not to place 

objects containing liquids, such as vases, upon the apparatus.

    The U.S. Government’s Occupational Safety and Health Administration (OSHA) has specified the following 

permissible noise level exposures: According to OSHA, any exposure in excess of the above permissible 
limits could result in some hearing loss. Earplugs or protectors to the ear canals or over the ears must be 
worn when operating this amplification system in order to prevent a permanent hearing loss, if exposure is 
in excess of the limits as set forth above. To ensure against potentially dangerous exposure to high sound 
pressure levels, it is recommended that all persons exposed to equipment capable of producing high sound 
pressure levels such as this amplification system be protected by hearing protectors while this unit is in 
operation.

15. Never break off the ground pin. Connect only to a power supply of the type marked on the unit adjacent to the power supply cord.

To prevent electrical shock or fire hazard, do not expose this appliance to rain or moisture.  Before using 

this appliance please read the operating instructions.

If your appliance features a tilting mechanism or a 
kickback style cabinet, please use this design feature with 
caution. Due to the ease with which the amplifier can be 
moved between straight and tilted back positions, only 
use the amplifier on a level, stable surface. DO NOT 
operate the amplifier on a desk, table, shelf or otherwise 
unsuitable non-stable platform.

Intended to alert the user of the presence of important operating and maintenance (Servicing) instructions in the literature 

accompanying the product.

Risk of electrical shock - DO NOT OPEN. To reduce the risk of electrical shock, do not remove the cover.  No user 

serviceable parts inside.  Refer servicing to qualified personnel.

30

Summary of Contents for Audiohub Venue AH2500D

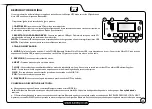
Page 1: ...ALL IN ONE AUDIO SOLUTION AH2500D...

Page 2: ...our new Laney product and becoming part of the worldwide Laney family Each and every Laney unit is designed and built with the utmost attention to care and detail so I trust yours will give you many y...

Page 3: ...of your active system Please read it thoroughly in order to get the best performance and reliability from your new Laney product The AudiohubVenue Clarity Convenience The Laney AudiohubVenue AH2500D...

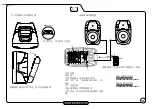
Page 4: ...rd when not in use MAXIMUM POWER CONSUMPTION 300 WATTS SUPPLY VOLTAGE AND FUSE RATING 220 240V 50 60Hz T3 15A L 250V MAXIMUM POWER CONSUMPTION 300 WATTS SUPPLY VOLTAGE AND FUSE RATING 100 110V 50 60Hz...

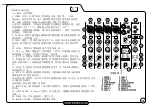
Page 5: ...PHANTOM POWER TREBLE PEAK PEAK TREBLE TREBLE TREBLE LEVEL L R CH1 CH2 CH3 CH4 5 4 3 2 1 0 10 9 8 7 6 5 4 3 2 1 0 10 9 8 7 6 5 4 3 2 1 0 10 9 8 7 6 5 4 3 2 1 0 10 9 8 7 6 5 5 4 4 3 3 2 2 1 1 0 5 5 4 4...

Page 6: ...PHANTOM POWER TREBLE PEAK PEAK TREBLE TREBLE TREBLE LEVEL L R CH2 CH3 CH4 5 4 3 2 1 0 10 9 8 7 6 5 4 3 2 1 0 10 9 8 7 6 5 4 3 2 1 0 10 9 8 7 6 5 4 3 2 1 0 10 9 8 7 6 5 5 4 4 3 3 2 2 1 1 0 5 5 4 4 3 3...

Page 7: ...so the LED illuminates only briefly on peaks in the music Using the system with this LED on all or most of the time will result in poor sound quality 7 EQ 2 band active EQ for tonal correction of the...

Page 8: ...ateorder thenthesubfolders ONE Playsonetrackrepeatedly cycletotherequiredtracktoplayusingNEXTbutton 8 FOD Playsalltrackinthecurrentactivefolder 6 NEXT Press to skip to the next track Automatically det...

Page 9: ...TWEETER WOOFER X OVER X OVER LIMITER LIMITER MASTER VOLUME LEVEL POWER AMP POWER AMP LEVEL LEVEL LEVEL EQ EQ EQ LEVEL CH1 CH2 CH3 CH4 CH5 6 LINE INPUT L RCA L RCA R BLUETOOTH MEDIA PLAYER SD CARD LINE...

Page 10: ...thumb screw on the cabinet is tight Don t over extend poles tripods ensure at least 4 x the pole diameter is still inside the outer pole Don t run cables across access ways if you have to run them ab...

Page 11: ...SB and SD card Outputs RCA mix out 2x 6 3mm Jack speaker outputs Controls CH1 4 gain 2 band eq effect send mic line switch CH5 6 gain Master 16 digital effect section with level Master 2 band eq maste...

Page 12: ...TRANSLATIONS...

Page 13: ...ez le loquet vers la gauche comme indiqu BRANCHEMENTS DE L ALIMENTATION ET DES ENCEINTES Veuillez toujours arr ter l appareil et d brancher le c ble d alimentation lorsque vous ne l utilisez pas La pr...

Page 14: ...au ligne Vous pouvez utilisez les 2 entr es Jack 6 35mm les 2 entr es gauche droite RCA ou n importe quelle combinaison des quatre 15 MIX OUT Permet d envoyer le signal m lang de votreAH 2500D vers un...

Page 15: ...alors qu une cl USB est d j branch e la carte SD devient la source audio 5 PR C DENT Permet de passer la piste pr c dente 6 SUIVANT Permet de passer la piste suivante 7 BOUCLE Permet d activer d sacti...

Page 16: ...o CONEXIONES DE ALIMENTACI NY DE LAS CAJAS Solamente remplazar el fusible por uno con las mismas especificaciones Siempre apague y retire el cable cuando no en uso lateral derecha del equipo 100 110V...

Page 17: ...s como amplificadores cajas o equipos de grabaci n 16 Selector PHANTOM POWER Prende y apaga la alimentaci n Phantom Power para todos los canales de MIC caso sea necesario Note que el Phantom solo es a...

Page 18: ...a viva de audio 3 TELA DEL MOSTRADOR 5 PREVIOUS Presione para retroceder de m sica 7 LOOP Use esta funci n para habilitar deshabilitar los modos de reproducci n en Loop Al usar este control con tarjet...

Page 19: ...ndicado CONEX ES DE ALIMENTA O E DAS CAIXAS Sempre apague e retire o cabo de for a quando n o em uso 100 110V 50 60Hz or 200 240V 50 60Hz NOTA A voltagem se encontra pr ajustada em Isto n o pode ser a...

Page 20: ...opera o O uso do sistema com este indicador acesso ou sempre ligando resulta em uma p ssima qualidade de som 16 Seletor PHANTOM POWER Liga e desliga a alimenta o Phantom Power para todos os canais de...

Page 21: ...rregar dispositivos USB 4 MODE Seleciona a fonte de entrada Cart o SD USB Bluetooth Cart es Micro SD drives USB auto detectados ao inserir Se um cart o Micro SD Card inserido enquanto um Pendrive USB...

Page 22: ...Netzkabel immer aus und trennen Sie es wenn es nicht verwendet wird BITTE BEACHTEN SIE Der akzeptierte Eingangsspannungsbereich ist voreingestellt auf 100 110V bei 50 60Hz oder 200 240V bei 50 60Hz Di...

Page 23: ...reo Kanal W hlen Sie zwischen 2x 6 35mm Klinke oder links rechts Cinch Eing nge Jede Kombination oder alle k nnen zusammen verwendet werden 8 FX SEND Diese Steuerung bestimmt wie viel falls vorhanden...

Page 24: ...kannt wenn eine Micro SD Karte eingelegt wird w hrend ein USB Stick bereits angeschlossen ist wird der Micro SC zur Live Audioquelle 5 PREVIOUS Dr cken Sie um zum vorherigen Titel zu springen 6 NEXT D...

Page 25: ...NSUMPTION 300 WATTS FUSE MAXIMUM POWER CONSUMPTION 300 WATTS 220 240V 220 240V 50 60Hz T3 15A L 250V MAXIMUM POWER CONSUMPTION 300 WATTS 100 110V 100 110V 50 60Hz T3 15A L 250V 100 110V 50 60Hz 200 24...

Page 26: ...6 5 5 4 4 3 3 2 2 1 1 0 5 5 4 4 3 3 2 2 1 1 0 5 5 4 4 3 3 2 2 1 1 0 5 5 4 4 3 3 2 2 1 1 0 EFFECT PEAK PEAK EFFECT EFFECT EFFECT BASS LEVEL LEVEL LEVEL LEVEL LEVEL MASTER VOLUME MIX OUT 5 5 4 4 3 3 2...

Page 27: ...CN 6 7 LOOP SD USB 3 2 USB ALL FOD B Laney Audiohub AH AH 5 8 SD USB USB SD SD 1 SD Micro Sd Micro SD USB Mp3 sd USB Micro SD ONE NEXT 8 3 A MODE 4 Bluetooth USB USB 4 SD USB C 6 7 8 5 4 1 2 3 CN 27...

Page 28: ...SAFETY INFORMATION...

Page 29: ...29...

Page 30: ...usVoltage within the products enclosure that may be sufficient to constitute a risk of electrical shock to persons 20 Symbols nomenclature used on the product and in the product manuals intended to al...

Page 31: ...31...

Page 32: ...32 OSHA OSHA nonstable...

Page 33: ...los de conveni ncia e no ponto de sa da do aparelho 4 Siga todas as instru es 5 N o use este aparelho perto da gua 6 Limpe apenas com um pano seco 7 N o bloqueie qualquer uma das aberturas de ventila...

Page 34: ...34...
Page 35: ...MODEL NUMBER SERIAL NUMBER PLACE OF PURCHASE DATE OF PURCHASE PLEASE COMPLETE FOR FUTURE REFERENCE revision1 10...

Reviews: