7
7
7
7
7
7
7
7
7
7
7
7
7
1
1
1
1
1
1
1
1
1
1
1
1
1
9
9
9
9
9
9
9
9
9
9
9
9
9
3
3
3
3
3
3
3
3
3
3
3
3
3
10
10
10
10
10
10
10
10
10
10
10
10
10
4
4
4
4
4
4
4
4
4
4
4
4
4
6
6
6
6
6
6
6
6
6
6
6
6
6
0
0
0
0
0
0
0
0
0
0
0
0
0
5
5
5
5
5
5
5
5
5
5
5
5
5
8
8
8
8
8
8
8
8
8
8
8
8
8
2
2
2
2
2
2
2
2
2
2
2
2
2
I
POWER
0
INPUT
BASS
CLEAN
TREBLE
GAIN
GAIN
DRIVE
1
DRIVE
2
BRIGHT
MASTER
MASTER
BASS
MIDDLE
TREBLE
CLEAN
DRIVE
MIDDLE
VOLUME
CLEAN
CHANNEL
DRIVE
1
DRIVE
2
DRIVE
EQUALISATION
REVERB
200
TUBE
FUSION
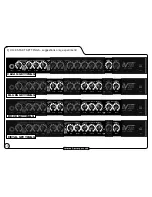
FRONT PANEL CONTROLS
1
2
4
6
9
8
12
5
7
11
10
10
9
8
6
7
4
5
3
2
1
10
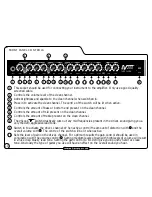
This socket should be used for connecting your instrument to the amplifier. Only use a good quality
screened cable.
Controls the volume level of the clean channel.
Adds brightness and sparkle to the clean channel when switched in.
Press in to activate the clean channel. The centre of the switch will be lit when active.
Controls the amount of bass or bottom end present on the clean channel.
Controls the amount of mid present on the clean channel.
Controls the amount of treble present on the clean channel.
The VScoop
switch drastically cuts out any mid frequencies present in the drive1 sound giving you a
very modern, aggressive lead tone.
Switch in to activate the drive1 channel. When active, control the amount of distortion with and the
overall volume with . The centre of the switch will be lit when active.
Sets the level of gain on the drive1 channel. For optimum results the gain control should be used in
conjunction with the volume control . Setting medium levels of gain with high levels of volume will result
in a nice crisp blue’sy lead tone. Setting the gain control to 8-10 will give you a punchy hard rock lead
tone. Obviously the type of guitar you use will have an effect on the overall sound you hear.
10
11
11
16
17
18
19
20
21
22
13
14
15
3
Summary of Contents for LV200
Page 1: ...200 ...
Page 8: ...8 ...


