background image

Troubleshooting

69

7

No sender is programmed for this number.

The short ID number that can be assigned to 
each sender is not programmed in the delivery 
server. Assign a correct number to each sender.

Original misfeed. Scanning has been cancelled.
Do you want to stored the scanned data?

There is a paper misfeed in the ADF. Remove 
the misfed original and specify whether to 
store the data or not.

Original misfeed. Scanning has been cancelled.

Press [Transmit] to transmit the scanned data.

To delete the data, press [Cancel].

There is a paper misfeed in the ADF. Remove 
the misfed original and specify whether to use 
the data or not.

Scanner is currently in use for another function
Cannot scan.

The machine is currently using the scanner for 
another function, such as copying. Retry the 
operation after the other function is completed.

Selected file is currently in use.

Cannot change file name.

The name of a file that is being edited with 
DeskTopBinder V2 Lite/Professional or that is 
in standby queue cannot be changed. Try the 
operation again after editing is terminated or 
standby was cancelled.

Selected file is currently in use.

Cannot change password.

The password of a file that is being edited with 
DeskTopBinder V2 Lite/Professional or that is 
in standby queue cannot be changed. Try the 
operation again after editing is terminated or 
standby was cancelled.

Selected file is currently in use.
Cannot change user name.

The user name of a file that is being edited 
with DeskTopBinder V2 Lite/Professional or 
that is in standby queue cannot be changed. 
Try the operation again after editing is termi-
nated or standby was cancelled.

Selected file is currently in use.

Cannot delete it.

A file that is being edited with DeskTopBinder 
V2 Lite/Professional or that is in a standby 
queue cannot be deleted. Try the operation 
again after editing is terminated or standby 
was cancelled.

The selected files contain the file deleted.

Check the stored files status.

After sending the files, some files were deleted 
with DeskTopBinder V2 Lite/Professional. 
Perform the selection process again.

Transmission has been cancelled due to con-
taining the deleted file.

Try again after checking the stored files status.

Before sending the files, some files were delet-
ed with DeskTopBinder V2 Lite/Professional. 
Perform the selection process again and resend 
the files.

Transmission has been failed.

Insufficient memory in server.

There is not enough free space on the hard 
disk of the delivery server. Free up the re-
quired amount.

Message

Possible Cause and Action

Summary of Contents for 5622

Page 1: ...5622 5627 5622 5627 5622 5627 5622 5627 your document management partner Scanner Reference Operator Guide ...

Page 2: ...y a qualified Customer Engineer The laser chassis is not repairable in the field Customer engineers are therefore directed to return all chassis and laser subsystems to the factory or service depot when replacement or the optical subsystem is re quired Warning Use of controls or adjustment or performance of procedures other than those specified in this manual might result in hazardous radiation ex...

Page 3: ...ctions installing necessary soft ware and operations for using the scanner functions Manuals for DeskTopBinder V2 Lite DeskTopBinder V2 Lite is software included on the CD ROM labeled Scan ner Driver Document Management Utilities for this machine For informa tion about the functions of DeskTopBinder V2 Lite see p 29 DeskTopBinder V2 Lite DeskTopBinder V2 Lite Setup Guide PDF Describes the operatin...

Page 4: ...uter V2 Lite ScanRouter V2 Lite Setup Guide PDF Describes the operating environment for ScanRouter V2 Lite in detail in stallation and settings This guide is displayed from the Setup screen when ScanRouter V2 Lite is installed ScanRouter V2 Lite Management Guide PDF Describes the outlined functions of ScanRouter V2 Lite and the manage ment and operation of a delivery server This guide is added to ...

Page 5: ...dial up router the router will dial and go online whenever connection to the deliv ery server is initiated Telephone charges may be incurred When connected to a computer that uses dial up access Do not install ScanRouter V2 Lite Professional on a computer which uses dial up access When using ScanRouter V2 Lite Professional DeskTopBinder V2 Lite Professional ScanRouter V2 Link or TWAIN driver on a ...

Page 6: ...ion cannot be used Reference This symbol indicates a reference Keys that appear on the machine s panel display Keys and buttons that appear on the computer s display Keys built into the machine s operation panel Keys on the computer s keyboard Names of Major Options Major options of this machine are referred to as follows in this documentation Printer Scanner Controller Type 1027 printer scanner c...

Page 7: ...Features 14 Making Scanner Settings 18 Making Scan Data Subject Settings 21 Installing Software 23 Auto Run Program 23 Software for using a Network TWAIN Scanner 25 Software for using a Network Delivery Scanner 26 Software Required to Use the Document Server 27 DeskTopBinder V2 Lite 27 Software Supplied on CD ROM 28 3 Setting Originals Placing the Original on the Exposure Glass 34 Placing the Orig...

Page 8: ... 51 6 Using the Document Server Storing Data 53 Storage Procedure 54 Viewing a List of Stored Files 58 Viewing the List 59 Searching for Files 61 Deleting Stored Files 62 Changing File Information 63 7 Appendix The Relationship between the Resolution and the Data Size 65 Troubleshooting 66 When Scanning Is Not Performed as Expected 66 Delivery Function Does Not Work 66 When the Error Message Is Di...

Page 9: ... in the Document Server Network TWAIN Scanner The scanner of this machine is used from the computer via a network The orig inals can be read in the same operation as for SCSI and USB connected scanners For more information see p 39 Scanning Originals Using Network TWAIN Scanner 1 This machine The scanner of the machine is used from the computer via a network 2 Computer Originals are scanned by TWA...

Page 10: ...r with the Document Server 2 Delivery server ScanRouter V2 Lite Professional is in stalled and used as a delivery server The sent data is delivered to an in tray A in the figure of a specified destination The delivered document is stored in an in tray or Windows folder B in the figure 3 Client computer The contents of the stored document are checked in the following way View the document in an in ...

Page 11: ...o others cannot view the document by setting a password For more information see p 53 Using the Document Server Limitation The optional HDD is required to use this function 1 This machine The originals scanned by the scanner is stored 2 Computer The stored document can be viewed or copied by connecting to the machine us ing DeskTopBinder V2 Lite Professional Reference For more information about De...

Page 12: ... this key for about one second to be gin warm up Pressing this key again while in warm up mode cancels warm up Note This key is inactive while scanning or setting scanner default values 6 Main power indicator Lights up when the main power switch is set to On 7 Operation Switch Pressing this switch turns the machine on The power indicator lights up To turn the machine off press this switch again No...

Page 13: ... depending on the mode Important Protect the display from shocks and strong pressure to prevent the possibility of damage The maximum allowable is 30 N 1 3 kgf 2 1 N Newton 2 kgf kilogram force 1kgf approx 9 8N Note The Copy screen is set as the default screen when the machine is turned on You can change this setting under the Priority Function of the Basic Set tings tab in System Settings System ...

Page 14: ...creen is displayed press Cancel Using the Document Server Press Scanner to display the Document Server screen If the network TWAIN scanner screen is displayed press Cancel The screen of the Document Server depends on whether the network delivery scanner is used When the network delivery scanner is used When the network delivery scanner is not used ...

Page 15: ...ancels the selected function or entered value and returns to the pre vious screen U U U UPrev T T T TNext Displays the next or previous page when functions will not fit on a sin gle page Exit Exits the Message screen Clear Clears the entered value and returns to the previous conditions The screen displayed does not change Exit Confirms the selected function or entered value then returns to the pre...

Page 16: ...Network Scanner 8 1 ...

Page 17: ...network delivery scanner or the Doc ument Server is used Using as a Network TWAIN Scanner Connect the machine to the network with an Ethernet cable System Settings manual Check the network settings in System Settings and change if re quired System Settings manual Make settings such as compression setting for the TWAIN scan ner p 12 Initial Scanner Setup On the client computers install the software...

Page 18: ... the delivery server Then make the required settings for server maintenance and delivery service p 26 Software for using a Network Delivery Scanner Reference For information about ScanRouter V2 Lite see the ScanRout er V2 Lite manual p i Manuals for This Machine Use ScanRouter V2 Administration Utility to set the destination and sender information On the client computers install the software requi...

Page 19: ...ck the network settings in System Settings and change if re quired System Settings manual Make settings for the Document Server such as the setting of the scanning feature and original orientation priority information p 12 Initial Scanner Setup On the client computers install the software required for view ing the documents stored in the Document Server such as Desk TopBinder V2 Lite p 27 DeskTopB...

Page 20: ... set if required System settings For information about the explanation of settings see the System Settings manual 1 Settings for use as network TWAIN scanner 2 Settings for use as network delivery scanner 3 Settings for use as Document Server 4 Do not change this setting It must be left at the factory default value 5 Make sure that IP address is set Settings TWAIN 1 Delivery 2 Store 3 Clock timer ...

Page 21: ...AIN 1 Delivery 2 Store 3 Scanner Features p 14 Resolution 200dpi Scan Size Auto Detection Scan type Character Image Density Mediam Scanner Settings p 18 Function Priority Delivery store Delivery Store Con nection Time out 10 sec Compression Black White On Compression Gray Scale Standard Delivery Option Off Original Setting 1 Sided Original Original Orientation Priority Mixed Original Sizes Priorit...

Page 22: ...d the autodetect functionofthe machine is used to set the original size When the size is specified scan ning is performed for that size regardless of the actual size of the original The following size can be selected A3S A4S A4R A5S A5R 11x17S 81 2x14S 81 2x13S 81 2x11S 81 2x11R 51 2x81 2S 51 2x81 2R B4S B5S B5R Custom Size Note When Custom Size is se lected the dimensions of the scan area width a...

Page 23: ... screen for entering a scan set ting name appears E Enter the desired name and press OK Reference For information about character input see the System Settings manual F Select the item to be set To select an item touch its key on the screen The item is highlighted Example resolution setting Example image density setting Note When selecting Custom size for Scan Size see p 16 Selecting a custom size...

Page 24: ...size with the number keys Select X1 or Y1 enter the value and then press C Use the number a scan starting point other than the standard scan starting point Select X2 or Y2 enter the value and then press D Enter the scan size area with the number keys Select X3 or Y3 enter the value and then press Depending on how the original is positioned the scan area will be as follows A When the original is pl...

Page 25: ...ess Exit The User Tools Counter Inquiry screen is shown H Press Exit The main menu is shown again Deleting programmed scan settings A Press the User Tools Counter Inquiry key The User Tools Counter Inquiry screen appears B Press Scanner Features The Scanner Features screen ap pears C Verify that the Basic Settings tab is shown D Press Delete E Select the setting you want to de lete A confirmation ...

Page 26: ...elected the network TWAIN scanner mode is set By pressing Cancel in this condition you can switch to network delivery scanner oper ation or Document Server oper ation When Delivery Store is se lected the network delivery scanner mode or the Document Server mode is set It is not pos sible to switch network TWAIN scanner operation from these modes To use the machine as a network TWAIN scanner ac ces...

Page 27: ...t Original Setting Set the initial value for original type and orientation When the original is always similar selecting this as the default makes operation easier You can select 1 Sided Original 2 Sided Orig T to T Top to Top 2 Sided Orig T to B Top to Bottom Reference p 37 Original Orientation and Scan Area Setting Original Orientation Priority Select the initial value for original placement ori...

Page 28: ...res The Scanner Features screen ap pears C Press the Scanner Settings tab D Press the item to be set The screen for changing the item setting appears Example Compression Gray Scale setting E Change the setting To select an item touch its key on the screen The item is high lighted To enter numerals use the number keys Note To cancel a setting press Can cel The value is not changed and the display r...

Page 29: ... V2 Professional is necessary The subject can be set when On in the Delivery Option of Initial Scanner Setup is set Setting Procedure This section describes the steps for making subject settings A Press the User Tools Counter Inquiry key The User Tools Counter Inquiry screen appears B Press Scanner Features The Scanner Features screen ap pears C Press the Subject Settings tab D Verify that Program...

Page 30: ...uiry screen appears B Press Scanner Features The Scanner Features screen ap pears C Press the Subject Settings tab D Press Delete E Select the subject you want to de lete A confirmation message appears F Press Yes The selected subject is deleted G To delete more subjects repeat steps E to F H Press Exit The display returns to the Scanner Features screen I Press Exit The main menu is shown again ...

Page 31: ...mputer in Windows 95 98 Me Win dows 2000 or Windows NT 4 0 the installer starts automatically Auto Run to install the TWAIN driver and various software Note Auto Run might not automatically work with certain OS settings In this case launch CDLaunch EXE located on the CD ROM root directory If you want to install without using Auto Run hold down the Shift key while inserting the CD ROM Keep the Shif...

Page 32: ...aller starts up The installation complete message is displayed Select thesoftware Insert the CD ROM Restart your PC TWAIN Driver TWAIN Driver Ver 3 ScanRouter V2 Lite ScanRouter V2 Lite DeskTopBinder V2 Lite DeskTopBinder V2 Lite Acrobat Reader Job Binding ScanRouter V2 Link Install all at once or select and install individually Install all at once or select and install individually ScanRouter V2 ...

Page 33: ...4 0 A Verify that Windows is running Insert the supplied CD ROM labeled Scanner Driver Document Management Utilities into the CD ROM drive of the computer The choose setup language screen appears Reference If the installer does not start automatically see p 23 Auto Run Program B Select a setup language and then click OK The CD ROM Launcher screen appears C Click Type1027 TWAIN Driver The software ...

Page 34: ... the operating environment for each software p 28 Software Supplied on CD ROM A Verify that Windows is running Insert the supplied CD ROM labeled Scanner Driver Document Management Utilities into the CD ROM drive of the computer The choose setup language screen appears B Select a setup language and then click OK The CD ROM Launcher screen appears C Click the key of the software to be installed The...

Page 35: ...ng check the operating environment for DeskTopBinder V2 Lite p 29 DeskTopBinder V2 Lite A Verify that Windows is running Insert the supplied CD ROM labeled Scanner Driver Document Management Utilities into the CD ROM drive of the computer The choose setup language screen appears B Select a language and then click OK The CD ROM Launcher screen appears C Click DeskTopBinder V2 Lite The change the la...

Page 36: ...t compatible Operating system Microsoft Windows 95 Microsoft Windows 98 Microsoft Windows Millennium Edition Microsoft Windows 2000 Server Microsoft Windows 2000 Professional Microsoft Windows NT Server 4 0 Service Pack 5 or later Microsoft Windows NT Workstation 4 0 Service Pack 5 or later Display resolution 800 600 pixels 256 colors or higher Network protocol TCP IP CD ROM Drive Wizard for the T...

Page 37: ...e File storage folder The files are stored in the following folder on the CD ROM provided with this machine UTILITY DESKV2 System requirements Hardware PC AT compatible CPU Pentium 133 MHz or faster Pentium II 266 MHz or faster recommended Operating system Microsoft Windows 95 OSR 2 or later Microsoft Windows 98 Microsoft Windows Millennium Edition Microsoft Windows 2000 Server Service Pack 1 or l...

Page 38: ...ient computers on the same network For more information see the manuals for ScanRouter V2 Lite or ScanRouter V2 Lite Help file File storage folder The files are stored in the following folder on the CD ROM provided with this machine UTILITY ROUTERV2 System requirements The following system requirements must be met to use ScanRouter V2 Lite Note Install the software on a stand alone server running ...

Page 39: ...y ScanRouter V2 Administration Utility manages the delivery system run by ScanRouter V2 Lite You can register destination and sender information about the scanned documents in the delivery server In addition this utility can monitor free disk space record error logs and maintain the delivery server Note ScanRouter V2 Administration Utility can be installed not only on the delivery server but also ...

Page 40: ...Preparations for Use as a Network Scanner 32 2 ...

Page 41: ...ination of original orientation and the orienta tion specified on the control panel or scanner driver does not change Scanned original Select the placement method Place the original on the ex posure glass Place the original in the auto matic document feeder ADF Place the original There are two original orienta tions Place the original so that the top edge touches the top left of the exposure glass...

Page 42: ...process B Place the original on the exposure glass with the side to be scanned facing down Align the far left edge of the original with the mark There are two original orienta tions Either orientation can be used for placement A Place the original so that the top edge touches the rear of the exposure glass B Place the original so that the top edge touches the top left of the exposure glass When us...

Page 43: ...estrictions that apply when using the copier function Originals longer than the length 432mm of the A3 11 x17 For information about which original sizes can be detected automatically and notes on placing originals in the ADF see the Copy Reference manual A Align the original guide with the original size B Insert the originals with the side to be scanned facing up For orig inals which are to be sca...

Page 44: ...laced in the ADF scanning finishes as one docu ment when the scan of all originals are completed by factory default If the next original is placed within a certain amount of time after all origi nals are scanned these multiple doc uments can be scanned as one document by the SADF After the originals are scanned the remaining time for accepting the next original is displayed When there is another p...

Page 45: ...he initial values can be changed under Original Setting Original Orientation Priority or Mixed Original Sizes Priority in the Scanner Initial Setup p 18 Making Scanner Settings 1 sided original 2 sided original selection A When scanning one sided orig inal make sure that 2 Sided Original is not highlighted B When scanning two sided orig inal press 2 Sided Original to se lect T to T or T to B accor...

Page 46: ...nt box in the Document group C Select Standard 0deg or Left 90deg from the drop down menu of the Orientation Reference p 33 Setting Originals D When the original is placed in the ADF select Simplex or Duplex from the drop down menu of the Side box Note If originals of the same width and different length are placed in the ADF specify the docu ment size in the Size box If Auto detection Uni size is ...

Page 47: ...TopBinder V2 Lite for scanning the basic flow of operations is as follows For more information about the operation procedure see p 40 Scanning Origi nals Start up DeskTopBinder V2 Lite and select the scanner Place the originals in the scanner Make the required scan settings using the TWAIN driver Scan and save the originals The scanned image can be edited and printed by DeskTopBinder V2 Lite 1 Sel...

Page 48: ...t E Click OK The Scanner Settings dialog box closes B Place the original in the scanner Reference p 33 Setting Originals C Make the scan settings A From the File menu point to Add Document and then click Scan The TWAIN driver starts up After a short while the dialog box of the TWAIN driver that operates the scanner appears This dialog box is called the Scanner Control dialog box Note The title bar...

Page 49: ...ation and Scan Area Setting For information about the setting of the Document group see Help When you want to configure the scanning area When you do not configure the scanning area the area is scanned with the size specified in the Size box A Click Preview The original that was placed is scanned and the Preview dialog box ap pears The scanning area in the preview appears within the broken lines B...

Page 50: ...how to edit and print see DeskTopBinder V2 Lite Help Functions of the TWAIN Driver The following is an introduction to the various functions of the TWAIN driver Reference For more information about each function or other functions see Help Automatic Tilt Correction This function automatically corrects character strings that were scanned slanted Printing to the Image This function allows you to imp...

Page 51: ...p List Displays of Destinations and Senders The display configuration when using the machine as network delivery scanner is as follows 1 Update Address Press this key to obtain destination infor mation from the delivery server and up date the display If the destination is changed in the delivery server press the key to update the display 2 Destination Display The selected destination is shown here...

Page 52: ...e list of destinations pro grammed in the delivery server Note When the entire list does not fit on one screen U U U U or T T T T can be used to scroll the display Group destinations are denoted by this symbol A bar above a title indicates that a des tination that belongs to it has been se lected ...

Page 53: ...N scanner mode C Make sure that no previous set ting remains Note If the previous setting remains press the Reset key D Place the original in the machine and adjust the settings for original size and orientation if required Reference p 33 Setting Originals E Make the scan settings To make the scan settings call up the stored settings or make the set tings individually Reference p 14 Setting Scanne...

Page 54: ... the latest informa tion for operation press the Update Address on the con trol panel before delivering scan data to update the dis played information If the list is updated after the destination or sender is se lected any selections are can celled Update the list before selecting destination and sender If there is scan data in the memory of the machine that have not yet been delivered Update Addr...

Page 55: ...select more destinations re peat step B Checking selected destinations A Use the destination field at the top of the screen to check which destinations are selected Note When multiple destinations are selected the selected des tinations are displayed in or der by pressing U U U UPrev or T T T TNext Pressing the Check Settings key on the control panel lets you verify the list of selected destinatio...

Page 56: ...to the scan data file When the optional ScanRouter V2 Profes sional is used to send data files as e mail the subject is auto matically entered as a title in the message subject A Press Attach Subject B Select a subject C Press OK The subject is applied I Press the Start key The original is scanned and the scan data file is delivered to the destination s If there is another page to scan place the o...

Page 57: ...was completed is recorded If delivery retry was performed but unsuccessful the date and time refers to the last retry oper ation Destination When multiple destinations were selected the first selected destination is displayed Sender File Name Pages Number of scanned pages Status Indicates whether delivery was successful or resulted in an er ror A Press Delivered Files Status on the network deliver...

Page 58: ...ivery Procedure A Place the original and adjust the settings for original size and ori entation if required Reference p 33 Setting Originals B Make the scan settings C Select the destination D If required specify the sender scan data delivery source and a subject E Press Store File The screen for setting Store File ap pears F Make sure Store Transmit to be selected G Press File Information to set ...

Page 59: ...ence p 58 Viewing a List of Stored Files B Select a file to be delivered Note When you select a file protected password the Password Entry screen appears After you have entered the correct password and pressed OK the file will be selected C To select multiple files repeat step B Note You can select up to 30 files for one operation If you select multiple files the files will be delivered in the or ...

Page 60: ...Delivering Stored Scan Data by the Network Delivery Scanner 52 5 ...

Page 61: ...o store data in the Document Server and how to as sign file information to stored data Note You can specify whether data stored in the Document Server is deleted auto matically later Automatic Delete Settings for Stored Data in System Set tings manual under Administrator The stored data is set to be deleted after one day by the factory default value For information about settings and changes see t...

Page 62: ...e that no previous set ting remains Note If the previous setting remains press the Reset key D Place the original in the machine and adjust the settings for original size and orientation if required Reference p 33 Setting Originals E Make the scan settings To make the scan settings call up the stored settings or make the set tings individually Reference p 14 Setting Scanner Fea tures Calling up st...

Page 63: ...e name and password for the file to be stored Reference For more information about how to specify file information see p 55 Specifying file infor mation H Press the Start key The original is scanned and the re sulting data is stored as a file in the Document Server When there is another page to scan place the original and then press the Start key When there are no more pages press the key Note To ...

Page 64: ...etwork delivery scanner func tion is not used This screen appears when the network delivery scanner func tion is used B Specify file information Specifying a user name A Press User Name The User Name Selection screen appears Note If no user name is pro grammed in System Settings under the Administrator tab the User Name Selection screen does not appear In stead the Non programmed Name Entry screen...

Page 65: ...tem Settings manual C Press OK The new file name is applied Specifying a password By specifying a password only a person who knows the password can view the data A Press Password The Password Entry screen ap pears B Enter a password consisting of four numbers C Press OK The password is applied Important Do not forget the password If you forget it contact the key operators in charge of this machine...

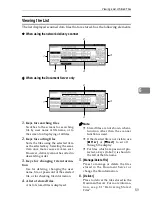
Page 66: ...er Function screen ap pears Note If the network TWAIN scanner screen is displayed press Can cel This screen is displayed if Function Priority in the Scan ner Initial Setup is set to net work TWAIN scanner mode B The displayed list of stored files appears The subsequent operation steps depend on whether the network delivery scanner is used When using the network delivery scanner A Press Select Stor...

Page 67: ... 3 Keys for changing file informa tion Use for deleting changing the user name file or password of the selected file or for checking file information 4 A list of stored files A list of stored files is displayed Note Stored files are not shown when a function other than the scanner function is used If the desired file is not visible use U U U UPrev or T T T TNext to scroll through the display For f...

Page 68: ...ted device name Displays the files stored in the connected device on the desk tree by dividing into User name and All uses folders 2 User name Displays only the files stored with the same user name specified in the connect ed device properties The files stored from the scanner are shown on the Scan ner folder 3 All users Displays all files stored in the connected device 2 1 3 ...

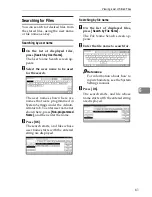
Page 69: ...ammed in System Settings under the Admin istrator tab To enter user name not shown here press Non programmed Name and then enter the name C Press OK The search starts and files whose user name starts with the entered string are displayed Searching by file name A On the list of displayed files press Search by File Name The File Name Search screen ap pears B Enter the file name to search for Referen...

Page 70: ... the list of stored files Reference p 58 Viewing a List of Stored Files B Select the file to be deleted Note Up to 30 files can be selected When you select a password protected file the Password En try screen appears Enter the correct password and then press OK C Press Delete File A confirmation message appears D Press Delete The file is deleted E Press Exit ...

Page 71: ...ant to change the file information Note When you select a password protected file the Password En try screen appears Enter the correct password and then press OK C Change the file information Changing the user name A Press Change User Name The screen for changing the user name appears B Select the new user name The user names shown here are names that were programmed in System Settings under the A...

Page 72: ...er characters see the System Settings manual C Press OK The file name is changed Changing a password A Press Change Password B Enter the new password con sisting of four numbers C Press OK The new password is stored Important Do not forget the password If you forget it ask the key operators in charge of this machine D Verify that the file information change was made as desired and press Exit ...

Page 73: ...pears on the control panel of the machine Specify the scan size and resolution again Limitation Depending on the image compression level the maximum image size will be limited Reference For information about the relationship between the resolution and the scan ning area when the machine is used as the network TWAIN scanner see the TWAIN driver help When the Text Text Photo or Photo is selected as ...

Page 74: ...ge is distorted or out of position The original was moved during scanning Do not move the original during scanning The original was not pressed flat against the exposure glass Make sure that the original is pressed flat against the exposure glass The image is scanned upside down The original was placed upside down Place the original in the correct direction The scanned image is dirty The exposure ...

Page 75: ...ine may not be correctly connect ed to the network Check the LED indica tors of the Ethernet board System Settings manual Cannot detect original size Select scan size and reset originals Place the original correctly Specify the scan size When placing an original directly on the exposure glass the opening closing action of the ADF triggers the automatic original size detection process Raise the ADF...

Page 76: ... messages are shown alternately There is not enough remaining hard disk ca pacity No more files can be stored Delete un needed files Memory is full Delete the unnecessary stored file Note These messages are shown alternately There is not enough remaining hard disk ca pacity Delete unneeded files Memory is full Press Transmit to transmit the scanned data To delete the data press Cancel Because ther...

Page 77: ...ile that is being edited with DeskTopBinder V2 Lite Professional or that is in standby queue cannot be changed Try the operation again after editing is terminated or standby was cancelled Selected file is currently in use Cannot change user name The user name of a file that is being edited with DeskTopBinder V2 Lite Professional or that is in standby queue cannot be changed Try the operation again...

Page 78: ...screen to check for which file the problem occurred p 49 Checking the De livery Result Transmission to the server has been failed The data will be retransmitted later A network error has occurred and a file was not sent correctly to the delivery server Wait until retry is performed automatically after a preset interval If the retry fails again notify the network administrator Message Cause and Act...

Page 79: ...g cannot be performed if large values are set for brightness when using halftone or high resolution When paper misfeed occurs in the machine during printing scanning cannot be per formed In this case after the misfed paper has been removed proceed with scanning No response from the scanner Check whether the machine is connected to a network correctly The network is crowded Reconnect after a while ...

Page 80: ...osed The name is already in use Check the registered names You try to register the name that is already in use Use another name The scanner power is off Check whether the main power switch of the machine is turned on Check whether the machine is connected to the network correctly Message Cause and Action ...

Page 81: ...ns pressing the Operation Switch causes the power indicator to flash instead of going out The exposure glass cover or ADF is open Communication is taking place between the machine and a connected device The HDD is operating Turning Off the Main Power Switch Preparation Normally do not turn off the main power If you turn off the main power see the Important below in advance Important Do not turn of...

Page 82: ...Appendix 74 7 A Make sure that the power indica tor goes off B Turn off the main power switch to make the main power indicator go off ...

Page 83: ... density 600dpi Variable range of scan density When placed on the exposure glass When used as network TWAIN scanner Setting range 100dpi 2400dpi When used as network delivery scanner Setting range 100dpi 200dpi 300dpi 400dpi 600dpi When placed in the ADF When used as network TWAIN scanner Setting range 100dpi 1200dpi When used as network delivery scanner Setting range 100dpi 200dpi 300dpi 400dpi 6...

Page 84: ...Function keys 5 Function priority 18 I Image density 14 Initial scanner setup 12 Installing Software 23 L List displays Delivery 43 Stored 59 M Main power indicator 4 Mixed original sizes priority 19 Mode 41 N Network delivery scanner 2 network TWAIN scanner 1 Number keys 5 O Operation Switch 4 Original orientation and scan area setting 37 Original orientation priority 19 Original setting 19 P Pla...

Page 85: ...Features 14 Software supplied on CD ROM 28 Start key 5 Status indicators 4 Store data 53 Stored files Changing file information 63 Delete 62 Delivering 51 Search 61 T The relationship between the resolution and the data size 65 Troubleshooting 66 Type1027 TWAIN Driver 28 U User Tools Counter Inquiry key 4 V Viewing a list of stored files in DeskTopBinder V2 Lite 60 W Warmup key 4 ...

Page 86: ...78 UE USA B453 ...

Page 87: ...mined by turning the equipment off and on the user is encouraged to try to correct the interference by one more of the following measures Reorient or relocate the receiving antenna Increase the separation between the equipment and receiver Connect the equipment into an outlet on a circuit different from that to which the receiver is connected Consult the dealer or an experienced radio TV technicia...

Page 88: ...Printer Scanner Controller Type 1027 Operating Instructions Scanner Reference UE USA B453 8607 ...

Reviews: