background image

HMB-6110 User Manual 


41 


3.


Connect to SOL via ipmitool command.   

 SOL usage:   

ipmitool -I lanplus -U [Username] -P [password] -H [compute blade BMC IP] sol [activate/deactivate] 


 Sample command to access compute blade 1 SOL: 

ipmitool -I lanplus -U admin -P admin -H 192.168.0.101 sol activate 


 SOL 

Command details can be found under “man ipmitool.” 


4.


Power up and turn on the compute blade.   


5.


Start installation with console serial setup. Refer to HTCA QSG for console serial setup installation.   


Summary of Contents for HMB-6110

Page 1: ...1 HMB 6110 User Manual Version 0 3 Date of Release 2022 03 10 Telecom Datacenter Appliances...

Page 2: ...The latest version of this document can be found on Lanner s official website available either through the product page or through the Lanner Download Center page with a login account and password Th...

Page 3: ...t department This document is copyrighted 2022 by Lanner Electronics Inc All rights are reserved The original manufacturer reserves the right to make improvements to the products described in this man...

Page 4: ...Town Changping District Beijing 102208 China T 86 010 82795600 F 86 010 62963250 E service ls china com cn USA Lanner Electronics Inc 47790 Westinghouse Drive Fremont CA 94539 T 1 855 852 6637 F 1 510...

Page 5: ...interference by one or more of the following measures Reorient or relocate the receiving antenna Increase the separation between the equipment and receiver Connect the equipment into an outlet on a c...

Page 6: ...ions dangereuses sont pr sentes Ne consid rez jamais que l alimentation est coup e d un circuit v rifiez toujours le circuit Cet appareil g n re utilise et met une nergie radiofr quence et s il n est...

Page 7: ...placement de composants Portez un bracelet anti ESD et veillez ce qu il soit bien au contact de la peau Si aucun bracelet n est disponible reliez votre corps la terre en touchant la partie m tallique...

Page 8: ...ger l quipement contre les effets n fastes du bruit externe et r duire les risques d lectrocution en cas de foudre Pour d sinstaller l quipement d branchez le c ble de mise la terre apr s avoir teint...

Page 9: ...ication 11 I O Overview 12 Motherboard Information 13 Accessing the Compute Blade s 19 Installing the CPU s 20 Installing System Memory 25 Installing IPMI Card Optional 27 Installing M 2 SATA Storage...

Page 10: ...C627 PCH 16x 288 pin DDR4 DIMMs max up to 512GB memory capacity 4x KR4 supporting 4x 100G on front Switch blades 5x Hot swappable smart fans Your package contains the following items 1x HMB 6110 Syst...

Page 11: ...to top 2nd layer switch blade Intel I10 1GbE x2 5x PCI Express Gen3 by 8 from CPU 2x PCI Express Gen 2 from PCH 1x OPMA connector 1x M 2 2280 M Key Socket 1x pin header for TPM 2 0 module Optional Re...

Page 12: ...ription A High Speed Connectors 2x Molex 288 PIN 2x Molex 120 PIN 2x Molex Power Connector B OPMA Slot For 1x IAC AST2500 IPMI 2 0 Module C Cooling Fans 5x Smart Fan D Rear I O 1x USB 2 0 1x RJ45 mana...

Page 13: ...HMB 6110 User Manual 13 The block diagram indicates how data flows among components on the motherboard Please refer to the following figure for your motherboard s layout design...

Page 14: ...HMB 6110 User Manual 14 The motherboard layout shows the connectors and jumpers on the board Refer to the following picture as a reference of the pin assignments and the internal connectors...

Page 15: ...D 2 Power on JFAN1 JFAN5 For Fan Module Connection Pin Description 1 GND 2 12V 3 RPM sense 4 RPM sense 5 PWM control JVGA1 For VGA Monitor Connection Pin Description Pin Description 1 RED 2 GND 3 GREE...

Page 16: ...58 68 NC 7 PERP3 11 PETN3 13 PETP3 17 PERN2 19 PERP2 23 PETN2 25 PETP2 29 PERN1 31 PERP1 35 PETN1 37 PETP1 41 PERN0 SATA_RP 43 PERP0 SATA_RN 47 PETN0 SATA_TN 49 PETP0 SATA_TP 53 REFCLKN 10 DAS 55 REF...

Page 17: ...S Pin Description 1 2 Normal 2 3 Clear CMOS JHDA_SDO For Flash Descriptor Security Override Pin Description 1 2 Normal 2 3 Override JSPITPM For Lanner TPM Module IAC TPM04 or SPI Fixture Debug Purpose...

Page 18: ...o the system please remove all power connections to shut down the device completely Also please wear ESD protection gloves when conducting the steps in this chapter Based on your application and modul...

Page 19: ...the steps below to access the compute blades 1 Select a compute blade you wish to access the internal components 2 Rotate and loosen the captive screws circled in the image below You may apply a screw...

Page 20: ...sink to make a PHM Processor Heat Sink Module 2 Install the PHM onto the motherboard Tool Description Torque Screwdriver Star T30 Set to 1 36N m or 12 in lbf for tightening the nuts which fasten the...

Page 21: ...er off vertically Bolster Plate A robust bolster plate is used to assist in PHM alignment for installation while effectively helping eliminate PCB bowing during compression Please locate the Cutout on...

Page 22: ...do 5 With a little pressure push the four corners of the carrier down to engage their latching features with the corresponding corners of the heat sink You might hear a clicking sound when the latch...

Page 23: ...there is no contamination or damage prior to the PHM installation 2 Flip the PHM over to align PIN1 of the carrier with the Cutout of the bolster plate 3 Flip the PHM back over so the package land of...

Page 24: ...se a torque driver to tighten the four nuts to 12 in lbf into the bolster plate following the sequence indicated on the heat sink 1 2 3 4 NOTE When fastening 3 and 4 nuts the gap between the metal spr...

Page 25: ...Channels 6 Channels 4 for 1 Dimm per Channel and 2 for 2 Dimm per Channel Supported DIMM Capacity 4GB 8GB 16GB 32GB Memory Size Maximum 512 GB RDIMM 32GB 16 Memory Type DDR4 RDIMM ECC DIMM depending o...

Page 26: ...ng memory modules of the same capacity speed and from the same manufacturer are highly recommended However with mixed module speeds the overall speed will be that of the slowest installed memory modul...

Page 27: ...for installation 1 Locate the OPMA socket on the motherboard 2 Align the notch of the IPMI card with the socket key in the slot Insert at 30 degrees into the socket until it is fully seated in the co...

Page 28: ...he steps for installation 1 Locate the M 2 socket on the motherboard 2 Align the notch of the M 2 storage card with the socket key in the slot Insert the storage card at 30 degrees into the socket unt...

Page 29: ...Locate the cooling fans at the rear of CPU blades The fans are covered by a bezel 2 Rotate and loosen the captive screw that locks the bezel for the cooling fans 3 Hold onto the loosened captive scre...

Page 30: ...nagement BMC stack with an IPMI 2 0 implementation System Management Sensor monitoring System power management Watchdog timer Fan speed monitor and control FRU information Event Log System Event Log S...

Page 31: ...power reset Chassis power soft Server s power status report Watchdog Timer The BMC provides an IPMI 2 0 compatible watchdog timer which can prevent the system from system hanging Fan Speed Control BM...

Page 32: ...ministrator Moreover the account creator is allowed to enable disable the user account at any time If not specified the default user accounts are listed follows User Name Password User Access Characte...

Page 33: ...0h Get Chassis Status Chassis 00h 01h Chassis Control Chassis 00h 02h Chassis Reset Chassis 00h 03h Sensor Device Commands Get Sensor Reading Factors S E 04h 23h Get Sensor Hysteresis S E 04h 25h Get...

Page 34: ...Ah 5Dh LAN Device Commands Set LAN Configuration Parameters Transport 0Ch 01h Get LAN Configuration Parameters Transport 0Ch 02h Serial Modem Device Commands Set User Callback Options Transport 0Ch 1A...

Page 35: ...you to enter username and password A screenshot of the login screen is given below Login Page Username Enter your username in this field Password Enter your password in this field Sign me in After ent...

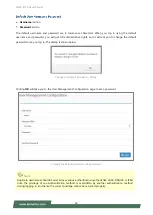
Page 36: ...log in The dialog is shown below Change the default password Dialog Clicking OK will take you to the User Management Configuration page to set a password Change the default password Set password Note...

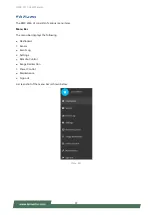
Page 37: ...UI consists of various menu items Menu Bar The menu bar displays the following Dashboard Sensor Event Log Settings Remote Control Image Redirection Power Control Maintenance Sign out A screenshot of t...

Page 38: ...ctions Notification Click the icon to view the notification messages Refresh Click the icon to reload the current page Sign out Click the icon to log out of the Web UI This option shows the logged in...

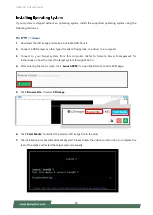
Page 39: ...o your target system from this computer Refer to Remote Server Management for instructions on how to access the target system through Web UI 4 After entering the main screen click Launch KVM to open t...

Page 40: ...A cable included in the accessory box and connect to the VGA port on the compute blade 4 Connect the other end of the VGA cable to your monitor 5 Power up and turn on the compute blade 6 Now you can s...

Page 41: ...IP sol activate deactivate Sample command to access compute blade 1 SOL ipmitool I lanplus U admin P admin H 192 168 0 101 sol activate SOL Command details can be found under man ipmitool 4 Power up...

Page 42: ...cluded from this warranty Improper or inadequate maintenance by the customer Unauthorized modification misuse or reversed engineering of the product Operation outside of the environmental specificatio...

Page 43: ...HMB 6110 User Manual 43 When requesting RMA service please fill out the following form Without this form enclosed your RMA cannot be processed...

Reviews: