There is a possibility of yellowing of the coating of white coloured beds.
Wood is a natural product, whose natural grain, texture and colour are subject to fluctuations associated with growth, location and climate. Moreover, hue of the wood
surface varies over time as a result of light and heat.
This natural process of aging is subject to greater or lesser extent on all types of wood. Wood is not resistant to light. Sunlight as well as diffused light inside the room
contribute the most to colour change. The degree of changes to the shade depends not only on the passing of time, but also on placement of the furniture.
Invisible elements such as slats, frame supporting the slats, bottoms of drawers, etc. are not painted as the rest of the bed.
All bolts and screws are to be screwed gently and slowly to avoid damaging the panels by cracks. Do not screw fittings close to the edges.
ATTENTION!
After assembling, please wipe the bed with a damp cloth. The product might give off a strong scent of paint after assembling, usually up to
72hours.
Możliwość żółknięcia powłoki koloru białego.
E
lementy niewidoczne takie jak : np. stelaż, dna szuflad, deska podtrzymująca stelaż, itp. nie są malowane, tak jak pozostała część łóżka.
Do not discard any of the
packaging until you have
checked that you have all the
parts and the pack of fxings.
Nie wyrzucaj opakowań,
dopóki nie sprawdziłeś, że
masz wszystkie części i okucia.
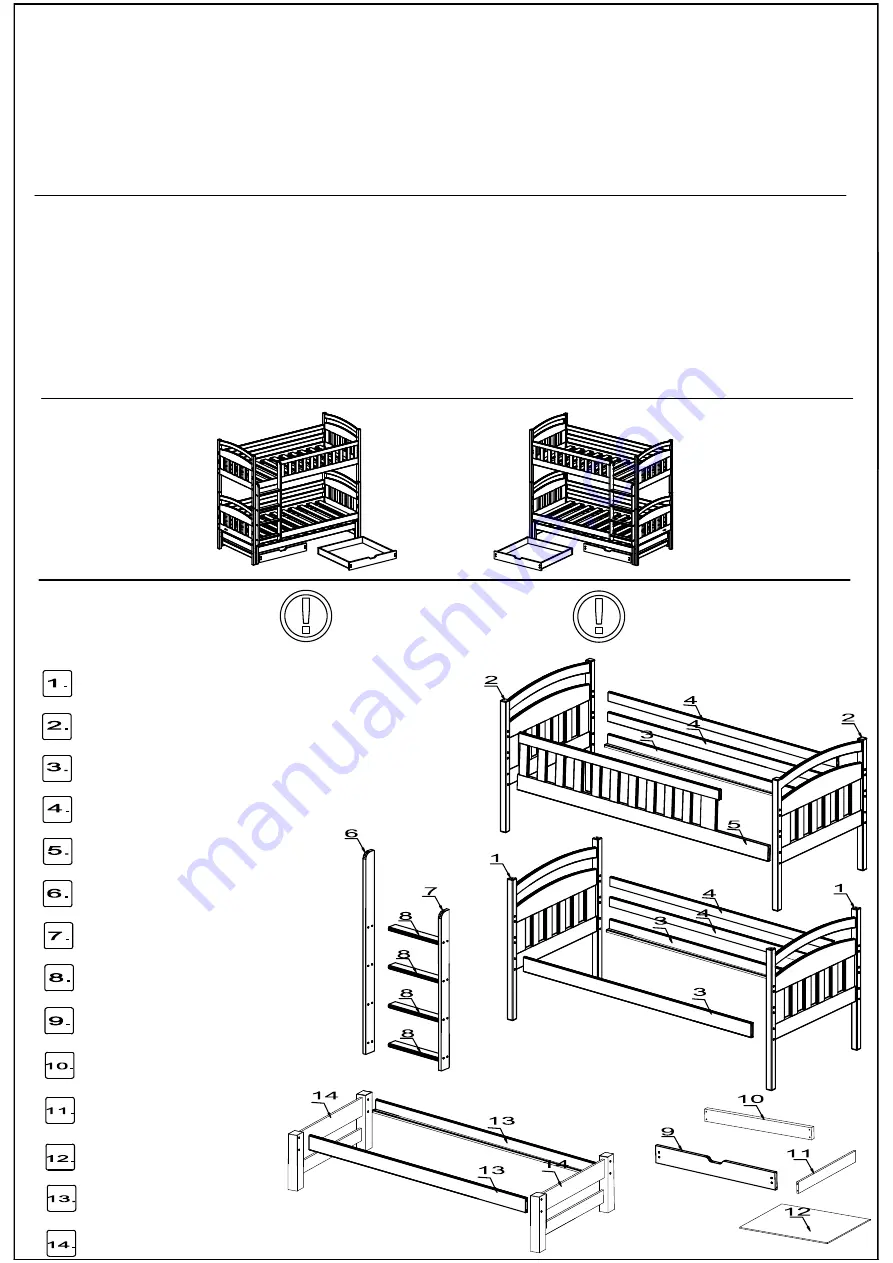
Parts Checklist
Lower Headboard (uniwersal - left/right) - 2 pcs.
Dolny Zagłówek (uniwersalny - lewy/prawy) - 2 sztuki
Upper Headboard (uniwersal - left/right) - 2 pcs.
Górny Zagłówek (uniwersalny - lewy/prawy) - 2 sztuki
Side Rail (upper/lower - front/back) - 3 pcs.
Listwa pod stelaż - 3sztuki
Long Guardrail - 4 pcs.
Listwa zabezpieczająca długa - 4 sztuki
Front Upper Guardrail - 1 pcs.
Płotek zabezpieczający 1sztuki
Ladder Longer Side Rail - 1 pcs.
Dłuższy bok drabinki - 1 sztuk
Ladder Shorter Side Rail - 1 pcs.
Krószy bok drabinki - 1 sztuk
Ladder step - 4 pcs.
Stopnie drabinki - 4 sztuki
Front of drawers - 2 pcs.
Front szuflady - 2 sztuki
Rear of drawers - 2 pcs.
Tył szuflady - 2 sztuki
Side of drawers - 4 pcs.
Bok szuflady - 4 sztuki
Bottom for drawers - 2 pcs.
Spód szuflady - 2 sztuki
Side Rail (front/back) - 2 pcs.
Listwa pod stelaż - 2 sztuki
Headrest For Extra Bed - 2 pcs.
Zagłówek do łóżeczka wysuwanego - 2 sztuki


