PremierWave® XC HSPA+ Intelligent Gateway User Guide
60
8: Input/Output Ports
Relay Output
Note:
When the relay is energized/turned on, the relay is closed, connecting both relay
ports on the I/O connector through the relay. When the relay is turned off, the signal path
is open, disconnecting the relay ports on the I/O connector.
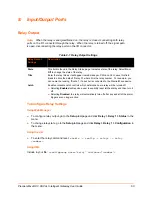
Table 8-1 Relay Output Settings
To Configure Relay Settings
Using Web Manager
To configure relay output, go to the
Setup
tab/page and click
Relay > Relay 1 > Status
in the
menu.
To change relay state, go to the
Setup
tab/page and click
Relay > Relay 1 > Configuration
in
the menu.
Using the CLI
To enter the relay command level:
enable -> config -> relays -> relay
<number>
Using XML
Include in your file:
<configgroup name="relay" instance="<number">
Relay Output
Settings
Description
State
This field is found in the Relay Status page. Indicates state of the relay. Select
On
or
Off
to change the state of the relay.
Title
Enter the relay title as it will appear in web manager, XML and CLI. Leave this field
blank to utilize the default “Relay N”, where N is the relay number. For example, you
can name the reading, “Buzzer”, if a buzzer is connected to the PremierWave device.
Latch
Enable or disable Latch controls which determine how a relay will be turned off.
Selecting
Enabled
will require a user to explicitly reset latched relay and then turn it
off.
Selecting
Disabled
, the relay will automaticaly turn off after any and all of the alarm
triggers are no longer active.


