background image

5: Configuration Using Web Manager

PremierWave® XN Intelligent Gateway User Guide

35

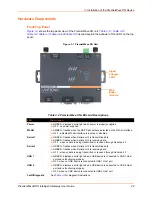
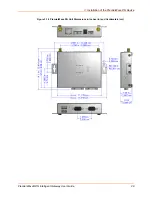
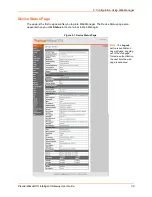
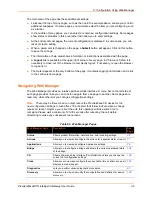
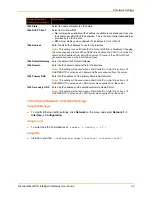
Web Manager Components

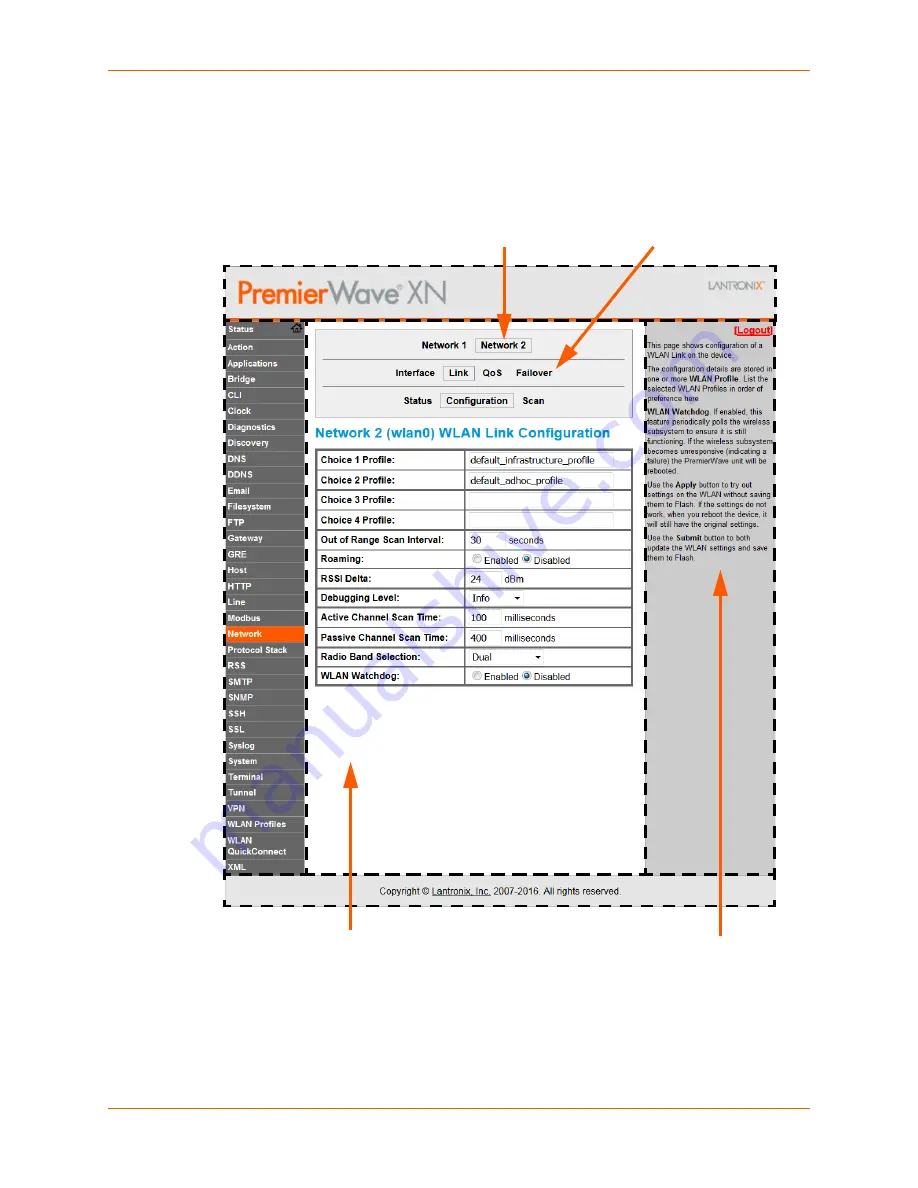
The layout of a typical Web Manager page is below.

Figure 5-2  Components of the Web Manager Page

Web Manager pages have these sections:

The menu bar always appears at the left side of the page, regardless of the page shown. The 
menu bar lists the names of the pages available in the Web Manager. To bring up a page, click it in 
the menu bar.

Menu Bar

Links to 
subpages

Items to 
configure

Information 
and Help Area

Header

Configuration and/or Status Area

Footer

Summary of Contents for PremierWave XN

Page 1: ...Part Number 900 606 Revision F October 2016 PremierWave XN Intelligent Gateway User Guide ...

Page 2: ...c License GPL as published by the Free Software Foundation FSF or the Python Software Foundation PFS License Agreement for Python 2 7 3 Python License Lantronix grants you no right to receive source code to the Open Source software however in some cases rights and access to source code for certain Open Source software may be available directly from Lantronix licensors Your use of each Open Source ...

Page 3: ...es losses and causes of action whether in contract or in tort or otherwise in connection with the user s access or usage of any of the information or content contained herein The information and specifications contained in this document are subject to change without notice Revision History Date Rev Comments February 2012 A Initial document for firmware release 7 3 0 0 December 2012 B Updated pinou...

Page 4: ...___________________________18 Troubleshooting Capabilities _________________________________________________18 Configuration Methods _____________________________________________________18 Addresses and Port Numbers ________________________________________________19 Hardware Address _____________________________________________________19 IP Address _________________________________________________...

Page 5: ...tatus __________________________________________________________43 Network 2 wlan0 Interface Settings __________________________________________44 To Configure Network 2 Interface Settings ___________________________________45 SmartRoam __________________________________________________________45 Network 2 wlan0 Link Settings ______________________________________________46 To Configure Network 2 ...

Page 6: ..._______________________________________________67 To Configure Gateway WAN Settings ______________________________________67 VPN ____________________________________________________________________67 To Configure VPN Settings ______________________________________________69 GRE Settings ____________________________________________________________70 To Configure Tunnel Serial Settings _____________...

Page 7: ...____________________________________________________93 Statistics _____________________________________________________________93 To View Statistics ______________________________________________________93 File Display ___________________________________________________________93 To Display Files _______________________________________________________94 File Modification __________________________...

Page 8: ..._____________________________103 Telnet Settings _______________________________________________________104 To Configure Telnet CLI Settings _________________________________________104 SSH CLI Settings _____________________________________________________104 To Configure SSH Settings _____________________________________________105 XML Settings ____________________________________________________...

Page 9: ...__________120 To Configure an Existing SSL Credential ___________________________________120 Trusted Authorities ____________________________________________________121 14 Modbus 122 Serial Transmission Mode __________________________________________________122 Modbus Statistics ________________________________________________________123 To View Modbus Statistics __________________________________...

Page 10: ...____________________________________134 Email Settings ___________________________________________________________134 To View Configure and Send Email _______________________________________135 17 Branding the PremierWave XN Device 136 Web Manager Customization _______________________________________________136 Short and Long Name Customization _________________________________________137 To Custo...

Page 11: ... for Full Duplex RS 422 485 4 wire __________24 Figure 3 8 PremierWave XN Pinout Configuration for Half Duplex RS 422 485 2 wire __________24 Figure 3 14 PremierWave XN Bottom Back Panel View___________________________________26 Figure 3 15 PremierWave XN WPS Button ____________________________________________27 Figure 3 16 PremierWave XN Unit Dimensions in Inches in and Centimeters cm ___________...

Page 12: ... Table 6 8 Adding or Deleting Network 2 wlan0 QoS Settings ____________________________ 47 Table 6 9 Network 2 Link Scan_____________________________________________________ 48 Table 6 10 Network 2 Link Scan Results on Web Manager _______________________________ 49 Table 6 11 Network 2 Link Status___________________________________________________ 49 Table 6 12 Network 2 wlan0 Failover Settings __...

Page 13: ..._________________________________ 93 Table 10 2 File Display Settings ____________________________________________________ 93 Table 10 3 File Modification Settings ________________________________________________ 94 Table 10 4 File Transfer Settings ___________________________________________________ 94 Table 10 5 IP Protocol Stack Settings _______________________________________________ 95 Table ...

Page 14: ... 123 Table 16 1 DNS Settings ________________________________________________________ 127 Table 16 2 FTP Settings _________________________________________________________ 128 Table 16 3 Syslog Settings _______________________________________________________ 128 Table 16 4 HTTP Settings________________________________________________________ 129 Table 16 5 HTTP Authentication Settings_____________...

Page 15: ...onfiguring network settings 7 Action Settings Instructions for configuring alarm settings 8 Line and Tunnel Settings Instructions for configuring line and tunnel settings 9 Terminal and Host Settings Instructions for configuring terminal and host settings 10 Maintenance and Diagnostics Settings Instructions to view statistics files and diagnose problems 11 Management Interface Settings Instruction...

Page 16: ...led information about the commands Also provides details for XML configuration and status PremierWave XN Intelligent Gateway Quick Start Instructions for getting the PremierWave XN device up and running DeviceInstaller Utility Online Help Instructions for using the Windows operating system based utility to locate the intelligent gateway and to view its current settings Com Port Redirector Quick St...

Page 17: ...ctor for 9 30 VDC power source Controller 32 bit ARM9 microprocessor running at 400 megahertz Mhz with 32 Kilobyte KB Configurable Cache and 32 Kilobytes KB internally based around the PremierWave XN intelligent gateway Memory 64 MB SDRAM 256 MB Flash and 8 MB serial SPI Flash Ethernet Wired 802 3 Ethernet networking Wireless 802 11 a b g n wireless networking Serial Ports Two 300 to 921 kbaud RS ...

Page 18: ...n a network it must have a unique IP address on the network There are four basic methods for logging into the PremierWave XN intelligent gateway and assigning IP addresses and other configurable settings Web Manager View and configure all settings easily through a web browser using the Lantronix Web Manager See Configuration Using Web Manager on page 33 DeviceInstaller Configure the IP address and...

Page 19: ...P Port 22 SSH Server Command Mode configuration TCP Port 23 Telnet Server Command Mode configuration TCP Port 80 HTTP Web Manager Configuration TCP Port 21 FTP UDP Port 30718 LDP Lantronix Discovery Protocol port TCP UDP Port 10001 Tunnel 1 see note below Note Additional TCP UDP ports and tunnels will be available depending on the product type The default numbering of each additional TCP UDP port ...

Page 20: ...Introduction PremierWave XN Intelligent Gateway User Guide 20 Figure 2 1 PremierWave XN Unit Product Label Bar Code Serial Number Part Number Country of Origin Manufacture Revision Manufacturing Date Code ...

Page 21: ...ly 12 VDC with international adapters Mounting components DIN rail mounting adapter cover plates and rubber feet PremierWave XN Quick Start Guide User Supplied Items To complete your installation you need the following items RS 232 422 485 serial devices that require network connectivity A serial cable as listed below for each serial device One end of the cable must have a female DB9 connector for...

Page 22: ... or disabled Serial 1 GREEN flashes when Serial port 2 is transmitting data AMBER flashes when Serial port 2 is receiving data OFF when no data is being transmitted or received through Serial port 2 Serial 2 GREEN flashes when Serial port 2 is transmitting data AMBER flashes when Serial port 2 is receiving data OFF when no data is being transmitted or received through Serial port 2 USB 1 GREEN dis...

Page 23: ...ng the WLAN signal strength see Table 3 12 for signal strength information for connections in 5 GHz band or Table 3 11 for signal strength information for connections in 2 4 GHz band For WPS status indications see Table 3 4 Fault Conditions Blink Pattern No Ethernet link detected Long long short short 2 seconds off pattern repeats No IP obtained from Ethernet network when eth0 interface is enabled...

Page 24: ... device The default serial port settings are 9600 baud 8 bits no parity 1 stop bit no flow control Figure 3 5 PremierWave XN Male DB9 DTE Serial Ports Figure 3 6 PremierWave XN Pinout Configuration for RS 232 Figure 3 7 PremierWave XN Pinout Configuration for Full Duplex RS 422 485 4 wire Figure 3 8 PremierWave XN Pinout Configuration for Half Duplex RS 422 485 2 wire 2 USB Reset Serial 1 Serial 2...

Page 25: ...bps Link 10 Mbps Activity Color Status Solid Light Green Full Duplex OFF Half Duplex Signal Strength Color Number of LED Signal Bars Greater than or equal to 60 dBm 5 Green Greater than or equal to 65 dBm and less than 60 dBm 4 Green Greater than or equal to 70 dBm and less than 65 dBm 3 Green Greater than or equal to 75 dBm and less than 70 dBm 2 Amber Greater than or equal to 80 dBm and less tha...

Page 26: ...nks Reset Button You can reset the PremierWave XN intelligent gateway to factory defaults including clearing the network settings The IP address gateway and netmask are set to 00s To reset the unit to factory defaults perform the following steps 1 Place the end of a paper clip or similar object into the reset opening see Figure 3 5 and press and hold down micro switch during a power cycle for 10 1...

Page 27: ...st Figure 3 15 PremierWave XN WPS Button To Start WPS Using the Device 1 Place the end of a paper clip or similar object into the WPS opening see Figure 3 15 and press and hold down for a minimum of 5 seconds 2 Remove the paper clip to release the button The unit will start Wi Fi protected setup Using the CLI To enter the command level enable config if 2 link To Cancel WPS Using the CLI To enter t...

Page 28: ...Connect your RJ 45 Ethernet cable to the RJ 45 port of the unit The PremierWave XN device supports a power range of 9 to 30 VDC You can power up the device with barrel power connector and or the 3 pin terminal connector for backup power supply Note As soon as you plug the device into power the device powers up automatically the self test begins and LEDs would indicate the device s status Perform t...

Page 29: ...3 Installation of the PremierWave XN Device PremierWave XN Intelligent Gateway User Guide 29 Figure 3 16 PremierWave XN Unit Dimensions in Inches in and Centimeters cm ...

Page 30: ...comes a plug and play mechanism to reach the device s Web UI Web Manager and complete the rest of the configuration Note There is no new software to install as UPnP support is built into Windows operating systems however it must be enabled on the Windows PC Please see notes on enabling UPnP Network Discovery on Windows XP and Windows 7 operating systems To search devices on Windows XP operating sy...

Page 31: ...d respond to the installation wizard prompts If prompted to select an installation type select Typical 2 Click Start All Programs Lantronix DeviceInstaller 4 4 DeviceInstaller 3 When DeviceInstaller starts it will perform a network device search To perform another search click Search 4 Expand the PremierWave folder by clicking the symbol next to the folder icon The list of available Lantronix Prem...

Page 32: ...nt IPv6 global address IP Address was Obtained Appears Dynamically if the PremierWave XN device automatically received an IP address e g from DHCP Appears Statically if the IP address was configured manually If the IP address was assigned dynamically the following fields appear Obtain via DHCP with values of True or False Obtain via BOOTP with values of True or False Subnet Mask Shows the subnet m...

Page 33: ...nager by selecting the Web Configuration tab on the DeviceInstaller application window To access Web Manager perform the following steps 1 Open a standard web browser Lantronix supports the latest versions of Internet Explorer Mozilla Firefox Safari Opera or Chrome web browsers 2 Enter the IP address or hostname of the PremierWave XN unit in the address bar The IP address may have been assigned ma...

Page 34: ...s the first to appear after you log into Web Manager The Device Status page also appears when you click Status in the menu bar in Web Manager Figure 5 1 Device Status Page Note The Logout button is available on any web page Logging out of the web page forcesre authentication the next time the web page is accessed ...

Page 35: ...f the Web Manager Page Web Manager pages have these sections The menu bar always appears at the left side of the page regardless of the page shown The menu bar lists the names of the pages available in the Web Manager To bring up a page click it in the menu bar Menu Bar Links to subpages Items to configure Information and Help Area Header Configuration and or Status Area Footer ...

Page 36: ...des an intuitive point and click interface A menu bar on the left side of each page provides links you can click to navigate from one page to another Some pages are read only while others let you change configuration settings Note There may be times when you must reboot the PremierWave XN device for the new configuration settings to take effect The chapters that follow indicate when a change requi...

Page 37: ...nfigure Modbus TCP server 122 Network Shows status and lets you configure the network interface 38 Protocol Stack Lets you perform lower level network stack specific activities 95 RSS Lets you change current Really Simple Syndication RSS settings 131 SMTP Shows and allows modification of the current configuration of SMTP 134 SNMP Shows and allows modification of the current configuration of SNMP 1...

Page 38: ...are to be replaced with a user specified name Network 1 Status In the Network 1 status pages you can view both the current interface operational settings as well as the settings that would take effect upon a device reboot as well as Link QoS and Failover status information To view Ethernet eth0 Interface status click Network on the menu and select Network 1 Interface Status To view Ethernet eth0 L...

Page 39: ... 0 0 Default Gateway Enter the IPv4 address of the router for this network Note This setting will be used if Static IP is active both DHCP and BOOTP are Disabled Hostname Enter the hostname for the interface It must begin with a letter or number continue with a sequence of letters numbers or hyphens and end with a letter or number This setting will take effect immediately but will not register the...

Page 40: ...tic IPv6 is active DHCPv6 is Disabled Changing this value requires a reboot When DHCPv6 is enabled the XPort Pro Lx6 tries to obtain an IPv6 address from a DHCPv6 server If it cannot then XPort Pro Lx6 generates and uses a Link local IPv6 address IPv6 Default Gateway Enter the default IPv6 Default Gateway IPv6 Domain Enter the IPv6 domain name suffix for the interface Note This setting will be use...

Page 41: ...h0 QoS QoS Quality of Service can be enabled and configured for both Network 1 eth0 and Network 2 wlan0 If enabled the router will control the flow of outbound traffic according to the user defined filters In other words QoS improves performance by allowing the user to prioritize applications Filters can be defined to prioritize traffic based on the source or destination network source or destinat...

Page 42: ...1 eth0 QoS information click Network on the menu and select Network 1 QoS Configuration Using the CLI To enter the eth0 QoS command level enable config if 1 qos Using XML Include in your file configgroup name qos instance eth0 Network 1 eth0 Settings Description State Click to enable or disable state Import filters Click to enable or disable import filters to import configurations from other inter...

Page 43: ...In the Network 2 status pages you can view both the current interface operational settings as well as the settings that would take effect upon a device reboot as well as Link QoS and Failover status information To view Ethernet wlan0 Interface status click Network on the menu and select Network 2 Interface Status To view Ethernet wlan0 Link status click Network on the menu and select Network 2 Lin...

Page 44: ...r preference IP Address Enter the IP address alone in CIDR form or with an explicit mask Default Gateway Enter the default gateway Hostname Enter the host name beginning with a letter continue with a letter number or hyphen and end with a letter or a number Domain Enter the domain for the interface DHCP Client ID Enter the DHCP client ID Primary DNS Enter the IP address of the primary Domain Name ...

Page 45: ...selected from the scan results Since moving between access points is a time consuming process which can negatively impact throughput SmartRoam employs a delta value to ensure that the move only occurs if there would be a significant gain in signal strength When searching the results of a scan SmartRoam only considers the APs with RSSI exceeding that of currently associated AP by at least the delta...

Page 46: ...n SmartRoaming scans Roaming Click to Enable or Disable SmartRoaming RSSI Delta The minimum difference in dBm between the current RSSI and the RSSI of any access point in the scan results before it will be considered as a roaming candidate The configured value will actually be used for the high power delta The roaming delta is cut in half for RSSI below 50 dBm The value for the low power delta wil...

Page 47: ...ighest priorities Bandwidth allocation is a minimum 5 each Voice Bandwidth allocation is minimum 30 Video Bandwidth allocation is minimum 20 Critical Applications Bandwidth allocation is minimum 15 Excellent Effort Bandwidth allocation is minimum 10 Best Effort Bandwidth allocation is minimum 10 Background Bandwidth allocation is minimum 5 and has the lowest priority Table 6 7 shows the network Qo...

Page 48: ... is selected Priority Select the priority of the filter from the drop down menu WLAN Link Information Commands Description Network Name Enter the Service Set Identifier network name of the device if known If the field is kept empty the scan performed will search for all available wireless devices Scan network SSID Perform a scan for devices within range of the device server Including the optional ...

Page 49: ... the device as well as whether it is operating in Adhoc IBSS mode WLAN Link Status Description Connection State Indicates the connection state BSSID A unique identifier for the Basic Service Set corresponding to the MAC address of the Access Point in infrastructure mode or a generated value in Adhoc mode AdHoc mode is limited to four connections SSID The Service Set Identifier of the connected net...

Page 50: ...ainst a known host If the remote host is determined to be not reachable the device will failover to the Ethernet interface If the remote host is determined to be reachable the device will failback to the Wi Fi interface Table 6 12 Network 2 wlan0 Failover Settings Network 1 Failover Settings Description State Click to enable or disable state Failover Interface Always select eth0 in the PremierWave...

Page 51: ...r connections A maximum of eight profiles can exist on the PremierWave XN intelligent gateway at a time All enabled profiles are active The PremierWave unit now supports dynamic profiles and prioritization of the profiles Dynamic Profiles are the ones created via WPS or QuickConnect Profiles are numbered based on priority Dynamic profiles in reversed order of creation choice list profiles Choice1 ...

Page 52: ...this action as desired View or Edit link to specific profile Click on a specific WLAN Profile name to edit the WLAN profile basic settings see Table 6 14 Create new profile Type in the name of the new profile to be created into the Create new profile field Then click the Submit button which appears to create the profile Once created the profile name may be clicked so you may edit profile settings ...

Page 53: ...allows the PremierWave XN intelligent gateway to reduce the data rate automatically depending on link quality TX Power Maximum Specify the maximum transmission output power in dBm Antenna Diversity Select the antenna the radio will use or allow PremierWave XN unit to automatically make the selection Enabled allows the PremierWave XN unit to select the antenna Antenna 1 use antenna closest to Ether...

Page 54: ...d 802 11i Table 6 16 WLAN Profile Security Settings WLAN Profile Security Settings Description Suite Specify the security suite to be used for this profile None no authentication or encryption method will be used WEP Wired Equivalent Privacy WPA Wi Fi Protected Access WPA2 IEEE 802 11i Robust Secure Network Authentication Select the authentication of the security key when the WPA or the WPA2 IEEE8...

Page 55: ... or WPA2 IEEE 802 11i are selected Note Lantronix recommends using a passphrase of 20 characters or more for maximum security Spaces and punctuation characters are permitted Note The passphrase input is not the same as ASCII input as used on some products ASCII is translated directly into hexadecimal bytes according to the ASCII table while a possibly larger passphrase is hashed into a key and pro...

Page 56: ...ze Select the key size in bits Select 40 for WEP40 and WEP64 select 104 for WEP104 and WEP128 TX Key Index Select one of four index listing keys for transmitting data Reception is allowed with all four keys Note For interoperability with some products that generate four identical keys from a passphrase this index must be one This field appears when the WEP suite type and the Hex key type are selec...

Page 57: ...inalizing the IEEE802 11i standard was still far away WPA2 is Wi Fi s subset of the broad IEEE802 11i standard to enforce better interoperability The PremierWave XN intelligent gateway is compliant with both WPA2 and IEEE802 11i Table 6 18 WLAN Profile WPA and WPA2 IEEE802 11i Settings WLAN Profile WPA WPA2 Settings Description Authentication Select the authentication method to be used PSK Pre Sha...

Page 58: ...nnel to authenticate the PremierWave XN device This is called inner authentication EAP TTLS and PEAP have been developed by different consortia and vary in details of which the most visible is the supported list of inner authentications Note When using EAP TLS EAP TTLS or PEAP authority at least one authority certificate will have to be installed in the SSL configuration that is able to verify the...

Page 59: ...file instance profile name and configitem name security Encryption Select one or more encryption types listed from strongest to least strong At least one selection will have to match the Access Points intended to connect with CCMP Uses AES as basis and is the strongest encryption option TKIP Uses WEP as the basis but adds extra checks and variations for added protection WEP Based on RC4 Note In ca...

Page 60: ...the PremierWave unit is associated with an access point scanning is only preformed on the band on which the unit is connected Refresh scan results every 60 seconds checkbox Check this to auto update the list of networks every 60 seconds Uncheck this to stop auto update SSID link Network ID of a network Click this link to display its configuration profile BSSID Basic service set identifier This is ...

Page 61: ... used as a router without NAT Firewall Select to enable or disable firewall Enabled enables the device firewall Disabled disable the device firewall MAC Address filter Select to enable or disable the MAC address filter Interface Specify the WAN interface Generally wlan0 interface IP Address Assign a static IP address to the gateway IPv6 Address Assign a static IPv6 address to the gateway Primary D...

Page 62: ...ic and will not work if the device is not reachable or traffic to certain ports is blocked before it reaches the device If traffic is going through firewalls all referenced ports on the gateway and LAN devices must be accessible Table 6 22 Port Forwarding Rules List Adding or Deleting New MAC Address Filter Settings Description Delete Click the checkbox to the left of any existing mac address filt...

Page 63: ...sed with single ports and not with port range Start Port Enter the starting port number End Port End port number optional If start port and end port are same it assumes a single port If start port and end port are not the same it is a port range Protocol Select the protocol for the rule TCP UDP or Both IP Address Enter the target for the port forwarding rule Target Port Indicate the target port Th...

Page 64: ...for the route Network Enter the Network or Host for the route Gateway Enter the Gateway for the route Interface Select the Interface for the route Metric Enter the priority for the route Lower metric means higher priority DHCP Settings Description Lease time Enter the duration for which lease is initially assigned Clients must renew after this duration State Enable or Disable the DHCP server for t...

Page 65: ...able 6 27 Routing Protocol Settings Routing Settings Description State RIP Select to enable or disable the RIP state Version Select how the RIP is to be configured It can accept Version 1 Version 2 or Version 1 and 2 Update Interval Indicate the number of seconds for the Update Interval Send unsolicited Response message every Update Interval seconds containing the complete routing table to all nei...

Page 66: ...formation via the routing protocols Table 6 28 Virtual IP Settings To Configure Gateway Virtual IP Using Web Manager To modify gateway DHCP server information click Gateway on the menu and select Configuration Virtual IP Using the CLI To enter the gateway command level enable config gateway Using XML Include in your file configgroup name virtual ip Virtual IP Settings Description Enabled checkbox ...

Page 67: ...e private network while benefiting from the functionality security and management policies of the private network Table 6 30 VPN Configuration DDNS Settings Description State Select to enable or disable the DDNS state User Name Enter a user name for the DDNS account Password Enter a password for the DDNS account Host Name Specify the host name to be used to update the DDNS Interval Indicate the in...

Page 68: ...d a server Interface Select the interface to use to connect to VPN Gateway REMOTE NETWORK Endpoint Enter the remote VPN gateway s IP address Subnet Enter the subnet behind the VPN gateway ID Specify the identifier through which to receive from the remote host during Phase 1 negotiation Router Next Hop Enter the next hop gateway IP address for the VPN gateway LOCAL NETWORK Subnet Define which local...

Page 69: ...up between the Remote and VPN Gateways IKE Lifetime Enter the lifetime in hours for IKE SA ISAKMP PHASE 2 ESP Encryption Select the encryption Algorithm in data exchange Authentication Select the hash Algorithm in data exchange DH Group Select the Diffie Hellman groups the Key Exchange group between the Remote and VPN Gateways for Phase 2 SA Lifetime Enter the lifetime in hours for SA in Phase 2 U...

Page 70: ... command level enable gre Using XML Include in your file configgroup name gre GRE Settings Description Name Enter the user defined name of the GRE tunnel State Select to enable and disable GRE tunnel IP Address Assign an IP address mask for the GRE tunnel MTU Enter the number of bytes indicating the largest physical packet size that the network can transmit Local Network Select the local network t...

Page 71: ...rm Reminder Interval Normal Email Normal Message Normal Reminder Interval SNMP Reminder Interval SNMP Normal Message and Delay Actions Table 7 1 contains the configuration options for all the alarms and reports listed above Table 7 1 Action Settings Action Settings Description Delay Use Delay to defer alarm processing Alarm actions will not be executed if the cause is corrected within this time Em...

Page 72: ...er s email address If the alarm stays on or off longer than the Reminder Interval another FTP Put is performed In Sequential mode connections will be attempted starting with number 1 until a connection is successful In Simultaneous mode all possible connections will be made HTTP Post Use HTTP Post post to configured HTTP server The URL appears behind the HTTP server IP address or hostname E g http...

Page 73: ... the Python language s standard library In addition the developer can take advantage of thousands of available third party packages to speed up development IDE Python scripts can be written with any text editor If using Windows for development Notepad is a powerful choice as this text editor includes traditional IDE features such as syntax highlighting and automatic indentation http notepad plus p...

Page 74: ...pon the start up of the PremierWave unit Uncheck the checkbox to disable automatically running the unit upon startup Run on shutdown checkbox Check the Run on shutdown checkbox within a particular script to have it run on shutdown of the Premierwave unit Uncheck the checkbox to disable automatically running the script upon shutdown Script Enter the path of script to run in Filesystem Parameter Ent...

Page 75: ...o Configure Application Settings Using Web Manager To configure application scripts click Applications on the menu Using the CLI To enter the application script change command level enable config applications Using XML Include in your file configgroup name applications ...

Page 76: ...the steps to view Line 1 statistics these steps apply to other line instances of the device Using Web Manager To view statistics for Line 1 click Line in the menu and select Line 1 Statistics Using the CLI To view Line statistics enable line 1 show statistics Using XML Include in your file statusgroup name line instance 1 Line Settings Note The following section describes the steps to configure Li...

Page 77: ... 600 1200 2400 4800 9600 19200 38400 57600 115200 230400 460800 921600 When selecting a Custom baud rate you may manually enter any value between 300 and 5000000 Note Custom baud rates are not supported when a line is configured for Command Mode Parity Set the Parity of the Line The default is None Data Bits Set the number of data bits for the Line The default is 8 Stop Bits Set the number of stop...

Page 78: ...me Enter the amount of time to wait during boot time for the Serial String This timer starts right after the Signon Message has been sent on the Serial Line and applies only if mode is Use Serial String Note This field becomes available when Use Serial String is selected for Mode Serial String Enter the Text or Binary string of bytes that must be read on the Serial Line during boot time in order t...

Page 79: ...Tunnel Statistics Tunnel statistics contains data counters error counters connection time and connection information Statistics are available at each individual connection and aggregated across all connections Note The following section describes the steps to view Tunnel 1 statistics these steps apply to other tunnel instances of the device To View Tunnel Statistics Using Web Manager To view stati...

Page 80: ...8 3 Tunnel Serial Settings To Configure Tunnel Serial Settings Using Web Manager To configure the Serial Settings for a specific tunnel click Tunnel in the menu and select Tunnel 1 Serial Settings Using the CLI To enter Tunnel 1 command level enable tunnel 1 serial Using XML Include in your file configgroup name tunnel serial instance 1 Tunnel Serial Settings Description Line Settings Line Setting...

Page 81: ...ad on the Serial Line Threshold Set the threshold byte count If the received serial data reaches this threshold then the data will be sent on the network Valid range is 100 to 1450 bytes Default is 512 Timeout Set the timeout value in milliseconds after the first character is received on the serial line before data is sent on the network Valid range is 1 to 30000 milliseconds Default is 1000 This ...

Page 82: ...l line Modem Control Asserted start waiting for an incoming connection as long as the Modem Control pin DSR is asserted on the serial line until a connection is made Modem Emulation start waiting for an incoming connection when triggered by modem emulation AT commands Connect mode must also be set to Modem Emulation Local Port Set the port number for use as the network local port The default local...

Page 83: ... if hardware or software flow control is configured Disabled this is the default setting incoming characters from the Serial Line are sent on into the network Any buffered characters are sent first Block Network Set whether Block Network is enabled for debugging purposes Choices are Enabled if Enabled incoming characters from the network will not be forwarded to the Serial Line Instead they will b...

Page 84: ...For Connect Mode using UDP the PremierWave XN module accepts packets from any device on the network It will send packets to the last device that sent it packets Note The port in Connect Mode is not the same port configured in Accept Mode The TCP keepalive time is the time in which probes are periodically sent to the other end of the connection This ensures the other side is still connected Table 8...

Page 85: ...egments will be retransmitted before the connection is closed Initial Send enter the Initial Send string for data sent out of the network upon connection establishment before any data from the Line The string may contain one or more Directives of the form char and can be entered in Text or Binary form Notes If the keep alive idle time the initial keep alive probe expires the user timeout is expire...

Page 86: ...ion Disabled serial data buffer is not flushed on network connection default Block Serial Set whether Block Serial is enabled for debugging purposes Choices are Enabled If Enabled incoming characters from the Serial Line will not be forwarded to the network Instead they will be buffered and will eventually flow off the Serial Line if hardware or software flow control is configured Disabled this is...

Page 87: ...d Host 3 2 The selected Host s exchanges its place with the Host above it 3 Click Submit The hosts change sequence Disconnect Mode Specifies the optional conditions for disconnecting any Accept Mode or Connect Mode connection that may be established If any of these conditions are selected but do not occur and the network disconnects to the device a Connect Mode connection will attempt to reconnect...

Page 88: ...Emulation Settings Description Echo Pluses Set whether the pluses will be echoed back during a pause pause escape sequence on the Serial Line Choices are Enabled Disabled default Echo Commands Set whether characters read on the Serial Line will be echoed while the Line is in Modem Command Mode Choices are Enabled Disabled default Verbose Response Set whether Modem Response Codes are sent out on th...

Page 89: ...r the Tunnel 1 Modem command level enable tunnel 1 modem Using XML Include in your file configgroup name tunnel modem instance 1 Connect String Enter the customized Connect String sent to the Serial Line with the Connect Modem Response Code Display Remote IP Set whether the Display Remote IP is enabled so that the incoming RING sent on the Serial Line is followed by the IP address of the caller Ch...

Page 90: ...d break or start echoing IAC is only supported in Telnet Login Connect Menu Select the interface to display when the user logs in Choices are Enabled shows the Login Connect Menu Disabled shows the CLI default Exit Connect Menu Select whether to display a choice for the user to exit the Login Connect Menu and reach the CLI Choices are Enabled a choice allows the user to exit to the CLI Disabled th...

Page 91: ...erminal 1 settings these steps apply to other terminal instances of the device Using Web Manager To configure a particular Terminal Line click Terminal on the menu and select Line 1 Configuration Using the CLI To enter the Terminal Line command level enable config terminal 1 Using XML Include in your file configgroup name terminal instance 1 Host Configuration Table 9 2 Host Configuration Host Set...

Page 92: ...level enable config host 1 Using XML Include in your file configgroup name host instance 1 SSH Username Appears if you selected SSH as the protocol Enter a username to select a pre configured Username Password Key configured on the SSH Client Users page or leave it blank to be prompted for a username and password at connect time Note This configuration option is only available when SSH is selected...

Page 93: ...mount option is disabled USB drive will not be mounted Table 10 1 File Statistics To View Statistics Using Web Manager To view statistics format the filesystem or configure USB auto mount features click Filesystem in the menu and select Statistics File Display View the list of existing files and their contents in the ASCII or hexadecimal formats Table 10 2 File Display Settings Filesystem Commands...

Page 94: ...n also be uploaded via HTTP Table 10 4 File Transfer Settings File Modification Commands Description rm Removes the specified file from the file system touch Creates the specified file as an empty file cp Creates a copy of a file mkdir Creates a directory on the file system rmdir Removes a directory from the file system format Format the file system and remove all data File Transfer Settings Descr...

Page 95: ...end a file to a remote location Local File Enter the name of the local file on which the specified get or put action is to be performed Remote File Enter the name of the file at the remote location that is to be stored locally get or externally put Host Enter the IP address or name of the host involved in this operation Port Enter the number of the port involved in TFTP operations Protocol Stack I...

Page 96: ...he menu and select ICMP Using the CLI To enter the command level enable config icmp Using XML Include in your file configgroup name icmp ARP Settings Table 10 7 ARP Protocol Stack Settings Protocol Stack ICMP Settings Description State The State selection is used to turn on off processing of ICMP messages This includes both incoming and outgoing messages Choose Enabled or Disabled Protocol Stack A...

Page 97: ...ration or viewing of IP socket information ping traceroute memory and processes Hardware To View Hardware Information Using Web Manager To view hardware information click Diagnostics in the menu and select Hardware Using the CLI To enter the command level enable device show hardware information Using XML Include in your file statusgroup name hardware IP Sockets You can view the list of listening a...

Page 98: ... the packet requires to reach the host and how long each hop takes If you visit a web site whose pages appear slowly you can use traceroute to determine where the longest delays are occurring Table 10 9 Traceroute Settings Diagnostics Ping Settings Description Host Enter the IP address or host name for the PremierWave unit to ping Count Enter the number of ping packets PremierWave device should at...

Page 99: ...Manager To configure the Diagnostic Log output click Diagnostics in the menu and select Log Using the CLI To enter the command level enable config diagnostics log Using XML Include in your file configgroup name diagnostics and configitem name log Diagnostics Log Description Output Select a diagnostic log output type Disable Turn off the logging feature Filesystem Directs logging to log txt Line 1 ...

Page 100: ...e Process ID PID Parent Process ID PPID user CPU percentage percentage of total CPU cycles and process command line information To View Process Information Using Web Manager To view process information click Diagnostics in the menu and select Processes Using the CLI To enter the command level enable show processes Using XML Include in your file statusgroup name processes Threads The PremierWave un...

Page 101: ...ter the command level enable config clock Using the XML Include in your file configgroup name clock Clock Description Method Select a clock change method Manual this option allows you to directly set the date and time SNTP this option keeps the time synchronized with the NTP Server Date Use the drop down menu to select the Year Month and Day This option becomes available when the Manual method is ...

Page 102: ...ur file configgroup name xml import control System Settings Description Reboot Schedule Set the reboot schedule by enabling the State and setting the Schedule to a specific daily set Time 24 hour or specific hour day or weekly Interval Reboot Device Click the Reboot button to reboot the device Restore Factory Defaults Click Factory Defaults to restore the device to the original factory settings Al...

Page 103: ...enu and select Configuration Using the CLI To enter CLI command level enable config cli Using XML Include in your file configgroup name cli Command Line Interface Configuration Settings Description Login Password Enter the password for the admin account PASS is the default password Enable Level Password Enter the password for access to the Command Mode Enable level There is no password by default ...

Page 104: ...settings control CLI access to the PremierWave XN device over the SSH protocol Table 11 3 SSH Settings Telnet Settings Description Telnet State Select to enable or disableCLI access via Telnet Telnet Port Enter an alternative Telnet Port to override the default used by the CLI server Blank the field to restore the default Telnet Max Sessions Specify the maximum number of concurrent Telnet sessions...

Page 105: ... The XML data can be dumped to the screen or exported to a file on the file system By default all groups are exported You may also select a subset of groups to export Table 11 4 XML Exporting Configuration XML Export Configuration Settings Description Export to browser Select this option to export the XCR data in the selected fields to the browser Use the xcr dump command to export the data to the...

Page 106: ...mand Click Clear All to clear all checkmarks or Select All but Networking to check all checkmarks except Networking XML Export Status Settings Description Export to browser Select this option to export the XCR data in the selected fields to the browser Use the xcr dump command to export the data to the browser Export to local file Select this option to export the XCR data to a file on the device I...

Page 107: ...ll of the selected Lines Table 11 6 Import Configuration from Filesystem Settings Import Configuration from Filesystem Settings Description Filename Enter the name of the file on the PremierWave XN unit local to its filesystem that contains XCR data Lines to Import Select filter instances to be imported in the line serial tunnel and terminal groups This affects both Whole Groups to Import and Text...

Page 108: ...Intelligent Gateway User Guide 108 To Import Configuration in XML Format Using Web Manager To import configuration click XML in the menu and select Import Configuration Using the CLI To enter the XML command level enable xml Using XML Not applicable ...

Page 109: ...e bridging subsystem Each Network Interface s own configuration is used when it becomes the Primary Interface Network 1 eth0 and Network 2 wlan0 Link Configuration settings are still used to configure and control the physical links Bridging Configuration To configure and enable bridging 1 Configure Network 1 eth0 and Network 2 wlan0 Interface settings which will be used for the Primary Interface F...

Page 110: ... the Bridging MAC Address are discarded Bridge Configuration A bridge may be configured between an Ethernet interface and a WLAN interface A bridge represents a relationship between the interface minor numbers For example br0 is a bridge between eth0 and wlan0 Table 12 1 Bridge Settings To View or Configure Bridge Settings Using Web Manager To view the Bridge status click Bridge on the menu select...

Page 111: ...remierWave XN Intelligent Gateway User Guide 111 Using the CLI To enter the Bridge command level enable config bridge 1 or enable config bridge br0 Using XML Include in your file configgroup name bridge instance br0 ...

Page 112: ...ryption as opposed to symmetric encryption in which a single secret key is used by both parties TLS SSL Transport Layer Security TLS and its predecessor Secure Sockets Layer SSL use asymmetric encryption for authentication In some scenarios only a server needs to be authenticated in others both client and server authenticate each other Once authentication is established clients and servers use asy...

Page 113: ...tificate request for a CA typically for a fee The CA will sign the certificate request producing a certificate key combo the certificate contains the identity of the owner and the public key and the private key is available separately for use by the owner As an alternative to acquiring a signed certificate from a CA you can act as your own CA and create self signed certificates This is often done ...

Page 114: ...ed certificate generator The self signed certificate has extension sbrpvk and is in the PKCS12 format OpenSSL can convert this into a PEM format certificate and key openssl pkcs12 in sbr_certkey sbrpvk nodes out sbr_certkey pem The sbr_certkey pem file contains both certificate and key If loading the SBR certificate into an PremierWave XN intelligent gateway as an authority you will need to edit i...

Page 115: ...that play the role of an SSH Server Specifically Tunneling in Accept Mode These keys can be created elsewhere and uploaded to the device or automatically generated on the device If uploading existing keys take care to ensure the Private Key will not be compromised in transit This implies the data is uploaded over some kind of secure private network Note Some SSH Clients require RSA Host Keys to be...

Page 116: ...r IP Address when adding public host keys for a Server This Server name should match the name used as the Remote Address in Connect Mode Tunneling Public RSA Key Click Choose File to browse to and select the existing public RSA key you want to use with this user In Web Manager you can also browse to the public RSA key to be uploaded If authentication is successful with the key no password is requi...

Page 117: ... Enter the password associated with the username Remote Command Enter the command that can be executed remotely Default is shell which tells the SSH server to execute a remote shell upon connection This command can be changed to anything the remote host can perform Private Key Click Choose File to browse to and select the existing private key you want to upload In Web Manager you can also browse t...

Page 118: ... The PremierWave XN intelligent gateway can generate self signed certificates and their corresponding keys This can be done for both the rsa and dsa certificate formats Certificates can be identified on the PremierWave XN unit by a name provided at generation time Table 13 5 Certificate and Key Generation Settings Certificate Generation Settings Description Country 2 Letter Code Enter the 2 letter...

Page 119: ...ample An expiration date of May 9 2018 is entered as 05 09 2018 Type Select the type of key RSA Public Key Cryptography algorithm based on large prime numbers invented by Rivest Shamir and Adleman Used for encryption and signing DSA Digital Signature Algorithm also based on large prime numbers but can only be used for signing Developed by the US government to avoid the patents on RSA Key Length Se...

Page 120: ... ssl and configitem name credentials instance name Upload Certificate Settings Description New Certificate SSL certificate to be uploaded RSA or DSA certificates are allowed The format of the certificate must be PEM It must start with BEGIN CERTIFICATE and end with END CERTIFICATE Some Certificate Authorities add comments before and or after these lines Those need to be deleted before upload New C...

Page 121: ... authority instance 1 Table 13 7 Trusted Authority Settings Trusted Authorities Settings Description Authority Click Choose File to browse to and select the SSL authority certificate RSA or DSA certificates are allowed The format of the authority certificate can be PEM or PKCS7 PEM files must start with BEGIN CERTIFICATE and end with END CERTIFICATE Some Certificate Authorities add comments before...

Page 122: ...TU or ASCII Users select the desired mode and serial port communication parameters baud rate parity mode etc when in the line configuration options Table 14 2 Modbus Transmission Modes The Modbus web pages allow you to check Modbus status and make configuration changes This chapter contains the following sections Modbus Statistics Modbus Configuration Transaction ID 2 bytes Identification of reque...

Page 123: ...dbus in addition to configuring the Modbus server See Chapter 8 Line and Tunnel Settings on page 76 for details To View and Configure the Modbus Server Using Web Manager To configure Modbus settings click Modbus on the menu and select Configuration Using the CLI To enter the SSL command level enable ssl To enter the Credentials command level enable ssl credentials Using XML Not applicable Modbus C...

Page 124: ...2 Install python rom image new or reinstall the complete firmware image kernel rootfs python rom new Note The devices that upgrade from existing firmware versions 7 7 and earlier and need Python support should use the DeviceInstaller serial recovery to upgrade to 7 9 Users must select the erase all flash option while upgrading firmware to 7 9 with kernel rootfs rom After that install python rom or...

Page 125: ...rmware on the PremierWave XN unit 5 Click OK in the confirmation popup which appears The firmware will be installed and the device will automatically reboot afterwards 6 Close and reopen the web manager internet browser to view the device s updated web pages Note You may need to increase HTTP Max Bytes in some cases where the browser is sending data aggressively within TCP Windows size limit when ...

Page 126: ...The device will reboot upon successful completion of the firmware upgrade Example FTP session ftp 192 168 10 127 Connected to 192 168 10 127 220 vsFTPd 2 0 7 Name 192 168 10 127 user admin 331 Please specify the password Password 230 Login successful Remote system type is UNIX Using binary mode to transfer files ftp put premierwave_xn_8_0_0_0R19 200 PORT command successful Consider using PASV 150 ...

Page 127: ... View or Configure DNS Settings Using Web Manager To view DNS current status click DNS in the menu To lookup DNS name or IP address click DNS in the menu to access the Lookup field Note To configure DNS for cases where it is not supplied by a protocol click Network in the menu and select Interface Configuration Using the CLI To enter the DNS command level enable dns Using XML Include in your file ...

Page 128: ... syslog Here you can configure the syslog host and the severity of the events to log Note The system log is always saved to local storage but it is not retained through reboots unless diagnostics logging to the file system is enabled Saving the system log to a server that supports remote logging services see RFC 3164 allows the administrator to save the complete system log history The default port...

Page 129: ...wn menu This setting applies to all syslog facilities The drop down list in the Web Manager is in descending order of severity e g Emergency is more severe than Alert HTTP Settings Description State Select to enable or disable the HTTP server Enabled default Disabled Port Enter the port for the HTTP server to use The default is 80 Secure Port Enter the port for the HTTPS server to use The default ...

Page 130: ...n file including firmware upgrade is uploaded from webpage Logging State Select to enable or disable HTTP server logging Enabled default Disabled Max Log Entries Set the maximum number of HTTP server log entries Only the last Max Log Entries are cached and viewable Log Format Set the log format string for the HTTP server Follow these Log Format rules a remote IP address could be a proxy b bytes se...

Page 131: ...urce Identifier URI Note The URI must begin with to refer to the filesystem Auth Type Select the authentication type None no authentication is necessary Basic encodes passwords using Base64 Digest encodes passwords using MD5 SSL can only be accessed over SSL no password is required SSL Basic is accessible only over SSL and encodes passwords using Base64 SSL Digest is accessible only over SSL and e...

Page 132: ...y the agent defaults to public community Write Community Specify the write community used by the agent defaults to private community System Contact Specify the system contact System Name Update the system name as necessary The default system name is premierwave_xn System Description Update the system description as necessary The default system information includes the manufacturer name model name ...

Page 133: ... Interface under Windows Components Networking Services Details before setting up the PremierWave device to utilize Discovery Using Web Manager To access the area with options to configure discovery and view current discovery statistics click Discovery in the menu Using the CLI To enter the command level enable config discovery Using XML Include in your file configgroup name discovery Discovery De...

Page 134: ...the SMTP server port number The default is 25 Username Enter a Username to direct outbound email messages through a mail server Password Enter a Password to direct outbound email messages through a mail server Overriding Domain Enter the domain name to override the current domain name in EHLO Extended Hello Email Configuration Settings Description From Click the Configure SMTP link to configure SM...

Page 135: ...re basic Email settings click Email in the menu and select Email 1 Configuration To send an email click Email in the menu and select Email 1 Send Email Using the CLI To enter Email command level enable email 1 Using XML Include in your file configgroup name email instance 1 Message File Enter the path of the file to send with the email alert This file appears within the message body of the email n...

Page 136: ...into the firmware image but may be overridden by placing the appropriate file in the appropriate directory on the PremierWave XN unit file system Web Manager files can be retrieved and overridden with the following procedure 1 FTP to the PremierWave XN device 2 Make a directory mkdir and name it http config 3 Change to the directory cd that you created in step 2 http config 4 Save the contents of ...

Page 137: ... additional configuration options available on the Systems page Table 17 1 Short and Long Name Settings To Customize Short or Long Names Using Web Manager To access the area with options to customize the short name and the long name of the product or to view the current configuration click System in the menu Using the CLI To enter the command level enable Using XML Include in your file configitem ...

Page 138: ...ation extended support services and product documentation To contact technical support or sales look up your local office at http www lantronix com aboujchent contact html When you report a problem please provide the following information Your name company name address and phone number Lantronix product and model number Lantronix MAC address or serial number Firmware version and current configurat...

Page 139: ...g from 0 to F which are represented as 0 9 A for 10 B for 11 etc To convert a binary value for example 0100 1100 to a hexadecimal representation treat the upper and lower four bits separately to produce a two digit hexadecimal number in this case 4C Use the following table to convert values from binary to hexadecimal Scientific Calculator Another simple way to convert binary to hexadecimal is to u...

Page 140: ... to Hexadecimal Conversions PremierWave XN Intelligent Gateway User Guide 140 Figure B 2 Windows Scientific Calculator 4 Click Hex The hexadecimal value appears Figure B 3 Hexadecimal Values in the Scientific Calculator ...

Page 141: ...15 247 47 CFR Part 15 Subpart E Section 15 407 RSS 210 Issue 8 December 2010 RSS GEN Issue 2 June 2007 ICES 003 Issue 4 February 2004 CISPR 22 2005 A1 2005 A2 2006 VCCI V 3 2010 04 AS NZS CISPR 22 2009 EN 55022 2006 A1 2007 EN 61000 3 2 2006 A1 2009 A2 2009 EN 61000 3 3 2008 ETSI EN 301 893 v1 7 1 ETSI EN 301 489 1 V1 8 1 ETSI EN 301 489 17 V2 1 1 ETSI EN 300 328 V1 8 1 Japan Article 2 Section 1 N...

Page 142: ...WC0244 Safety Low Voltage Directive 2006 95 EC IEC EN 60950 1 Second Edition UL 60950 1 Second Edition CAN CSA C22 2 No 60950 1 07 Second Edition Manufacturer s Contact Lantronix Inc 7535 Irvine Center Drive Suite 100 Irvine CA 92618 USA Tel 949 453 3990 Fax 949 453 3995 RoHS REACH and WEEE Compliance Statement Please visit http www lantronix com legal rohs for Lantronix s statement about RoHS REA...

Page 143: ...ve Yes Passive Yes 2484 14 N A N A Active Yes N A N A Passive Yes 5 GHz Band 5180 36 Active Yes Active Yes Active Yes Passive Yes 5200 40 Active Yes Active Yes Active Yes Passive Yes 5220 44 Active Yes Active Yes Active Yes Passive Yes 5240 48 Active Yes Active Yes Active Yes Passive Yes 5260 52 Passive No Passive No Passive No Passive No 5280 56 Passive No Passive No Passive No Passive No 5300 60...

Reviews: