Lantronix
SM12XPA Web User Guide
33848 Rev. A
Page
134
of
473
7. Spanning Tree
The Spanning Tree Protocol (STP) can be used to detect and disable network loops, and to provide backup links
between switches, bridges or routers. This allows the switch to interact with other bridging devices (that is, an
STP-compliant switch, bridge or router) in your network to ensure that only one route exists between any two
stations on the network and provide backup links which automatically take over when a primary link goes down.
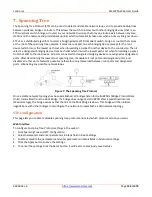
STP uses a distributed algorithm to select a bridging device (STP-compliant switch, bridge or router) that serves
as the root of the spanning tree network. It selects a root port on each bridging device (except for the root
device) which incurs the lowest path cost when forwarding a packet from that device to the root device. Then it
selects a designated bridging device from each LAN which incurs the lowest path cost when forwarding a packet
from that LAN to the root device. All ports connected to designated bridging devices are assigned as designated
ports. After determining the lowest cost spanning tree, it enables all root ports and designated ports, and
disables all other ports. Network packets are therefore only forwarded between root ports and designated
ports, eliminating any possible network loops.
Figure 7: The Spanning Tree Protocol
Once a stable network topology has been established, all bridges listen for Hello BPDUs (Bridge Protocol Data
Units) transmitted from the Root Bridge. If a bridge does not get a Hello BPDU after a predefined interval
(Maximum Age), the bridge assumes that the link to the Root Bridge is down. This bridge will then initiate
negotiations with other bridges to reconfigure the network to reestablish a valid network topology.
STP Configuration
This page lets you enable or disable spanning tree protocol and select which protocol version you want.
Web Interface
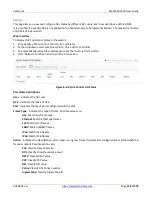
To configure Spanning Tree Protocol settings in the web UI:
1.
Click Spanning Tree and STP Configuration.
2.
Select parameters and enter parameters in blank field in Basic Settings.
3.
Enable or disable the parameters and enter parameters in blank fields in Advanced settings.
4.
Click the Apply button to save the settings.
5.
To cancel the settings, click the Reset button. It will revert to previously saved values.

