


11148001
Operating Instructions
Valid from:
23.09.2020
EPIC
®
CRIMPING TOOL DIGITAL
Document: L11148001EN
Page 5 of 10
We reserve all rights according to DIN ISO 16016.
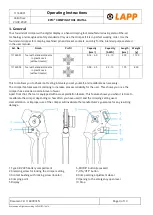
3. Crimping procedure
•
Feed the prepared cable into the connector
•
Lay the contact with the cable into the crimper's crimping point until it will not go any further; the
contact bushing will position the contact exactly.
•
Close the crimper until unlocking via the catch
•
Open the crimper and remove the crimped contact
Note:
Do not crimp the gauge or other similar objects as this may damage the crimper. Always avoid crimping solid
materials such as steel at hardness levels above 35 HRC.
4. Changing the contact bushing
•
Unscrew the central socket-head screw on the mounted contact bushing (3) using an SW 2.5 mm Allen
key, using another Allen key on the other side for countering as necessary.
•
Remove the contact bushing (3).
•
Fasten the optional contact bushing (3) by the same sequence in reverse.
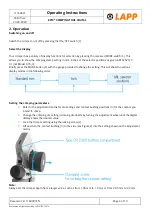
5. Changing the battery
A type 2025 battery for the digital display will last around a year depending on how often
you use the crimper. You
will need to change the battery after this period. Open the battery compartment upwards
in the direction of the arrow for easy battery removal and replacement.
Info:
Always set your crimper to the lower setting (reference setting) before you insert a new battery.
You will always need to recalibrate your crimper (CAL) after a battery change.
Always dispose of batteries at approved recycling collection points.
6. Work process safety
All crimping tools are subject to mechanical wear that will affect your crimper's lifespan differently depending
on load (cable gauge, materials…)
There is a certain amount of tolerance for this wear, and you can compensate for it by recalibrating your
crimper. Your crimper will reach its wear limit between ifty and two hundred thousand uses depending on
how heavily you use it.
The crimper display (5) will show you when to calibrate or recalibrate your crimper as follows:
•
After a battery change (CAL)
Recalibration is essential in order to restore the crimper to working order.
•
After your crimper has reached a certain number of crimps (REC)
If the crimper display (5) shows E1 after several recalibration attempts, then the dies in your crimper are worn to the
limit; you will need to have your crimper inspected.


