background image

11148001


Operating Instructions


Valid from: 

23.09.2020 

EPIC

®

 CRIMPING TOOL DIGITAL  


Document: L11148001EN 

Page 7 of 10 

We reserve all rights according to DIN ISO 16016.


10. E1 message after calibration or recalibration


If the crimper display shows an E1 message after several calibration or recalibration attempts (the message 
will be shown in sequence at irst, then permanently as E1), then the dies in your four-indent crimper are 
so worn that the wear can no longer be compensated for. Send your crimper to the manufacturer or an 
authorised repair shop for inspections. 

11. Monitoring wear – General 

Any tool is subject to a certain amount of wear, even if used properly. Press the MODE button (6) for ten 
seconds – range: 8 to 15s – for your crimper's current condition with numerical data on the crimper display (5). 
 
The following information will be shown in sequence: 


Serial number (eight digits in sequence) 


Remaining lifetime in percent (remaining service life) 


Reference value – lower setting as specified by the manufacturer 


Number of calibrations so far 

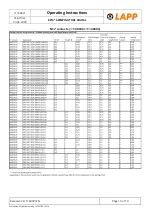
12. Troubleshooting and remedy 


Display 

Cause 

Solution 

„E1“ 

The crimper was not turned down to its lower 
(reference) setting using the adjustment wheel 
after changing the battery.


Repeat the procedure (See 9, 
Calibration after a battery change).


„E1“ 

The display shows E1 after correct 
recalibration–Your crimp dies have reached 
their limit of wear.


The crimper dies are worn out. Send 
in your 
crimper for inspections.


„E2“ 

Calibration or recalibration at a higher 
adjustment value than on initial factory 
calibration (too much play between the punch 
and gauge).


Repeat calibration or recalibration 
with the 
gauge supplied (see 8 or 9).


13. Servicing and maintenance 

Make sure that your hand crimper is in a clean and proper state before use. Remove any crimping residues from 
between the crimping jaws and contact bushing. Lubricate the joints regularly with machine lubricant, and protect 
them from soiling. Make sure that all of the pins are secured by retaining rings. 
Always have the crimper manufacturer or an authorised repair shop repair your four-indent crimper. 


Summary of Contents for EPIC 11148001 EPIC 11148004

Page 1: ...ent L11148001EN Page 1 of 10 We reserve all rights according to DIN ISO 16016 EPIC CRIMPING TOOL DIGITAL EPIC CRIMPING TOOL DIGITAL SMALL Operating Instructions for 11148001 11148004 Important notes f...

Page 2: ...mping procedure 5 4 Changing the contact bushing 5 5 Changing the battery 5 6 Work process safety 5 7 Testing calibration to 1 0 mm or 2 0 mm using the gauge 6 8 Recalibrating the crimper REC 6 9 Cali...

Page 3: ...ts in plastic case without locator 0 08 2 5 28 13 175 820 This tool allows you to check it at testing intervals you set yourself and recalibrate as necessary The crimper features wear monitoring to in...

Page 4: ...8 76 3 Briefly press the MODE button 6 with the gauge provided to change the setting This will show the various display modes in the following order Setting the crimping parameters Refer to the adjus...

Page 5: ...ften you use the crimper You will need to change the battery after this period Open the battery compartment upwards in the direction of the arrow for easy battery removal and replacement Info Always s...

Page 6: ...such as from 1 05 mm down to 1 0 mm or from 2 05 mm down to 2 0 mm gauge Keep the ON OFF switch 7 pressed and press the MODE button 6 using the gauge Keep the MODE button 6 pressed for at least ive s...

Page 7: ...fe Reference value lower setting as specified by the manufacturer Number of calibrations so far 12 Troubleshooting and remedy Display Cause Solution E1 The crimper was not turned down to its lower ref...

Page 8: ...1 1 mm female hyperboloid contact 74034500 74034501 0 14 26 0 80 0 34 24 0 90 0 50 22 1 10 0 75 20 1 15 1 00 18 1 15 LS 1 2 mm male contact 74034100 74034101 0 14 26 1 25 6 0 34 24 1 30 0 50 22 1 30...

Page 9: ...t No mm2 AWG Adjustment wheel Locator D Sub 1 mm male contact 44423357 0 25 24 1 00 3 0 34 22 1 05 0 50 21 1 10 0 75 20 1 15 1 00 18 1 20 D Sub 1 mm fremale contact 44423356 0 25 24 1 00 4 0 34 22 1 0...

Page 10: ...11148001 Operating Instructions Valid from 23 09 2020 EPIC CRIMPING TOOL DIGITAL Document L11148001EN Page 10 of 10 We reserve all rights according to DIN ISO 16016 M17 contacts 11148004 11148304...

Reviews: