15
MIST-LESS GUN
English
ROUTINE MAINTENANCE
R
To reduce the risk of serious injury, including fluid
injection or splashing the eyes or on the skin:
• Always follow the PRESSURE RELIEF PROCE-
DURE (
see page 8
) before checking, adjusting,
cleaning or repairing the gun or any part of the
system.
• After adjusting or servicing the gun, if fluid does
flow, the gun is not assembled properly or the
trigger lock is damaged, reassembled the gun
or return it to your nearest distributor. Do not
use the gun until the problem is corrected.
• When removing the gun from the hose, be sure to
hold the inlet fitting securely to avoid loosening
from the gun body.
INSPECTING THE VALVE FOR OBSTRUCTIONS OR DAMGE
PLEASE NOTE:
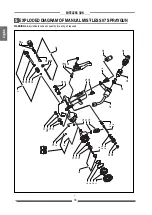
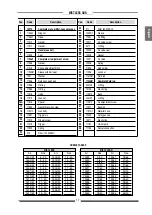
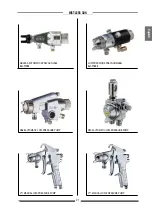
for details see the exploded diagram on page 16.
If fluid continues to flow after the trigger is released, the gun valve
may be obstructed or need adjustment. The valve stem (
34
) or
valve seat (
10
) may be worn or damaged. Adjust or replace parts
as instructed below. To reduce the risk of serious injury, do not
use the gun until the problem is corrected.
• Follow the Pressure Relief Procedure (
see page 8
) and
disconnect the gun from the hose.
• Disassemble the gun as instructed, then clean and inspect
the parts.
• Replace any worn or damaged parts and reassemble the
gun as instructed.
VALVE NEEDLE AND SEAL SERVICE
PLEASE NOTE:
for details see the exploded diagram on page 16
If fluid flows beyond the seal, the gaskets (
8
) or the rod (
34
) might
be damaged or worn.
To replace them, follow the procedure described below:
• Be sure to read the WARNING (
see page 6
).
• Follow the Pressure Relief Procedure (
see page 8
) and
disconnect the gun from the hose.
•
Loosen the spring adjustment fitting (9) and remove the spring
(
22
).
•
Unscrew the sleeve (
10
), clean or replace it if necessary.
• Remove the needle (
34
),clean it and, if necessary, replace
it.
• Remove the gasket pressing screw (
17
) and the gasket (
16a
).
Replace the gaskets.
• Fit the gasket pressing screw.
• Insert the needle (
34
).
• Screw the coupling sleeve (
10
) with the dedicated washer
(
11
) into the gun body (
18
).
The needle (34) and the coupling sleeve (10) must
be accurately fitted: during the last turn of the
screwing coupling sleeve (10) must compress the
needle (34) to provide the proper seal.
If thematerial will leak from the valne while ope-
rating the gun:
• proceed with the pressure release as discribed
at page 8
• Disassemble the coupling sleeve(10) and turn
the needle (34) anticlockwise. In this way the
spring (22) compression will be increased and
seal will be more accurate.


