
PTB-1-WHT
Larson Electronics, LLC
Phone: (800) 369-6671
Fax: (903) 498-3364
www.larsonelectronics.com
4
of
8
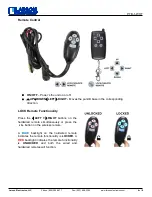
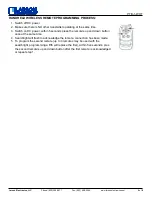
Remote Control
•
ON/OFF
– Power’s the unit on or off.
•
UP
DOWN
LEFT
RIGHT
-
Moves the pan/tilt base in the corresponding
direction.
LOCK Remote Functionality
Press the
LEFT
+
RIGHT
buttons on the
hardwired remote simultaneously or press the
/
button on the wireless remote.
A
BLUE
backlight on the hardwired remote
indicates the remote functionality is
LOCKED
. A
RED
backlight indicates the remote functionality
is
UNLOCKED
and both the wired and
hardwired remotes will function.


