background image

18

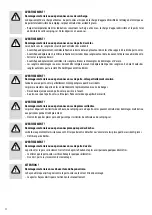
WARNING! 

WARNING! 

WARNING! 

WARNING! 

WARNING! 

WARNING! 

ATTENTION! 

Personal injury or material damage due to overloading. 

Personal injury or material damage due to loss of the bicycles.

Personal injury or material damage due to improperly locked bicycle carrier. 

Personal injury or material damage due to projecting parts. 

Personal injury or material damage due to tarpaulins. 

Personal injury or material damage due to loss of the bicycles. 

Material damage due to opening vehicle tailgate. 

Exceeding the max. carrying capacity of the bicycle carrier or the permissible bearing load of the trailer coupling or the  

permissible overall caravan weight can lead to serious accidents.

Carrying bicycles without using the safety straps can lead to accidents.

Driving with an extended bicycle carrier can lead to accidents. 

The moving parts of bicycle carrier constitute a source of danger if not properly fitted. 

Parts projecting beyond the edge of the vehicle, caravan or bicycle carrier can cause personal injury or material damage when 

driving. 

Tarpaulins increase the air resistance. They can become loose and fly about leading to serious accidents. 

After the attachment, the carrier first settles properly into the A-frame after driving several kilometres. 

The vehicle tailgate could impact against the bicycle carrier or bicycle and be damaged. 

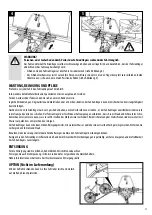
•  Observe the information on the max. carrying capacity, permissible bearing load and permissible overall weight of your  

vehicle. Never exceed these specifications.

•  Before the start of every journey, check the correct and firm attachment of the strap around the bikes and the frame holder 

bracket of the carrier.

•  Before the start of every journey, check the correct and firm attachment of both straps around the front wheel, and the strap 

around the rear wheel of the bicycle.

•  Tighten the straps if necessary.

•  Before the start of every journey, check that the straps are not worn or damaged.

•  Worn or damaged straps must be replaced with undamaged straps before the start of the journey. The straps used must be 

approved by EAL GmbH.

•  Never drive with an extended bicycle carrier.

•  Ensure that the bicycle carrier is always locked with both locking pins.

•  Fit only such parts which do not project beyond the edge of the vehicle, caravan or bicycle carrier.

•  Never use tarpaulins or covers.

•  Check the attachment of the carrier for secure attachment after driving several kilometres.

•  Redo the attachment if it is loose.

•  Switch off electric tailgates and operate them manually.

Summary of Contents for BC260

Page 1: ...Deichsel BC 260 gleitend Bedienungsanleitung 2 Article number 11844 Sliding aluminium caravan A frame bike carrier BC 260 Operatinginstructions 16 R f 11844 Porte v los coulissant en aluminium pour ti...

Page 2: ...ers nicht berschritten werden Zumbestimmungsgem enGebrauchgeh rtauchdieBeachtungallerInformationenindieserMontageanleitung insbesonderedieBeachtung der Sicherheitshinweise Jede andere Verwendung gilt...

Page 3: ...ie maximal zul ssige St tzlast IhresWohnwagens HinweisemitdemWortVORSICHT Warnenvoreinerm glicherweisedrohendenGefahr Wennsienichtgemiedenwird k nnen leichte oder geringf gige Verletzungen die Folge s...

Page 4: ...igen gefahrenen Kilometern erst richtig auf der Deichsel Die Heckklappe k nnte gegen den Fahrradtr ger oder das Fahrrad schlagen und besch digt werden Beachten Sie unbedingt die Angaben zur max Nutzla...

Page 5: ...5 LIEFERUMFANG...

Page 6: ...UNG Personen oder Sachschaden durch besch digten Fahrradtr ger Besch digungen desTr gers z B durch verbogeneTeile Risse oder Kratzer schlie en die sichere Funktion desTr gers aus Montieren Sie den Fah...

Page 7: ...t besch digen kann HaltenSieausreichendenAbstandzwischendemFahrzeugunddemFahrradtr gerein positionierenSiedenFahrradtr gerso weit wie m glich an dieVorderseite desWohnwagens Lassen Sie ausreichend Abs...

Page 8: ...m ssen die U Klammern von der Unterseite her um das Chassis gelegt werden Anschlie end wird mit dem Gegenblech den Scheiben M6 und den Muttern M6 derTr ger befestigt Das m ssen Sie mit den anderen 3 S...

Page 9: ...nnen sich w hrend der Fahrt l sen Pr fen Sie den Fahrradtr ger auf sichere Befestigung Ersetzen Sie besch digte bzw defekteTeile Entfernen Sie alle nicht fest mit dem Fahrrad verbundenen Teile wie z B...

Page 10: ...hrauben und Schienen f hren Schrauben Sie alle Fl gelschrauben an den Schienen vor Fahrtantritt handfest an 2 1 HINWEIS Die Rahmenhalter k nnen beliebig am Fahrrad platziert werden Nehmen Sie sich bei...

Page 11: ...der verschlissene Gurte m ssen vor Fahrtantritt gegen unbesch digte Gurte ausgetauscht werden Es d rfen nur Gurte verwendet werden die von der EAL GmbH daf r zugelassen sind 4 3 WARNUNG Personen oder...

Page 12: ...ger vollst ndig nach vorn geschoben ist wenn Sie die Klappe der Deichselbox ffnen ffnen Sie die Klappe der Deichselbox Vergewissern Sie sich dass sich nichts unter demTr ger befindet Achten Sie auf Ih...

Page 13: ...nd odereinemweichenTuchgereinigtwerden EntfernenSie vorher groben Schmutz und Staub Benutzen Sie keine L sungsmittel oder hnliche Reiniger da diese den Fahrradtr ger besch digen k nnen ReinigenSiedenF...

Page 14: ...14 EXPLOSIONSZEICHNUNG...

Page 15: ...raube 4 13 Befestigungsb gel 4 2x Links 2x Links 14 Sicherungspin 2 15 Abdeckung f r Mutter 8 M6 16 Selbstsichernde Mutter 8 M6 17 Kunststoff R ndelschraube 8 M6 18 Nutstein 8 M8 x 55 19 Schloss Schra...

Page 16: ...r must not be exceeded under any circumstances Proper use also includes the observation of all information provided in these fitting instructions and in particular the safety instructions Any other fo...

Page 17: ...r better understanding The bicycle carrier is suitable for the transport of two bicycles at most Please note that the maximum payload of your caravan may not exceed just as you may not exceed the maxi...

Page 18: ...he attachment the carrier first settles properly into the A frame after driving several kilometres The vehicle tailgate could impact against the bicycle carrier or bicycle and be damaged Observe the i...

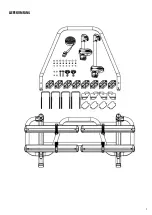
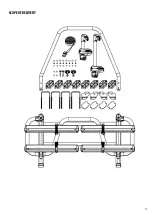
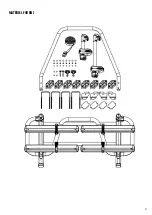
Page 19: ...19 SCOPE OF DELIVERY...

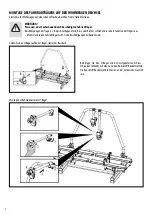
Page 20: ...WARNING Personal injury or material damage due to damaged bicycle carrier Damage of the carrier e g by bent parts cracks or scratches prevent the safe operation of the carrier Do not fit the bicycle...

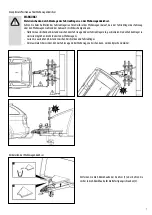
Page 21: ...e Keep a sufficient distance between the vehicle and the bicycle carrier place the bicycle carrier as far as possible towards the front of the caravan Keep a sufficient distance between the caravan st...

Page 22: ...eavailable seedrawingbelow Firstofall youmustplacetheU boltaroundtheframefromtheunderside Next securethebrackettolockthecarrierwiththewashers M6 and nuts M6 Do not completely secure the brackets so th...

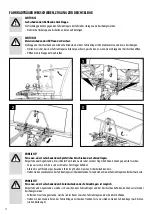
Page 23: ...ier Improperly tightened parts on the bicycles can become loose during the journey Check the bicycle carrier for secure attachment Replace damaged and or defective parts Remove all parts not firmly at...

Page 24: ...journey resulting in the loss of the nuts and rails Tighten all wing nuts on the rails hand tight before starting the journey 2 1 NOTE The frame holders are flexible to place on your bicycle Try the f...

Page 25: ...ged Wornordamagedstrapsmustbereplacedwithundamaged straps before the start of the journey The straps used must be approved by EAL GmbH 4 3 WARNING Personal injury or material damage due to loss of the...

Page 26: ...d operate them manually Always ensure that the bicycle carrier is completely pushed forward before you open the storage door Carefully open the storage door Makesurethatthereisnothingunderthecarrier K...

Page 27: ...t remove any coarse dirt and dust Do not use any solvents or similar cleaning agents since these can damage the bicycle carrier Clean the bicycle carrier regularly when used in coastal areas or in win...

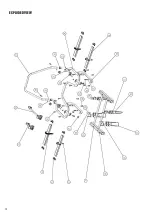
Page 28: ...28 EXPLODEDVIEW...

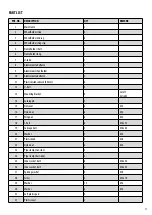
Page 29: ...distance block 30 mm 8 12 U bolt 4 13 Mounting bracket 4 2x left 2x right 14 Lockingpin 2 15 Nutcover 8 M6 16 Nylon nut 8 M6 17 Wingnut 8 M6 18 T bolt 8 M8 x 55 19 Carriage bolt 2 M8 x 60 20 Washer 2...

Page 30: ...respect de toutes les informations contenues dans ces instructions de montage en particulier le respect des consignes de s curit Toute autre utilisation est consid r e comme non conforme et peut entr...

Page 31: ...rt une meilleure compr hension Le porte v los est con u pour transporter jusqu deux v los Respectez le poids maximal admissible de votre camping car et la charge d appui maximale admissible de votre c...

Page 32: ...se d tacher ou s envoler et ainsi provoquer des accidents graves Le porte v los se pose correctement sur le timon apr s la fixation et apr s avoir parcouru quelques kilom tres Le hayon arri re pourrai...

Page 33: ...33 MAT RIEL FOURNI...

Page 34: ...comme indiqu ci dessous AVERTISSEMENT Dommages mat riels ou aux personnes en cas de porte v los endommag Les dommages sur le porte v los par ex cause de pi ces tordues des fissures ou des rayures emp...

Page 35: ...ilisation Gardez une distance suffisante entre le v hicule et le porte v los positionnez le porte v los aussi loin que possible l avant du camping car Gardez une distance suffisante entre la bo te de...

Page 36: ...attaches universelles autour du ch ssis depuis l arri re Fixez ensuite le porte v los l aide de la plaque oppos e des rondelles M6 et des crous M6 du porte v los L op ration doit tre r p t e avec les...

Page 37: ...her pendant le d placement Contr lez la fixation correcte du porte v los Remplacez les pi ces endommag es ou d fectueuses Retirez toutes les pi ces qui ne sont pas fix es au v lo telles que les pompes...

Page 38: ...provo quer la perte des vis et des rails Vissez manuellement toutes les vis oreilles dans les rails avant le d placement 2 1 REMARQUE Lessupportsdecadrepeuvent treplac sauchoixsurlev lo Lorsdupremierm...

Page 39: ...emplac es avant le d placement par des sangles en bon tat Seules des sangles autoris es par la soci t EAL GmbH peuvent tre utilis es 4 3 AVERTISSEMENT Dommages mat riels ou aux personnes en cas de per...

Page 40: ...hayons lectriques et actionnez les manuellement Assurez vous de glisser le porte v los compl tement vers l avant lorsque vous ouvrez le clapet de la bo te du timon Ouvrez le clapet de la bo te du timo...

Page 41: ...n doux Retirez auparavant le gros de la salet et de la poussi re N utilisez pas de solvants ou de produits similaires car ceux ci risquent d endommager le porte v los Dans les zones c ti res et en cas...

Page 42: ...42 VUE CLAT E...

Page 43: ...retoise en plastique 30 mm 8 12 Vis de liaison universelle 4 13 trier de fixation 4 2x gauche 2x droit 14 Goupille de s curit 2 15 Couvercle pour crou 8 M6 16 crou autobloquant 8 M6 17 Vis molet e en...

Page 44: ...44 EAL GmbH Otto Hausmann Ring 107 42115Wuppertal Deutschland Germany Allemagne 49 0 202 42 92 83 0 49 0 202 42 92 83 160 info eal vertrieb com www eal vertrieb com EAL GmbH 11844 10 2019...

Reviews: