PLMNL0252 REV. B Effective Date: 10/16/17
39
FiberCUT
®
HR Operation Manual
6. Lay a piece of clean lens tissue on the
surface of the optic. With an
eyedropper squeeze a few drops of
reagent grade acetone on the lens
tissue wetting the complete area of
the optic.
7. Without lifting the dampened lens
tissue, drag the tissue across the optic
just fast enough so the acetone
evaporates behind the tissue.
If it is done correctly there will be
no streaks left on the optic.
It may be necessary to repeat
steps 6 and 7 multiple times.
If steps 5 to 7 do not remove all
contamination, proceed to
to replace the focusing mirror.
5.10 Replacing the Focusing Mirror
Perform the instructions in this
section ONLY if there is a
problem with the mirror.
Before opening any part of the
head, clean off the dust and/or
process debris using an
exterior cleaning towel
(PLTLS0023) or equivalent.
If the head is not removed and
relocated to a clean area already, see
step 1.
If the head is removed and relocated
to a clean area, proceed to step 2.
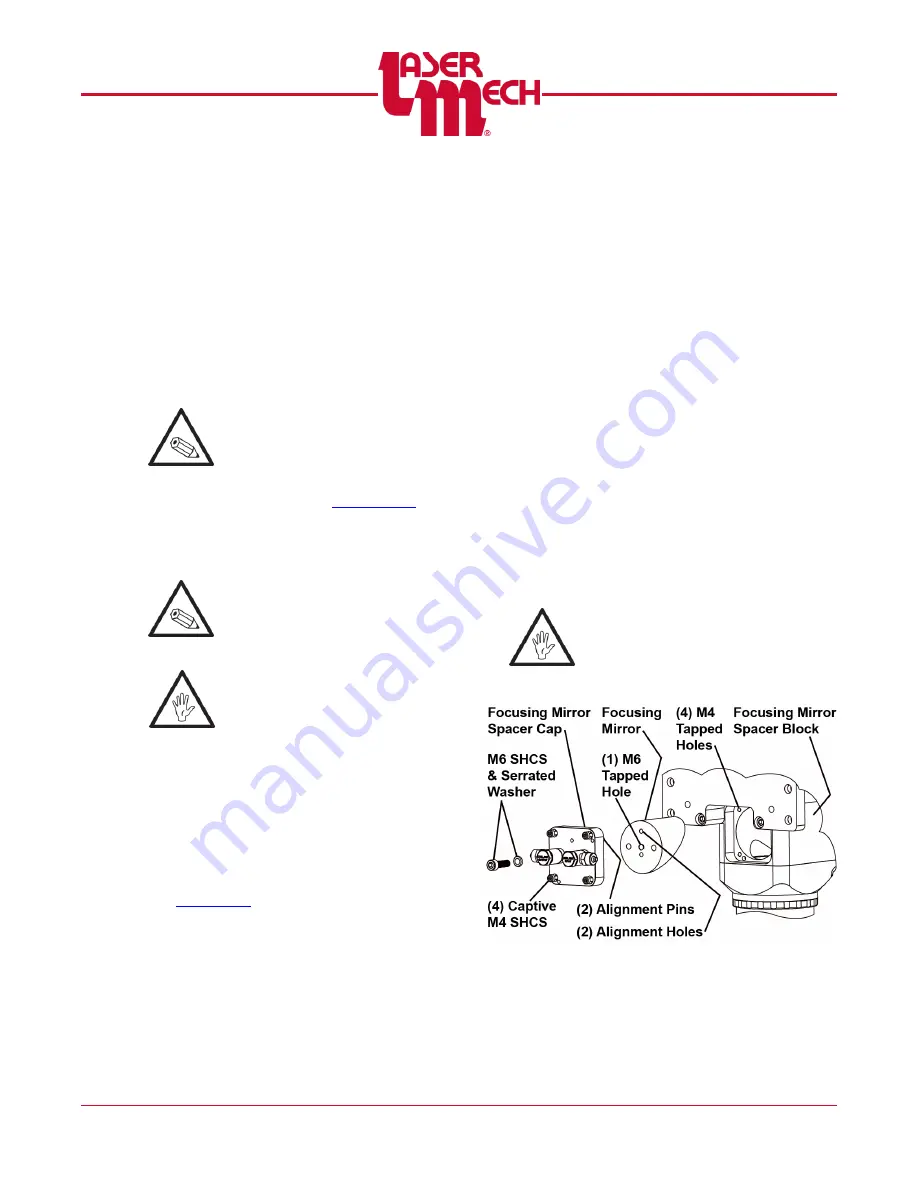
1. Remove the focusing mirror spacer
cap and focusing mirror according to
For steps 2 to 8, see
2. Remove the M6 SHCS and serrated
washer securing the focusing mirror
spacer cap to the focusing mirror.
3. Remove the focusing mirror, but keep
the M6 SHCS and serrated washer.
4. Align a new focusing mirror so:
The M6 threaded hole in the
center is in line with the M6 hole in
the focusing mirror spacer cap.
The (2) alignment holes are in line
properly with the (2) keyed
alignment pins in the focusing
mirror spacer cap.
5. Insert and tighten the M6 SHCS and
M6 serrated washer.
Hold the mirror against rotation
force applied by the M6 SHCS.
6. Align the focusing mirror spacer cap
and focusing mirror so the (4) captive
M4 SHCS are in line with the (4) M4
threaded holes in the focusing mirror
spacer block.
7.
CAREFULLY
insert the focusing
mirror spacer cap and focusing mirror
straight into the focusing mirror spacer
block.
Take care not to damage the sides of
the focusing mirror by contacting the
focusing mirror spacer block.
8. Tighten the (4) captive M4 SHCS.
Figure 60


