background image

BLU-BD1000              

USER MANUAL


41 


TROUBLESHOOTING 

TROUBLESHOOTING 

 
In order to prolong the service life of your player, it is recommended to wait at least 30 
seconds before you turn it on again after switching it off. 


Remove disc and turn power off after operation. 


Some functions of the player may not be applicable to certain discs. 


Some discs with special features may not be fully supported by the player.  This is 
not a malfunction of the unit. 


In case of player malfunction, please turn it off, wait for 30 seconds and turn it back 
on.  If the problem still exists, please follow the troubleshooting instructions or 
contact Laser Technical Support. 
 

Use this chart to resolve general operational problems. If there are any problems 
that you cannot resolve, please contact Laser technical Support


TROUBLESHOOTING 

Symptom


Possible Cause


Solution


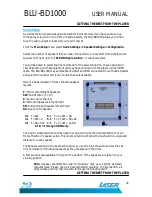
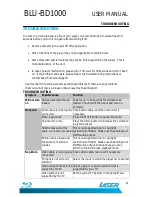
Will not turn 
on 

Blu-ray data is still being 
loaded 

Wait for up to 10 seconds for all data to be 
loaded. The unit will then boot and turn on  
correctly 

No sound


Audio cable is not properly 
connected


Check audio cable, and then reconnect if 
necessary.


Mute is activated


Press the MUTE button to cancel the mute.


Volume is too low


Press the VOL + button to increase the volume to 
a preferred level. 

SACD is played and the 
audio connection is coaxial 


This is not supported due to copyright 
restrictions of SACD.  Please use the analogue or 
HDMI audio output. 


DVD-Audio is played and 
the audio connection is 
coaxial. 


This is not supported due to copyright 
restrictions of SACD.  Please use the analogue or 
HDMI audio output. Alternatively, you may 
switch to the DVD-Video playback mode.


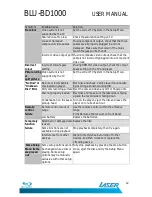
No picture


Video cable is not properly 
connected


Check video cable; reconnect if necessary.


TV input is not correctly 
selected


Select the input to which the player is connected.


Video output format is not 
support by the TV


Select a proper output resolution that is 
supported by your TV.


Video system is not 
supported by the TV


Set the correct TV System in the Setup Menu.


Summary of Contents for BLU-BD1000

Page 1: ...BLU BD1000 Blu ray Disc Player User Manual...

Page 2: ...not use this device in the open if there is a high level of moisture in the air Only place the device on a stable surface and ensure that cables attached to the device can not cause the device to fal...

Page 3: ...f Panasonic Corporation and Sony Corporation Designed for Windows Media Microsoft HDCD and the HDCD logo are trademarks or registered trademarks of Microsoft Corporation in the United States and or ot...

Page 4: ...scs 8 Cleaning Discs 9 WHATS IN THE BOX 9 KNOWING YOUR BLU BD1000 10 THE REMOTE CONTROL 10 Installing the Remote Control Batteries 12 CONNECTING THE PLAYER 13 CONNECTING VIDEO 13 GOOD Connecting By Co...

Page 5: ...MENU 23 AUDIO 23 SUBTITLE 23 Playback 24 Closed Caption 24 Angle Mark 24 Secondary Audio Mark 24 Security 24 DISPLAY SETTINGS 25 TV 26 TV SCREEN 26 Resolution 26 TV System 26 Colour Space 26 HDMI Deep...

Page 6: ...Current Chapter number 30 Playback time 30 Playback type 30 Audio track 30 Angle 30 Subtitle 30 Code Page 30 Subtitle Style 30 Second Video PIP 30 Second Audio 30 Audio Video Bitrate 30 Still Off 30...

Page 7: ...ersion and encoding It is possible that a Blu ray disc manufactured after the player was manufactured uses certain new features of the Blu ray Disc specifications To ensure the best possible viewing e...

Page 8: ...With cartridge DVDs with cartridge HD DVD Data files on CD Extra discs CD Audio with DRM Non finalised media BD Video discs recorded at a rate of 50 fields frames per second NOTE It may not be possibl...

Page 9: ...t thinner or benzene to clean this unit Before using chemically treated cloth carefully read the instructions that came with the cloth Please use a damp soft cloth Wring out any excess liquid and gent...

Page 10: ...t shapes Cleaning Discs DO Don t Wipe discs with a soft damp cloth and allow to dry before placing disc in the players tray Never use alcohol paint thinner or benzene to clean discs KNOWING YOUR BLU B...

Page 11: ...00 and the remote control Item Description Item Description 1 STANDBY On Off 6 STOP loaded disc during playback 2 Disc load tray 7 USB port 3 OPEN CLOSE tray button 8 COMPOSITE COMPONENT DIGITAL COAXI...

Page 12: ...VIEW BD1080 model only Press to view multiple videos picture in picture 10 MUTE Press to must volume 11 OSC Press to view On Screen Controls 12 BOOKMARK Press to add Book mark for a loaded disc 13 PRO...

Page 13: ...n 23 MENU Press to show the Main Menu for current disk 24 FORWARD REVERSE Press to fast forward fast rewind 25 STOP Press to stop current playback 26 PAUSE Press to Pause current playback 27 HDMI Pres...

Page 14: ...best suits your needs and equipment Image and sound quality will vary between connection types Please connect the Video Audio and Ethernet cable before connecting to a mains power outlet CONNECTING VI...

Page 15: ...as PbPrY 2 Select the AV Channel on the TV which corresponds to the video input E g COMPONENT 3 This will allow video from the player to show on the connected television Please see AUDIO CONNECTION fo...

Page 16: ...system to the input source used in step 1 3 This will allow audio from the player to play on the connected device NOTE The STEREO AUDIO OUT terminals will always provide a down mixed stereo signal fr...

Page 17: ...DMI input on the television NOTE If you have connected the BLU BD1000 to a Home Theatre System using the Coaxial Digital Audio cable you may need to also connect the RCA Stereo Connection to your TV T...

Page 18: ...tions regarding other connection methods In order to play multi channel audio for all formats the receiver must support HDMI v1 1 or later For Blu ray Disc a receiver that supports HDMI v1 3 with deco...

Page 19: ...rd disk with an external power supply This unit supports USB Mass Storage Class Bulk Only Transport devices only Most USB thumbs drives portable hard disk drives and card readers conform to this devic...

Page 20: ...Connect the power plug from the player to a mains power outlet and then turn the switch on 2 The red stand by power LED on the front panel of the player should now be off 3 Allow for up to 10 seconds...

Page 21: ...reen Language Option Press the Enter Button to continue 3 Use the UP DOWN Navigation buttons on the remote control to select the correct resolution for your Television or monitor you are using Please...

Page 22: ...ill revert to the previous resolution 5 If the message shown to the right is displayed it means that the current selected resolution is not compatible with the display Press the HDMI button on the rem...

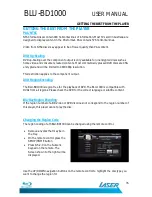
Page 23: ...the Setup Menu Use the ENTER button on the remote to confirm the selection Other Keys to be used are displayed on screen throughout the menu Note Some options in the Setup menu may not be available if...

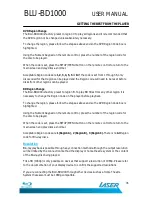
Page 24: ...Easy Setup Launches STARTUP WIZARD OSD On Screen Display ENGLISH The Menu Language for the BLU BD1000 is set at English only MENU ENGLISH SPANISH DUTCH SWEDISH KOREAN Select the language you wish the...

Page 25: ...ll not be displayed AUST Rating Player Rating OFF Turns the Parental control features OFF KID SAFE Only plays Discs classifieds as Kid Safe G Only plays Discs classifieds as G and lower PG Only plays...

Page 26: ...our Television or monitor Use the UP and Down navigation button on the remote control to select the sub setting to change Use the Right navigation button to access the option The Current set option is...

Page 27: ...e HDMI output uses YCbCr 4 2 2 colour space Generally this is the colour space that is closest to the colour space encoded on the discs All discs are encoded in YCbCr 4 2 0 colour space and the video...

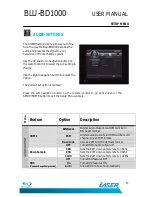
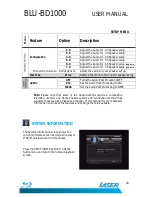
Page 28: ...n on the remote control to go back a level or the SETUP HOME button to exit the Setup Menu entirely Menu Feature Option Description Bitstream Digital Audio Output via HDMI will be in Bitstream format...

Page 29: ...to the current speaker setup OFF Turns the Audio Post Processing OFF UpMix PL2 Set the Audio Post Processing to PL2 NE06 Set the Audio Post Processing to NE06 Note Please note that some of the Audio S...

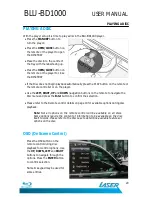
Page 30: ...RIGHT UP and DOWN navigation buttons on the remote to navigate the Disc menu and press the Enter button to confirm the selection Please refer to the Remote control details on page 10 for available opt...

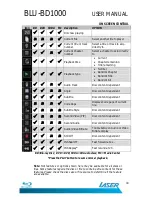
Page 31: ...pendant Code Page Displays Code page of current file Subtitle Style Disc content dependant Second Video PIP Disc content dependant Second Audio Disc content dependant Audio Video Bitrate Toggle betwee...

Page 32: ...buttons on the remote to select and view a saved bookmark and press the enter button to confirm the selection Programming a Disc DVD CD audio only 1 Follow the instructions for Playing a Disc 2 While...

Page 33: ...The left hand panel of the Media Center Screen shows the type of media in the tray or USB port 2 The right hand panel show the Type size and file system of the current selected item Use the UP Down na...

Page 34: ...f a folder can be added to a playlist Once the playlist has been created it can be used to playback files one after the other Files can be added by selecting the file to be added and pressing the Righ...

Page 35: ...r next file in the playlist The playlist can be edited by selecting the file to be removed and pressing the Right navigation button The file will be marked with a Press the POPUP TITLE button to displ...

Page 36: ...iction applies to the component output DVD Region Encoding The BLU BD1000 is region free for the playback of DVD The BLU 1000 is compatible with DVDs from all regions Please check the DVD for the corr...

Page 37: ...from any other region it is necessary to change the Region Code on the player before playback To change the region please follow the steps as above and so the DVD Region Code box is highlighted Using...

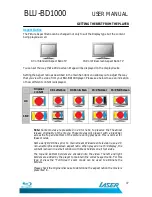
Page 38: ...al 16 9 Full Screen 4 3 16 9 Note Some movies are presented in 2 35 1 ratio to preserve the Theatrical release originality of the movie These movies will present with a black bar across the top and bo...

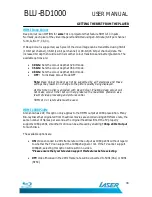
Page 39: ...ture quality being displayed At this time no disc is encoded with Deep Colour Enabling deep colour will not make colour richer but will help preserve the maximum precision as a result of video process...

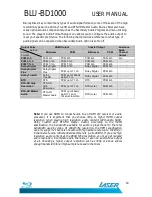
Page 40: ...le Here is a basic diagram of Home Theatre speaker layouts F Front Left and Right Speakers SW Sub Woofer 1 or 2 C Centre Voice channel S Surround Speakers left and right SR Surround Rear Speaker left...

Page 41: ...ueHD Dolby TrueHD PCM up to 192kHz 24 bit 7 1ch Dolby Digital PCM 2ch DTS DTS PCM up to 7 1ch DTS PCM 2ch DTS HD High Resolution DTS HD High Resolution PCM up to 7 1ch DTS core PCM 2ch DTS HD Master A...

Page 42: ...it for up to 10 seconds for all data to be loaded The unit will then boot and turn on correctly No sound Audio cable is not properly connected Check audio cable and then reconnect if necessary Mute is...

Page 43: ...lity by inserting a known working disc Disc Error Dirty disc recording surfaceEject the disc and clean any dirt or fingerprints Disc not properly loaded Eject disc and make sure the label side is faci...

Page 44: ...nections Analogue Audio Stereo LEFT RIGHT RCA Digital AUDIO Coaxial 75 OHM RCA HDMI Stereo Up to 7 1 Channel Analogue Video Composite Yellow RCA Component Y Pb Pr 480i 480p 720p 1080i for non restrict...

Page 45: ...er Product and the type of defect Step 2a Contact your place of purchase They will assess the nature of the fault and refund or replace the product as per their store refund or warranty policy Step 2b...

Reviews: