background image

90° 


SETTING UP


(CONTINUED)


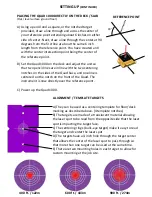
PLACING THE QUAD 1000 DIRECTLY ON THE DECK / SLAB 


(Flat / level surface ground floor) 


A)


Using a pencil and a square, or the notched target 
provided, draw a line through and across the center of 
your reference point extending about 6 inches on either 
side of center. Next, draw a line through the center at 90 
degrees from the first line at about the same 6 inch 
length from the reference point. You have created an X 
with the center intersection point being the center of 
the reference point.


B)


Set the Quad 1000 on the deck and adjust the unit so 
that two pencil lines are in line with the two centering 
notches on the sides of the Quad base, and one line is 
centered on the notch on the front of the Quad. The 
instrument is now directly over the reference point. 

 
C)


Power up the Quad 1000. 


ALIGNMENT / TEMPLATE TARGETS 


A) They can be used as a centering template for floor/deck 
marking as described above. (4 template notches) 
B) The targets are made of a translucent material allowing 
the laser spot to be read from the opposite side that the laser 
spot is impacting the target face. 
C) The centering rings (bulls-eye target) make it easy to read 
the target and center the laser spot 
D) The targets have a ¼ inch hole through the target center 
that allows the center of the laser spot to pass through so 
that more than one target can be used at the same time.  
E) There are two mounting holes in each target to allow for 
custom mounting at the job site. 


REFERENCE POINT 

 400 ft. / 122m 

 600 ft. / 183m 

 900 ft. / 274m 

Summary of Contents for QUAD 1000

Page 1: ...QUAD 1000 OWNERS MANUAL OPERATION GUIDE Built in Redmond Oregon USA www laserlinemfg com...

Page 2: ...mount and adjustable legs Made of heavy duty aluminum with a finished textured black E coating surface and a handle on each side for easy safe positioning 4001 0010 Target Template 2ea with ultra bri...

Page 3: ...ling status and battery power are displayed on the LCD screen The downward shooting smaller beam plumb bob is activated and will be blinking Once the Quad has self leveled to within its operating spec...

Page 4: ...has leveled E Once leveled slide the trivet until the plumb laser is directly over your point The instrument is now projecting a beam reference at Zenith USING A TRIPOD Standard flat head with 5 8x 11...

Page 5: ...base and one line is centered on the notch on the front of the Quad The instrument is now directly over the reference point C Power up the Quad 1000 ALIGNMENT TEMPLATE TARGETS A They can be used as a...

Page 6: ...d calibration check have it checked by your Dealer Service Department MAINTENANCE The Quad 1000 requires no maintenance other than periodically cleaning the laser output lens Use a soft cloth with Win...

Page 7: ...7mm Nominal 300 91m 375 9 52mm 500 152m 500 12 7mm 700 213m 687 17 46mm 900 274m 875 22 22mm 1 200 366m 1 15 29 3mm Environment Operating Temperature 0 to 122F 18 to 50c Storage Temperature 4 to 158...

Page 8: ...e enclosed instructions in this manual Warning Under no circumstances attempt to open or disassemble the Laser Housing Doing so may cause exposure to potentially hazardous levels of laser radiation Ca...

Reviews: