background image

Cubus / Cubus G

59

auto

auto

man

ES


BLOQUEO de transporte: el aparato cuenta con un freno  

especial del motor como protección para el transporte.

IP  66


Protección contra el polvo y el agua – Este aparato se caracteriza 

por una especial protección contra el polvo y la lluvia.

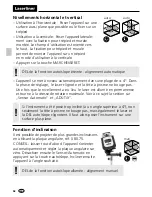
Nivelar en 
horizontal

Nivelar en 
vertical

Plano  
inclinado

Ángulo de 90° 

Función de 
referencia 90°

Retículas espaciales: 

muestran los planos láser y las funciones.

auto: alineación automática / man: alineación manual

CON

Influjo  
externo

Fase de ajuste  
Sensor Automatic

Activación de ADS: 
pulsar la tecla Tilt, 
el LED parpadea a 
ritmo de segundo.

Para  
mayor  
seguridad el láser se 
para y parpadea; el 
LED de inclinación 
se enciende con luz 
permanente.

ADS activo a los 
30 seg., parpadeo 
más rápido del 
LED.

Comienzo de 
la rotación

Operación de la ADS

El sistema ADS activa el control 30 seg. después de una nivelación 

completa del láser (fase de ajuste). Parpadeo del LED de Tilt a  

ritmo de segundo durante la fase de ajuste, parpadeo rápido si el  

ADS está activo.

!

Summary of Contents for Cubus

Page 1: ...Cubus Cubus G DE 02 EN 13 NL 24 DA 35 auto auto man IP 66 FR ES IT PL FI PT SV 46 57 NO TR RU UK CS ET LV LT RO BG EL Laser 515 nm Laser 635 nm...

Page 2: ...dungszweck innerhalb der Spezifikationen ein Die Messger te und das Zubeh r sind kein Kinderspielzeug Vor Kindern unzug nglich aufbewahren Umbauten oder Ver nderungen am Ger t sind nicht gestattet dab...

Page 3: ...schen Ger ten Lupe Mikroskop Fernglas Verwenden Sie den Laser nicht auf Augenh he 1 40 1 90 m Gut reflektierende spiegelnde oder gl nzende Fl chen sind w hrend des Betriebes von Lasereinrichtungen abz...

Page 4: ...atische Ausrichtung man Manuelle Ausrichtung DE Ein Fremd einwirkung Einrichtphase Sensor Automatic Aktivieren des ADS Tilt Taste dr cken blinken der Tilt LED im Sekundentakt Der Laser bleibt sicherhe...

Page 5: ...Ladeger t nur innerhalb geschlossener R ume verwenden weder Feuchtigkeit noch Regen aussetzen da ansonsten die Gefahr eines elektrischen Stromschlages besteht Vor Einsatz des Ger tes Akku voll auflad...

Page 6: ...Austritt Referenzlaser Prismenkopf Austritt Laserstrahl Empfangsfeld Infrarot Signal Bedienfeld 5 8 Gewinde Akkufach Anschlussbuchse f r Netz Ladeger t Netz Ladeger t Betriebsanzeige rot Akku wird gel...

Page 7: ...ion LED aus Automatische Ausrichtung LED an Manuelle Ausrichtung AN AUS Taste Betriebsanzeige LowBat LED blinkt LED Tilt Funktion Tilt Funktion Empfangsfeld Infrarot Signal Ausgang Infrarot Signal Bet...

Page 8: ...d ADS Tilt Horizontales und vertikales Nivellieren Horizontal Das Ger t auf einer m glichst ebenen Fl che aufstellen oder auf einem Stativ befestigen Vertikal Das Ger t mit montierter Stativ und Wandh...

Page 9: ...iert und eingestellt werden Das Segment wird mit den Positionierungs Tasten in die gew nschte Position gedreht Handempf nger Modus Arbeiten mit dem optionalen Laserempf nger Den Rotationslaser auf die...

Page 10: ...gungen 10 C 50 C Luftfeuchtigkeit max 80 rH nicht kondensierend Arbeitsh he max 4000 m ber NN Normalnull Lagerbedingungen 10 C 70 Luftfeuchtigkeit max 80 rH Schutzklasse IP 66 Abmessungen B x H x T 13...

Page 11: ...ehen Sie das Ger t um 180 und markieren Sie den Punkt A3 Die Differenz zwischen A2 u A3 ist die Toleranz f r die X Achse 5 3 und 4 f r die berpr fung der Y bzw Z Achse wiederholen Kalibrierungs berpr...

Page 12: ...t Justierung der Y und Z Achse Justiermodus aktivieren Den Cubus einschalten Die AN AUS Taste und die auto slope Taste gleichzeitig dr cken bis die LED auto slope schnell blinkt Mit der tilt Taste auf...

Page 13: ...accordance with its intended purpose and within the scope of the specifications The measuring tools and accessories are not toys Keep out of reach of children Modifications or changes to the device a...

Page 14: ...device has been set up press the tilt button to activate the ADS enabling you to protect the laser from changes in position caused by the device being disturbed by external factors The tilt LED flash...

Page 15: ...he monitoring function until 30 seconds after the laser levelling procedure has been completed set up phase The tilt LED flashes every second during the set up phase rapid flashing when ADS is active...

Page 16: ...hen the laser is not connected to the power pack charger The battery can also be charged while using the device The status indicator 4 flashes when the battery charge is low Insert batteries into the...

Page 17: ...ence laser outlet Prism head laser beam outlet Infrared signal receptor Control panel 5 8 thread Battery compartment Connection socket for power pack charger Power pack charger Operation indicator red...

Page 18: ...LED LED off automatic alignment LED on manual alignment ON OFF button Operation indicator LowBat LED flashes Tilt function LED Tilt function Infrared signal receptor Infrared signal emitter Operation...

Page 19: ...bout Sensor Automatic and ADS Tilt Horizontal levelling and vertical levelling Horizontal Position the device on a level surface or on a tripod Vertical Place the device on its side with the stand and...

Page 20: ...ifferent widths You position the segment via the direction buttons Hand receiver mode Working with the laser receiver available as an optional extra Set the rotary laser to maximum speed and switch on...

Page 21: ...ox 3 h Operating conditions 10 C 50 max humidity 80 rH no condensation max working altitude 4000 m above sea level Storage conditions 10 C 70 max humidity 80 rH Protection class IP 66 Dimensions W x H...

Page 22: ...d mark point A3 The difference between points A2 and A3 is the tolerance for the X axis 5 To check the Y and Z axis repeat steps 3 and 4 Preparing the calibration check It is possible for you to check...

Page 23: ...Adjust the Y and Z axes Activate adjustment mode Switch on the Cubus Simultaneously press the ON OFF button and the auto slope button until the LED auto slope flashes rapidly Switch to the Y axis usi...

Page 24: ...n de aangegeven specificaties De meetapparaten en het toebehoren zijn geen kinderspeelgoed Buiten het bereik van kinderen bewaren Ombouwwerkzaamheden of veranderingen aan het apparaat zijn niet toege...

Page 25: ...en tegen positiewijzigingen door externe inwerking moet het ADS door het indrukken van de tilt toets ingeschakeld worden De ADS functie wordt weergegeven door een knipperende tilt LED zie afbeelding b...

Page 26: ...to automatische uitlijning man handmatige uitlijning NL Aan Externe inwerking Inrichtfase Sensor Automatic Activeren van het ADS druk op de tilt toets de tilt LED knippert iedere seconde De laser blij...

Page 27: ...leen in gesloten ruimten gebruikt en niet aan vocht of regen blootge steld worden omdat anders gevaar voor elektrische schokken bestaat Laad de accu v r het gebruik van het apparaat compleet op Netada...

Page 28: ...rentielaser Prismakop uitlaat laserstraal Ontvangstveld infraroodsignaal Bedieningsveld 5 8 schroefdraad Accuvak Aansluitbus voor netadapter laadtoestel Netadapter laadtoestel Bedrijfsindicator rood a...

Page 29: ...unctie LED uit automatische uitlijning LED aan handmatige uitlijning AAN UIT toets Bedrijfsindicator LowBat led knippert LED tilt functie Tilt functie Ontvangstveld infraroodsignaal Uitlaat infraroods...

Page 30: ...Horizontaal nivelleren en verticaal nivelleren Horizontaal plaats het apparaat op een zo vlak mogelijke ondergrond of bevestig het op een statief Verticaal Plaats het apparaat met de gemonteerde stat...

Page 31: ...llende breedten activeren en instellen Positioneer het segment met behulp van de richtingtoetsen Handontvanger Modus Werken met de optionele laserontvanger Stel de rotatielaser in op het maximale toer...

Page 32: ...d max 80 rH niet condenserend werkhoogte max 4000 m boven NAP Nieuw Amsterdams Peil Opslagvoorwaarden 10 C 70 luchtvochtigheid max 80 rH Veiligheidsklasse IP 66 Afmetingen B x H x D 130 x 160 x 145 mm...

Page 33: ...rkeer punt A3 Het verschil tussen A2 en A3 moet binnen de tolerantie van de nauwkeurigheid zitten 5 Herhaal punt 3 en 4 voor de Y en Z as voor volledige controle Kalibratie controle voorbereiden U kan...

Page 34: ...eren de Cubus inschakelen Druk tegelijkertijd op de AAN UIT toets en de auto slope toets totdat de LED auto slope snel knippert Schakel met de tilt toets om naar de Y as Afstelling stuur de laser met...

Page 35: ...n bruges til det tilt nkte anvendelsesform l inden for de givne specifikationer M leapparaterne og tilbeh ret er ikke leget j Skal opbevares utilg ngeligt for b rn Ombygning eller ndring af apparatet...

Page 36: ...ndes For at beskytte det indjusterede apparat mod positions ndringer pga ydre p virknin ger skal ADS aktiveres ved at trykke p Tilt tasten ADS funktionen indikeres ved at Tilt LED en blinker se neden...

Page 37: ...onerne auto automatisk indstilling man manuel indstilling Ind Ydre p virkning Indstillingsfase Sensor Automatic Aktivering af ADS Tryk p Tilt tasten Tilt LED en blinker i sekundtakt Laseren stopper af...

Page 38: ...etadapteren opladeren blinker LED en for lysnetadapteren opladeren I Det genopladelige batteri kan ogs oplades under drift N r batteriladningen er svag blinker driftsindikatoren 4 Inds ttelse af batte...

Page 39: ...ering Udgang referencelaser Prismehoved udgang laserstr le Modtagelsesfelt infrar dt signal Betjeningspanel 5 8 gevind Batterirum Tilslutningsstik til lysnetadapter oplader Lysnetoplader Driftsindikat...

Page 40: ...slukket Automatisk indjustering LED lyser Manuel indjustering TIL FRA knap Driftsindikator LowBat LED blinker LED tilt funktion Tilt funktion Modtagelsesfelt infrar dt signal Udgang infrar dt signal D...

Page 41: ...Sensor automatik og ADS Tilt Horisontal og vertikal nivellering Vandret Plac r Titanium p en vandret flade eller s t den p et stativ Lodret Apparatet med p monteret stativ og v gholder opstilles ved...

Page 42: ...forskellige bredder Viften styres hen til den nskede m leposition med retningstasterne H ndmodtager modus Arbejde med lasermodtageren ekstraudstyr Indstil rotationslaseren til den maksimale omdrejnin...

Page 43: ...akku ca 3 timer Arbejdsbetingelser 10 C 50 Luftfugtighed maks 80 rH Ikke kondenserende Arbejdsh jde maks 4000 m o h Opbevaringsbetingelser 10 C 70 Luftfugtighed maks 80 rH Beskyttelsesklasse IP 66 M l...

Page 44: ...llen mellem A2 og A3 er tolerancen for X aksen 5 Gentag pkt 3 og 4 til kontrol af Y eller Z aksen Forberedelse til kontrol af retvisning Man kan kontrollere kalibreringen af laseren Opstil apparatet m...

Page 45: ...ustering af Y og Z aksen Aktivering af Juster modus T nd for Cubus Tryk samtidigt p TIL FRA knappen og auto slope knappen til LED en auto slope blinker hurtigt Skift til Y aksen med tilt knappen Juste...

Page 46: ...e cadre des sp cifications Les appareils et les accessoires ne sont pas des jouets Les ranger hors de port e des enfants Les transformations ou modifications de l appareil ne sont pas autoris es et an...

Page 47: ...ts de position li s des interactions ext rieu res l ADS doit tre activ en appuyant sur la touche tilt Le clignotement de la DEL tilt signale l activation de la fonction ADS voir la repr sentation grap...

Page 48: ...t manuel FR Mise en marche Interaction ext rieure Phase de r glage Sensor Automatic Activation du syst me ADS appuyer sur la touche tilt les DEL tilt clignotent toutes les secondes Le laser ne bouge p...

Page 49: ...rique chargeur I clignote si l appareil n est pas connect au bloc d alimentation lectrique chargeur Il est galement possible de charger l accu pendant le fonctionnement La DEL d affichage du fonctionn...

Page 50: ...on laser Champ de r ception du signal infrarouge Champ de commande Filetage de 5 8 Compartiment accu Douille de raccordement pour le bloc d alimentation lectrique chargeur Bloc d alimentation lectriqu...

Page 51: ...DEL allum e alignement manuel Touche MARCHE ARRET DEL de fonctionnement Accu faible la DEL clignote DEL de la fonction tilt Fonction tilt Champ de r ception du signal infrarouge Sortie du signal infr...

Page 52: ...ertical Utilisation l horizontale Poser l appareil sur une surface aussi plane que possible ou le fixer sur un tr pied Utilisation la verticale Poser l appareil lat rale ment avec la fixation pour tr...

Page 53: ...tense en quatre largeurs diff rentes Positionner le segmet avec les touches de direction Mode r cepteur manuel Pour travailler en mode r cepteur manuel disponible en option R gler le laser rotatif la...

Page 54: ...non condensante altitude de travail max de 4000 m au dessus du niveau moyen de la mer Conditions de stockage 10 C 70 humidit relative de l air max 80 rH Cat gorie de protection IP 66 Dimensions l x h...

Page 55: ...entre les points A2 et A3 est la tol rance de l axe des X 5 R p tez les instructions des points 3 et 4 pour le contr le de l axe des Y et de l axe des Z Pr liminaires au contr le du calibrage Vous pou...

Page 56: ...Activation du mode de r glage allumer le Cubus Appuyer simultan ment sur la touche MARCHE ARR T et sur la touche auto slope jusqu ce que la DEL auto slope clignote rapidement Passez l axe Y au moyen...

Page 57: ...el aparato nicamente para los usos previstos dentro de las especificaciones Los instrumentos de medici n y los accesorios no son juguetes infantiles Mant ngalos fuera del alcance de los ni os No est p...

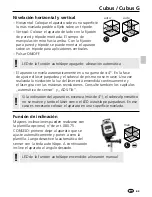
Page 58: ...rato ajustado contra cambios de posici n debidos a influjos externos debe activarse el ADS pulsando la tecla de inclinaci n La activaci n de la funci n ADS se indica mediante el parpadeo del LED de Ti...

Page 59: ...l ser y las funciones auto alineaci n autom tica man alineaci n manual CON Influjo externo Fase de ajuste Sensor Automatic Activaci n de ADS pulsar la tecla Tilt el LED parpadea a ritmo de segundo Pa...

Page 60: ...or de red cargador el LED del cargador I est intermitente Tambi n se puede cargar la bater a durante el funcionamiento Cuando la carga de la bater a es d bil parpadea el indicador de servicio 4 Coloca...

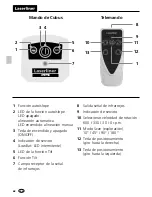
Page 61: ...ezal de prisma salida rayo l ser Campo receptor de la se al de infrarrojos Mandos Rosca de 5 8 Compartimento para pilas Entrada para el alimentador de red cargador Alimentador de red y cargador Indica...

Page 62: ...ci n manua Tecla de encendido y apagado ON OFF Indicaci n de servicio LowBat LED intermitente LED de la funci n Tilt Funci n Tilt Campo receptor de la se al de infrarrojos Salida se al de infrarrojos...

Page 63: ...autom tica de sensor y ADS Tilt Nivelaci n horizontal y vertical Horizontal Coloque el aparato sobre una superficie lo m s nivelada posible o f jelo sobre un tr pode Vertical Colocar el aparato de lad...

Page 64: ...nsa en 4 anchuras diferentes El segmento se posiciona con las teclas de direcci n Modo de receptor manual Trabajar con el receptor opcional l ser ajusar el l ser de rotaci n a la velocidad m xima y en...

Page 65: ...humedad del aire m x 80 rH no condensante altitud de trabajo m x 4000 m sobre el nivel del mar nivel normal cero Condiciones de almac n 10 C 70 humedad del aire m x 80 rH Clase de protecci n IP 66 Di...

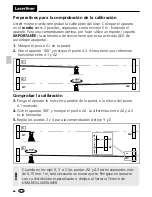
Page 66: ...rque el punto A3 La diferencia entre A2 y A3 es la tolerancia 5 Repita los puntos 3 y 4 para la comprobaci n del eje Y y Z Preparativos para la comprobaci n de la calibraci n Usted mismo puede comprob...

Page 67: ...la Scan Ajuste de los ejes Y y Z Activar el modo de ajuste encender el Cubus Pulsar simult neamente los botones ON OFF y auto slope hasta que el LED de auto slope parpadee con rapidez Cambiar al eje Y...

Page 68: ...GmbH Co KG Laserliner M hnestra e 149 59755 Arnsberg Germany Tel 49 2932 638 300 Fax 49 2932 638 333 info laserliner com Umarex GmbH Co KG Donnerfeld 2 59757 Arnsberg Germany Tel 49 2932 638 300 Fax...

Reviews: