HandyLaser
03
1
2
3
4 5
1
6
6
7
9
10
8
2
3
DE
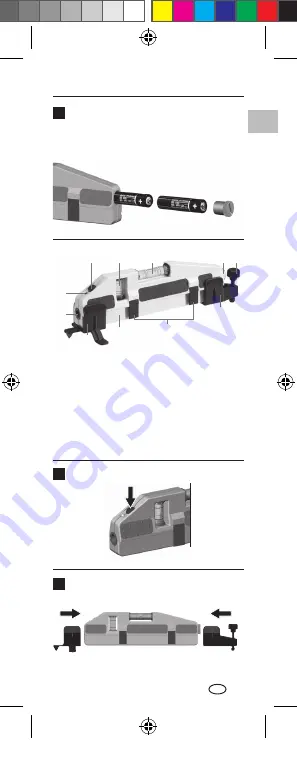
Batterien einlegen
Das Batteriefach öffnen und Batterien gemäß
den Installations symbolen einlegen. Dabei auf
korrekte Polarität achten.
1
AN- / AUS-Schalter
2
Vertikallibelle
3
Horizontallibelle
4
Batteriefach
5
Justierfuß-
verstellung
6
Justierfuß
7
Feder-
Klemmhalterung
8
Magnete (Unterseite)
9
Laseraustritt
10
LED-Laserindikator
ON/OFF
Justierfüße aufstecken
Manual_HandyLaser_Rev0115.indd 3
23.01.15 08:33
Summary of Contents for HandyLaser
Page 54: ...54 0 5 3 P 50 2 1 650 EN 60825 1 2007 10 RU 2 nual_HandyLaser_Rev0115 indd 54 23 01 15 08 3...
Page 57: ...HandyLaser 57 www laserliner com info RU nual_HandyLaser_Rev0115 indd 57 23 01 15 08 3...
Page 58: ...58 0 5 3 P 50 2 1 650 EN 60825 1 2007 10 UA 2 nual_HandyLaser_Rev0115 indd 58 23 01 15 08 3...
Page 61: ...HandyLaser 61 www laserliner com info UA nual_HandyLaser_Rev0115 indd 61 23 01 15 08 3...
Page 85: ...HandyLaser 85 www laserliner com info BG nual_HandyLaser_Rev0115 indd 85 23 01 15 08 3...
Page 89: ...HandyLaser 89 www laserliner com info GR nual_HandyLaser_Rev0115 indd 89 23 01 15 08 3...
Page 98: ...98 nual_HandyLaser_Rev0115 indd 98 23 01 15 08 3...
Page 99: ...HandyLaser 99 nual_HandyLaser_Rev0115 indd 99 23 01 15 08 3...


