HandyLaser
39
1
2
3
4 5
1
6
6
7
9
10
8
2
3
PT
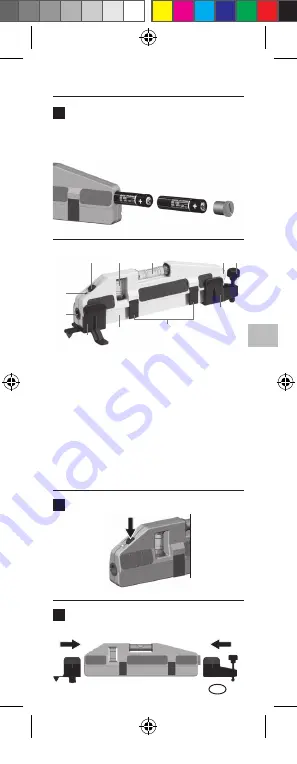
Colocar as pilhas
Abra o compartimento de pilhas e insira as
pilhas de acordo com os símbolos de instalação.
Observe a polaridade correcta.
1
Botão para ligar /
desligar
2
Nível de bolha vertical
3
Nível de bolha
horizontal
4
Compartimento
de pilhas
5
Regulação do pé
de ajuste
6
Pé de ajuste
7
Suporte de aperto
elástico
8
Magnetes
(parte inferior)
9
Janela de saída
do laser
10
Indicador laser LED
ON/OFF
Encaixar os pés de ajuste
Manual_HandyLaser_Rev0115.indd 39
23.01.15 08:33
Summary of Contents for HandyLaser
Page 54: ...54 0 5 3 P 50 2 1 650 EN 60825 1 2007 10 RU 2 nual_HandyLaser_Rev0115 indd 54 23 01 15 08 3...
Page 57: ...HandyLaser 57 www laserliner com info RU nual_HandyLaser_Rev0115 indd 57 23 01 15 08 3...
Page 58: ...58 0 5 3 P 50 2 1 650 EN 60825 1 2007 10 UA 2 nual_HandyLaser_Rev0115 indd 58 23 01 15 08 3...
Page 61: ...HandyLaser 61 www laserliner com info UA nual_HandyLaser_Rev0115 indd 61 23 01 15 08 3...
Page 85: ...HandyLaser 85 www laserliner com info BG nual_HandyLaser_Rev0115 indd 85 23 01 15 08 3...
Page 89: ...HandyLaser 89 www laserliner com info GR nual_HandyLaser_Rev0115 indd 89 23 01 15 08 3...
Page 98: ...98 nual_HandyLaser_Rev0115 indd 98 23 01 15 08 3...
Page 99: ...HandyLaser 99 nual_HandyLaser_Rev0115 indd 99 23 01 15 08 3...


