background image

15

Pow erCross-Laser 8 S

A

B

E

D

F

G
H

1

C

GB

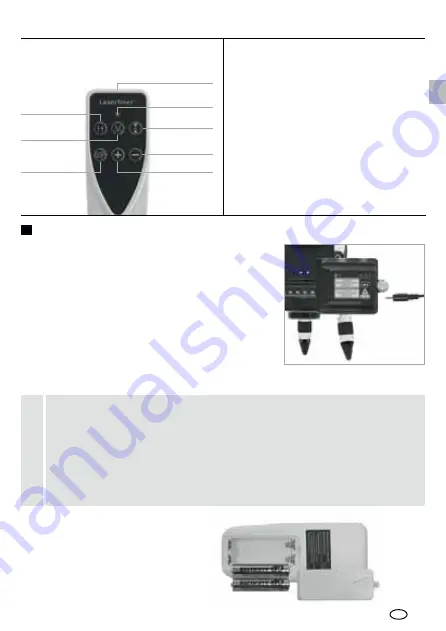
Horizontal laser lines

Vertical laser lines

auto/man function /  

 Incline 

X/Y 

axes

D

  Infrared signal emitter

LED status indicator

Hand receiver mode

Move X/Y axes

H  

Move X/Y axes

Before using the laser for the first time, insert  
the battery in the device and fully charge (at  
least 6 hours). Connect the battery charger to 
charge the battery. The LED of the battery pack 
lights red while the battery is charging. When 
the LED changes to green, charging is complete. 
When the laser lines blink slowly, the battery  
is low. In that case, recharge the battery. The 
rechargeable battery can either be charged  
when it is not inserted in the device or when  
the device is in use.

Insert batteries into  
the remote control


– Observing the correct polarity.

  Use of lithium-ion rechargeable battery

Remote control

–  The battery may only be charged with the battery charger provided 

and used only in this laser device. Any other use may cause injury  
or fire.

–  M ake sure there are no conductive objects in the vicinity of the  

battery contacts. Short-circuiting of these contacts can cause burn  
injuries or fire.

– Do not open the rechargeable battery. This could cause short-circuits.

!

Summary of Contents for PowerCross-Laser 8 S

Page 1: ...Pow erCross Laser 8 S NO TR RU UA CZ EE LV LT RO BG GR DE 02 GB 12 NL 22 DK 32 FR ES IT PL 42 52 62 72 4H 4V 1D S Laser 635 650 nm FI PT SE...

Page 2: ...beiliegende Heft Garantie und Zusatzhinweise Befolgen Sie die darin ent haltenen Anweisungen Diese Unterlage ist aufzubewahren und bei Weitergabe der Lasereinrichtung mitzugeben DE Allgemeine Sicherh...

Page 3: ...ntale bzw vertikale Nivellieren erleich tert z B um den Laser mit einem Kurbelstativ oder einer Wandhalterung auf eine gew nschte H he einzustellen Zudem kann auf vibrierenden Untergr nden und bei Win...

Page 4: ...nterseite 6 Austritt Lotlaser Unterseite 7 Justierf e mit abnehmbaren Gummikappen 8 Adapter nur f r Kurbel und Teleskopstative 9 Vertikale Laserlinien 10 LED Handempf ngermodus 11 Handempf ngermodus 1...

Page 5: ...euchtet Sobald die Laserlinien langsam blinken ist die Batterieladung schwach Dann den Akku erneut aufladen Der Akku kann auch au erhalb des Ger tes oder w hrend des Betriebes geladen werden Einlegen...

Page 6: ...les und vertikales Nivellieren Das Laserger t anschalten Jetzt ist die Sensor Automatik aktiv und nivelliert das Laserger t automatisch aus Sobald die Nivellierung abgeschlossen ist und die auto LED k...

Page 7: ...rz dr cken werden die Achsen umgeschaltet Siehe nachfolgende Abbildungen Horizontale Neigung einstellen bis max 3 X Y Achse Bei der Neigungsfunktion sind die Laserlinien nicht mehr horizontal bzw vert...

Page 8: ...k nnen mit der optionalen Winkelplatte Art Nr 080 75 angelegt werden Dazu ein Kurbelstativ verwenden z B Profikurbel Stativ 300 cm Art Nr 080 34 Siehe nachfolgende Abbildungen TIPP Zuerst die Winkelpl...

Page 9: ...er Laserempf nger erkennt durch dieses Pulsieren die Laserlinien Der Handempf ngermodus kann sowohl beim horizontalen bzw vertikalen Nivellieren als auch bei den Neigungsfunktionen verwendet werden Be...

Page 10: ...r entfernt sind Schalten Sie das Ger t ein LASERKREUZ AN Zur optimalen berpr fung bitte ein Stativ verwenden 1 Markieren Sie Punkt A1 auf der Wand 2 Drehen Sie das Ger t um 180 u markieren Sie Punkt A...

Page 11: ...it einer 2 5 m langen Schnur befestigen das Lot sollte dabei frei pendeln Ger t einschalten und den vertikalen Laser auf die Lotschnur richten Die Genauigkeit liegt innerhalb der Toleranz wenn die Abw...

Page 12: ...onal notices completely Follow the instructions they contain This document must be kept in a safe place and if the laser device is passed on this document must be passed on with it General safety inst...

Page 13: ...tor brake during transport Laser diodes of the highest performance class produce extremely bright laser lines They remain visible even on surfaces at great distances or on dark surfaces as well as und...

Page 14: ...ad underside 6 Window for plumb laser underside 7 Adjustable feet with removable rubber caps 8 Adapter for crank tripods and teleskopic stands 9 Vertical laser lines 10 LED Hand receiver mode 11 Hand...

Page 15: ...is complete When the laser lines blink slowly the battery is low In that case recharge the battery The rechargeable battery can either be charged when it is not inserted in the device or when the dev...

Page 16: ...vertical levelling Switch the laser device on The automatic sensor is now active and will level the laser device automatically As soon as device levelling is completed and the auto LED illuminates con...

Page 17: ...switch between axes Refer to the illustrations below Horizontal levelling adjustment up to a max of 3 X Y axis For the slope function laser lines are no longer aligned to the horizontal or vertical p...

Page 18: ...hich is available as an optional extra product ref 080 75 To this end you need to use a crank tripod such as the 300 cm professional crank tripod product ref 080 34 Refer to the illustrations below TI...

Page 19: ...lines darker The laser receiver RX can detect these pulsating laser lines Hand receiver mode can be used for horizontal or vertical levelling as well as for slope functions Follow the operating instr...

Page 20: ...between 2 walls which must be at least 5 metres apart Switch the device on LASER CROSS ON The best calibration results are achieved if the device is mounted on a tripod 1 Mark point A1 on the wall 2 T...

Page 21: ...about 5 m from a wall Fix a plumb bob with a line of 2 5 m length on the wall making sure that the bob can swing freely Switch on the device and align the vertical laser to the plumb line The precisio...

Page 22: ...Co KG Laserliner M hnestra e 149 59755 Arnsberg Germany Tel 49 2932 638 300 Fax 49 2932 638 333 laserliner umarex de Umarex GmbH Co KG Donnerfeld 2 59757 Arnsberg Germany Tel 49 2932 638 300 Fax 333...

Reviews: