12
B
C
2,5 m
<
2 mm = OK
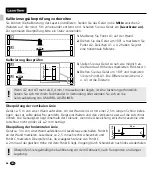
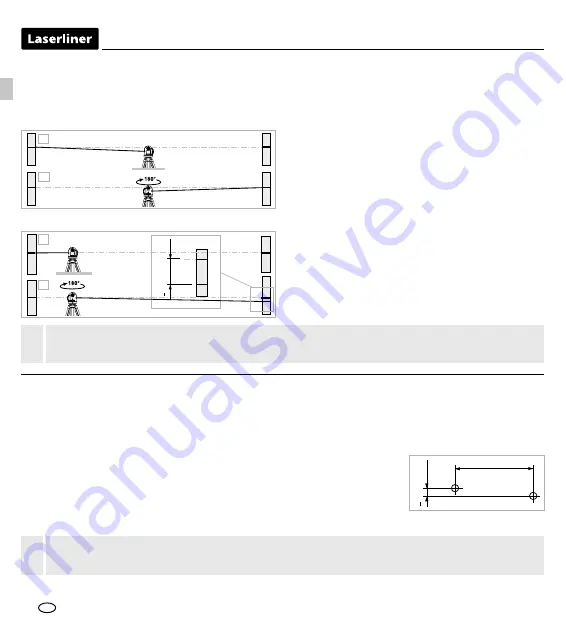
Checking the horizontal line
Position the device about 5 m from a wall and switch on the cross laser.
Mark point B on the wall. Turn the laser cross approx. 2.5 m to the
right and mark point C. Check whether the horizontal line from point C is
level with point B to within ± 2 mm. Repeat the process by turning the laser to the left.
Checking the vertical line
Position the device about 5 m from a wall. Fix a plumb bob with a line of 2.5 m length on the wall,
making sure that the bob can swing freely. Switch on the device and align the vertical laser to the
plumb line. The precision is within the specified tolerance if the deviation between the laser line and
the plumb line is not greater than ± 2 mm.
Regularly check the calibration before use, after transport and after extended periods of storage.
!
A1
A2
2.
1.
A3
A2
A2
A1
4.
3.
A3
A2
<
0,4
mm / m = OK
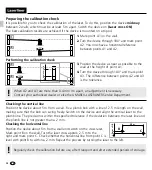
Preparing the calibration check
It is possible for you to check the calibration of the laser. To do this, position the device
midway
between 2 walls, which must be at least 5 m apart. Switch the device on
(Laser cross ON)
.
The best calibration results are achieved if the device is mounted on a tripod.
1.
Mark point A1 on the wall.
2.
Turn the device through 180° and mark point
A2. You now have a horizontal reference
between points A1 and A2.
Performing the calibration check
When A2 and A3 are more than 0.4 mm / m apart, an adjustment is necessary.
Contact your authorised dealer or else the UMAREXLASERLINER Service Department.
!
3.
Position the device as near as possible to the
wall at the height of point A1.
4.
Turn the device through 180° and mark point
A3. The difference between points A2 and A3
is the tolerance.
EN


