BL57-NE
3-8
(E)
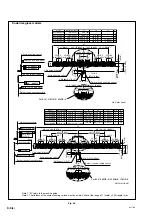
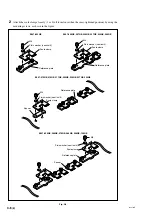
BL57-006NE, 007NE, 026NE,
BL57-012NE, 016NE, 017NE, 022NE, 036NE, 037NE, 042NE,
027NE, 032NE, 046NE
056NE, 066NE, 076NE, 086NE, 096NE, 106NE
B
A
B
A
B
A
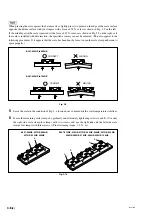
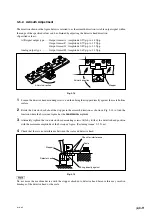
When pressing the scale against the datum surface, lightly press two points on the edge of the scale surface
opposite the datum surface with your fingers with a force of 9.8 N or less as shown in Fig. 3-9 on the left.
If the middle part of the scale is pressed with a force of 4.9 N or more as shown in Fig. 3-9 on the right, or if
the scale is installed with deformation, the specified accuracy cannot be achieved. (This also applies to the
following procedures. If it appears that the scale has been bent by force, loosen the scale clamp and mount it
again properly.)
Fig. 3-9
5
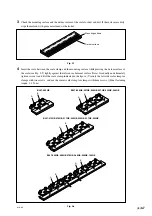
Leave the scale in the condition of Fig. 3-8 for one hour or more until the scale temperature stabilizes.
6
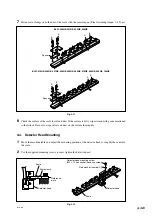
Secure the remaining scale clamps by gradually and alternately tightening screws A and B. (Use only
the right-side scale clamp for clamps with two screws, and use the right-side and the left-side scale
clamps for clamps with three screws.) (Final fastening torque: 1.4 N
·
m)
Fig. 3-10
CORRECT
WRONG
CORRECT
WRONG
BL57-003NE to 046NE
BL57-056NE to 106NE
Summary of Contents for BL57-003NE Series
Page 2: ...BL57 NE...
Page 8: ...6 E BL57 NE...
Page 10: ...ii E BL57 NE...
Page 14: ...2 2 E BL57 NE...
Page 28: ...BL57 NE 3 14 E...
Page 36: ...4 8 E BL57 NE...
Page 48: ...7 4 E BL57 NE...
Page 50: ...8 2 E BL57 NE...
Page 58: ...ii G BL57 NE...
Page 62: ...2 2 G BL57 NE...
Page 76: ...BL57 NE 3 14 G...
Page 84: ...4 8 G BL57 NE...
Page 96: ...7 4 G BL57 NE...
Page 98: ...8 2 G BL57 NE...


