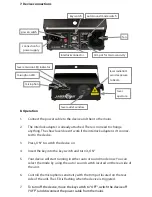
7. Device connections
connection for
power supply
microphon
microphon LED
power switch
fan
laser
aperture
key switch
8. Operation
1.
Connect the power cable to the device and then to the mains
2.
The Interlock adapter is already attached. There is no need to change
anything. The show laser doesn‘t work if the interlock adapter isn‘t connec-
ted to the device.
3.
Press „ON“ to switch the device on
4.
Insert the key into the key switch and turn it „ON“
5.
Your device will start running in either auto or sound mode now. You can
select the mode by using the auto / sound switch located on the rear side of
the unit.
6.
Controll the microphone sensitivity with the trim pot located on the rear
side of the unit. The LED is flashing when the device is triggered.
7.
To turn off the device, move the key switch to “OFF”, switch the device off
(“OFF”) and disconnect the power cable from the mains.
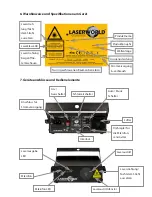
interlock connector
trim pot for micro sensivity
auto/sound mode switch
laser emission LED indicator
laser radiation!
avoid exposure
to beam.
laser outlet window
Summary of Contents for EL-60G II
Page 24: ......


