

User Manual: Pro-3000RGB
Stand: 11/2008
Page 5 of 9
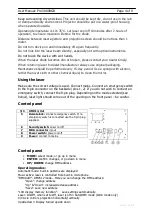
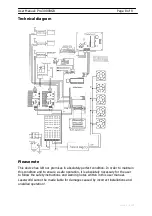
ILDA mode
When an IDLA compatible interface is connected to the laser, the laser is
automatically switched to ILDA mode. Output is then controlled from a PC running
software.
The laser uses pins 4 and 17 of the IDLA signal to detect the presence of an ILDA
interface.
Further information can be found in the software manual.
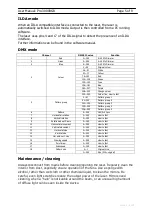
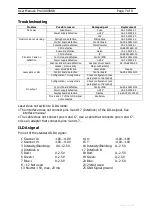
DMX mode
Channel
DMX512 value
Function
1
Red
0~255
0~100% Dimmer
2
Green
0~255
0~100% Dimmer
3
Blue
0~255
0~100% Dimmer
0~25
Original colour
26~51
White
52~77
Yellow
78~103
Red
104~129
Green
130~155
Cyan
156~181
Blue
182~207
Purple
208~233
Change colour
4
Colour
234~255
Colour flux, slow to fast
0~51
Pattern group 1
52~103
Pattern group 2
104~154
Pattern group 3
155~205
Pattern group 4
5
Pattern group
206~255
Pattern group 5
6
Pattern
0~255
160/5=32pcs
7
Horizontal rotation
0~255
slow to fast
8
Vertical rotation
0~255
slow to fast
9
Rotation about Z-axis
0~255
slow to fast
10
Horizontal movement
0~255
slow to fast
11
Vertical movement
0~255
slow to fast
12
Horizontal size
0~255
slow to fast
13
Vertical size
0~255
slow to fast
14
Hor. and vert. size
0~255
slow to fast
15
Drawing speed
0~255
slow to fast
16
Point draw
0~255
slow to fast
17
Scanspeed
0~255
slow to fast
0~1
Original size
18
Pattern size
2~255
Size (120=original)
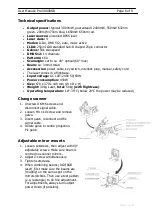
Maintenance / cleaning
Always disconnect from mains before cleaning/opening the laser. Regularly clean the
interior from dust, especially ensure operation of the fans. Use a sponge with
alcohol, rather than wet cloth or other chemical liquid, to clean the mirrors. Be
careful, even light scratches reduce the output power of the laser. Mirrors need
cleaning, when a “halo” is noticeable around the beam, or an unusual high amount
of diffuse light can be seen inside the device.


