background image

Table of Contents

Section-Page

iv

XR500T 11/19/21

Table of Contents

SECTION 5

MAINTENANCE

5-1

5.1

Maintenance Safety Rules ......................................................................5-1

5.2

Torque Values ........................................................................................5-1

5.3

Mower Deck Leveling Adjustment ........................................................5-1

5.4

Every 8 Operating Hours........................................................................5-2

5.5

First 8 Hours...........................................................................................5-2

5.6

First 50 Hours.........................................................................................5-2

5.7

Every 50 Operating Hours......................................................................5-2

5.8

Every 200 Operating Hours....................................................................5-2

5.9

Every 500 Operating Hours....................................................................5-2

5.10

Annual ....................................................................................................5-2

5.11

Articulator Specifications, XR500 .........................................................5-2

5.12

Articulator Maintenance Chart...............................................................5-3

Description and Purpose

The XR500T pull behind finish mower includes a 96” width of cut from five independently


flexing decks with up to 24° of total up/down motion and 360° of float for superior cut qual

-

ity  in  even  the  most  challenging  contours  and  valleys.  In  addition,  the  center  decks


include a pivot in the center capable of up to 3° of up/down motion. 

Built in the USA, the XR500T pull behind mower is a self-contained mower that fits the


production needs of golf courses, sports turf professionals, and commercial landscapers.


It is intended for finish cuts on turf.

Summary of Contents for XR500 Series

Page 1: ...WARNING Read and understand this manual before using this machine The Articulator Owner s Manual XR500 series XR500T Manual number MXR500T This is the original language for this manual ...

Page 2: ...eet Indianapolis IN 46214 Phone 317 892 4444 800 515 6798 www lastec com DOLIRUQLD 3URSRVLWLRQ DUQLQJ 51 1 UHDWKLQJ JDV GLHVHO HQJLQH H KDXVW H SRVHV RX WR FKHPLFDOV NQRZQ WR WKH 6WDWH RI DOLIRUQLD WR FDXVH FDQFHU DQG RU ELUWK GHIHFWV RU RWKHU UHSURGXFWLYH KDUP OZD V VWDUW DQG RSHUDWH WKH HQJLQH LQ D ZHOO YHQWLODWHG DUHD I LQ DQ HQFORVHG DUHD YHQW WKH H KDXVW WR WKH RXWVLGH R QRW PRGLI RU WDPSHU Z...

Page 3: ...ty Rules 2 2 2 7 Maintenance Safety Rules 2 3 2 8 Storage Safety Rules 2 3 2 9 Hazard Identified Chart 2 3 SECTION 3 INITIAL SETUP 3 1 3 1 Assembly Instructions 3 1 3 2 Mounting The Articulator To The Tractor 3 1 3 3 Hose Spring Installation 3 2 3 4 PTO Shaft Range Verification 3 2 3 5 Gearbox 3 3 3 6 Mower Deck Leveling Adjustment 3 3 3 7 Drive Belts 3 4 3 8 Deck Belts Tension 3 5 3 9 Deck Alignm...

Page 4: ...s XR500 5 2 5 12 Articulator Maintenance Chart 5 3 Description and Purpose The XR500T pull behind finish mower includes a 96 width of cut from five independently flexing decks with up to 24 of total up down motion and 360 of float for superior cut qual ity in even the most challenging contours and valleys In addition the center decks include a pivot in the center capable of up to 3 of up down moti...

Page 5: ... not hesitate 1 3 Warranty Registration Complete the following Lastec Warranty Registration Form and return to Lastec within 15 days of the purchase of the Articulator This will aid you Lastec and Lastec distributor in warranting and servicing of your Articulator Warranty registration can be done online through the Lastec web site at www lastec com See Figure 1 1 If you have difficulties accessing...

Page 6: ...ace or repair defective part or unit If warrantor determines that the part or unit is not defective under the terms of this warranty then pur chaser shall be responsible for expenses incurred by warrantor in returning part or unit to original purchaser Warrantor gives no allowance for labor travel time mileage or incidental or conse quential damages Purchaser must submit warranty claims to a distr...

Page 7: ... on or store the deck This manual provides essential information and instruc tions which will help you enjoy years of dependable performance from the deck The designed and tested safety of the deck is dependent upon its operation within the parameters and limita tions explained in this manual Be familiar with and follow all safety rules in this manual as well as all safety rules for any related eq...

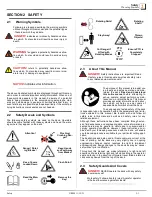
Page 8: ...d oil from the drive unit engine area to avoid a fire hazard Verify that the deck is properly mounted set up adjusted and in good operating condition Always perform the pre operation equipment inspec tion and the appropriate maintenance schedule Sec tion 5 before operating the deck 2 6 Operation Safety Rules DANGER NEVER allow children to operate the deck NEVER allow children on or near the deck N...

Page 9: ...ays use personal protection equipment such as eye hand head and ear protection when performing any service or maintenance to the drive unit or deck Keep the deck in good operating condition with all safety devices in place Check the blades frequently Verify that they are sharp free of nicks and cracks and securely fastened Periodically tighten all bolts nuts and screws Verify that all fasteners ar...

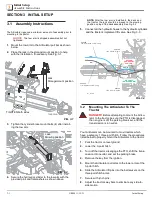
Page 10: ...icu lator to the tractor be sure the PTO is disengaged then engine is off the parking break set and the transmission is in neutral Your Articulator can be mounted to most tractors which have a category 1 three point hitch Follow the procedures listed below to properly mount the Articulator to the tractor 1 Park the tractor on level ground 2 Lower the 3 point hitch 3 Turn off the tractor disengage ...

Page 11: ... to the tie wrap locate around the hoses 3 4 PTO Shaft Range Verification CAUTION It is important to verify that the PTO shaft falls within the proper operating range to ensure safe operation of the Articulator under vary ing cutting conditions 1 Take the tractor and Articulator to your most severely mounded area 2 Disconnect the PTO shaft from the tractor 3 Drive the tractor up a mound or across ...

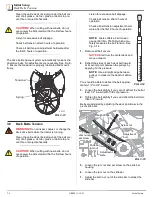
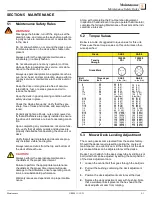
Page 12: ...If a leak is discovered repair it and refill the gearbox before operating the Articulator 3 6 Mower Deck Leveling Adjustment The Articulator mowing decks come leveled from the Las tec factory Re level the decks as needed Leveling Decks 1 and 3 Decks 1 and 3 attach to the deck cross tube by sliding pivot ball joints Adjust these joints by setting the position of the deck adjustment cam 1 Back off t...

Page 13: ...rs above the plate the deck is set at 1 Placing any combination of wheel spacers above the plate will raise the deck by the corresponding thickness of the spacer s used Calibrate the height of cut using the adjustment chains 1 Set the spacers to the desired deck height 2 Measure from the bottom of the pan to the floor to ver ify the setting 3 Adjust the turnbuckle in or out to calibrate the mea su...

Page 14: ... for excessive belt slippage Check belt tension after 2 hours of operation Check all belt tension adjustment hard ware after the first 8 hours of operation NOTE Lastec offers a belt tension gauge Part No 016309 which accu rately measures the belt tension See Fig 3 14 1 Remove all belt covers NOTICE Start from the center deck and move outward 2 Deflect the sides of each deck belt inward at its cent...

Page 15: ...bar to adjust the slide bar CAUTION Do not tighten the bolt head and nylock nut against the adjustment plate on the deck Maintain 1 32 gap between plate and washers to allow the deck to float properly without placing excess stress on the slide bar 5 Tighten slide bar jam nuts 6 Tighten the set screw and its jam nut on the slide bar housing 7 Clean each entire deck area under the belt covers of all...

Page 16: ... the PTO shaft cover retaining chains are secure Check the oil level in the gearbox Inspect area around and under the gearbox for any oil leakage Set the deck height to the desired level Check the deck drive belt and idler tension spring for proper installation tension and condition Clean the entire center deck area including under the belt cover of all grease oil fuel grass or debris Check all de...

Page 17: ... manual and the tractor manual 1 Transport to the work area 2 Lower the Articulator into the cutting position WARNING Ensure the Articulator is not posi tioned over any debris or loose objects Ensure there are no people near the Articulator especially in the path of discharge 3 Turn off the tractor disengage the PTO shift the trans mission into neutral and set the parking brake 4 Remove the safety...

Page 18: ...and tractor Ensure entire area around the tractor and Articulator are clear of people or obstructions before traveling in reverse If you are not familiar with backing techniques practice in an open area to develop the required skills before operat ing the Articulator When backing up with the articulator with the blades on or off you must carefully watch the area around the articulator for obstacle...

Page 19: ...mage to the Articulator unsafe operating condi tions and substandard performance Warranty issues are dependent on proper mainte nance Along with completing the Pre Operation Equipment Inspection Checklist each time you operate the Articulator complete the following Maintenance Checklists at the indi cated time intervals 5 2 Torque Values Below is a table of suggested torque values for this unit Pl...

Page 20: ...80W90 gear oil 5 7 Every 50 Operating Hours Check deck alignment and belt tension Check deck drive belt alignment Grease all blade spindle bearing housings Fill until grease purges from the weep hole in the side of the bearing housing Inspect all bushings for wear Replace as needed Inspect gearbox pivot stop bolts wear pad and bushings Replace or adjust as needed Check and clean if necessary any d...

Page 21: ...s Perform the Appropriate Maintenance Procedures Listed In Your Tractor Manual Verify grass chutes cleared Clean lube retighten all guide wheels Lubricate the PTO Quick Disconnect Pin or Twist Sleeve Check deck alignment and belt tension Check drive belt alignment Inspect gearbox pivot stops wearpads and bushings Clean off any debris that has accumulated Inspect gearbox and seals fopr leaks Grease...

Reviews: