
1.
Remove items from the box. You should have:
-
Bag containing the Studio Cubelite (flat)
-
4 x Black support rods
-
4 x Silver support rods
-
Circular acrylic sheet
-
Roll of translucent film
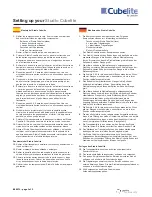
Remove the Studio Cubelite from the protective bag.
2.
Lay the Studio Cubelite on the floor and position the
end of one of the black rods on the corner of the lower
steel rim. Ensure the steel rim locates into the jaws of
the tip at the end of the rod.
3.
Pull the middle and top steel rims away from the lower
steel rim and locate the jaws of the tip at the other end
of the black rod into the middle rim.
4.
Repeat steps 2&3 for the remaining three corners.
When all four rods are in place, check they are all in a
vertical position.
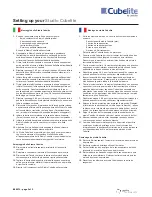
5.
Position the end of one of the silver rods on the corner
of the middle steel rim. Ensure the steel rim locates
into the jaws of the tip at the end of the rod.
6.
Pull the middle and top steel rims away from each
other and locate the jaws of the tip at the other end of
the silver rod into the top rim. This process will require
more force than you used when positioning the black
rods, as they are a much tighter fit. This helps pull out
the crease in the white fabric.
7.
Repeat steps 5&6 for the remaining three corners.
When all four rods are in place, check they are all in a
vertical position.
8.
Remove the blue protective film and place the circular
acrylic sheet inside the top white section and place it
on the white fabric surface seperating the top and
bottom sections (do not drop this sheet as it will break).
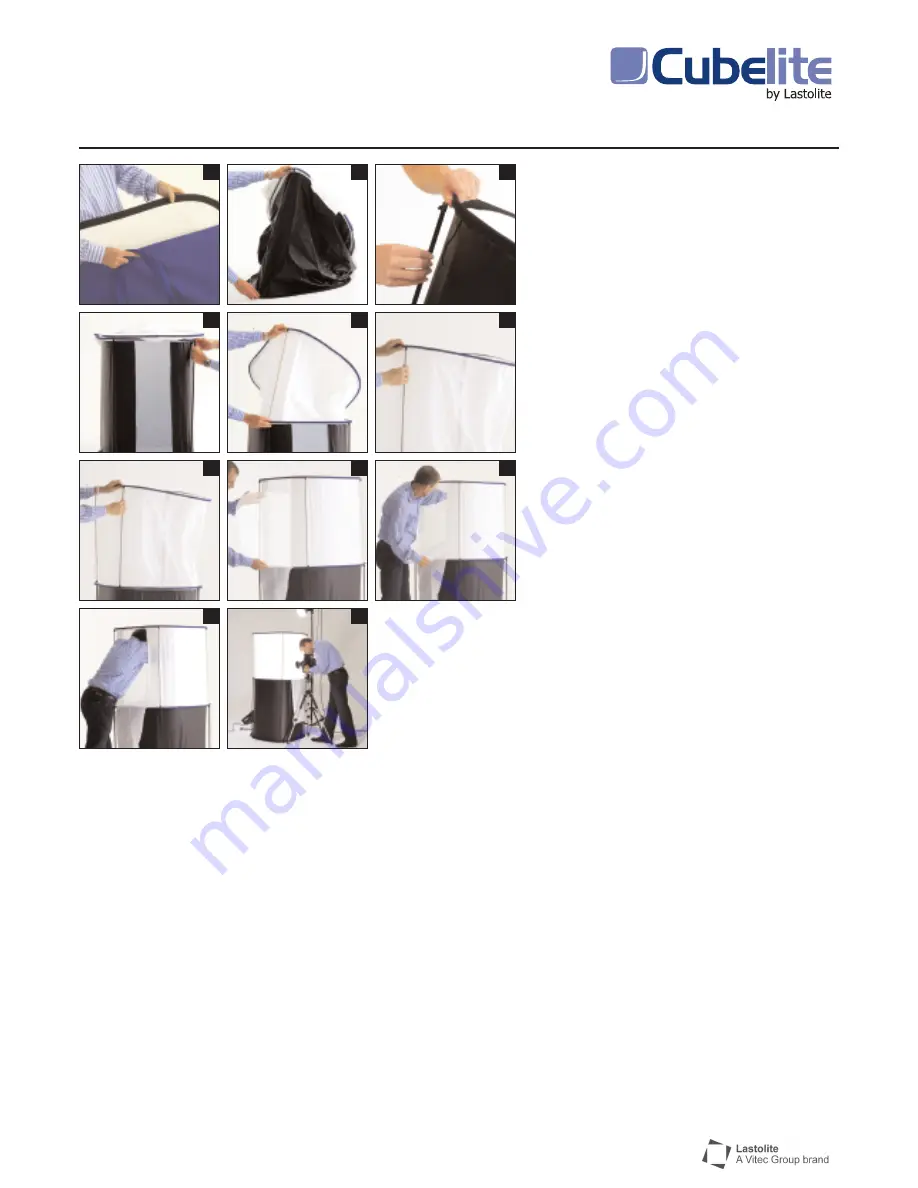
9.
Place the translucent film inside the top white section
of the Studio Cubelite. There is a velcro strip running
along one edge of the film.
10
. Attach the velcro edge of the translucent film to the
the two velcro tabs already sewn into the top of the
white section.
11.
The Studio Cubelite is ready to use. Add to it your
chosen lighting solution. Refer to the label near the
rear opening of the Studio Cubelite for advice on
how to position the light source inside.
Breaking Down your Studio Cubelite
12.
Remove the translucent film, roll it up and return it to
the protective tube.
13.
Remove and pack away your chosen lighting system.
14.
Remove the circular acrylic sheet from the top of the
lower unit and return it to the protective bag.
15.
Remove the supporting rods from the top section then
the lower section and allow the three steel rims to lie
on top of each other. Return them to the protective bag.
16.
Return all the Studio Cubelite items to the storage box.
Setting up your
Studio Cubelite
1
2
3
4
5
6
7
8
9
10
11
B90371 - page 1 of 3


