background image

31

ERROR No. APPEARS

Refer to the following list for proper operation.

TROUBLESHOOTING

Contact the store from whom you bought 
the Time Clock, call Lathem Time directly 
at (800) 241-4990.

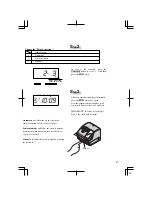
Correctly insert the card.

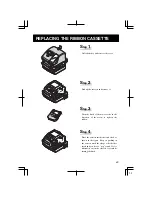
Make sure that the ribbon cassette is 
correctly inserted in place.

Press the push bar.

Enter the correct password again.

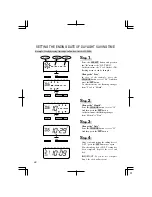
Make sure the correct starting and ending 
date of daylight saving time and enter again.

Refer to your owner's manual on the page 
related to the item you want to set and enter 
again correct setting data.

CPU error

The remaining life of lithium battery for 
memory back-up is short.

The card is not inserted in the clock properly.

Cannot print.
The printer motor or home position sensor 
is not normal.

Cannot print.
The print head motor or the sensor does not 
operate properly.

Incorrect password 

D.S.T. setting mistake

Setting data you entered is not usable.
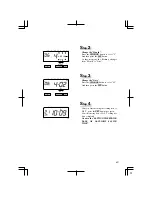
E-00

E-01

E-05

E-30

E-38

E-40

E-41

E-49

    No.                                                Error  contents                                                                                      Action

OTHER FAILURES

The time clock does not operate.

Ensure the AC adapter is properly plugged into the AC outlet.

The time clock does not print.

Ensure the ribbon is installed correctly.

The card is jammed.

Press the push bar and try to pull out the card at the same time.

No signal has been received.

1) Wait for early morning hours to pass.

2) Re-locate in area that is away from metal studs or close to western facing  window.  

Note: There are some environments and weather conditions that may influence the reception of 

the atomic clock radio signal.  Since it also operates as a highly-accurate (+/- 15 seconds 

per month) quartz time clock, the 1500E will function properly while outside the 

reception area or if it can not receive the WWVB signal.


The time is exact to the minute but the hour is incorrect.

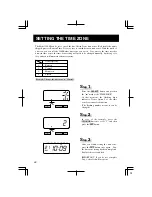
Ensure the correct time zone is selected by time zone setting.


Error

ENGLISH

33

Summary of Contents for 1500E

Page 1: ...Lathem Time Corporation ENGLISH 1...

Page 2: ...CLASS A LIMITS FOR RADIO NOISE EMISSIONS FROM DIGITAL APPARATUS AS SET OUT IN THE RADIO INTERFERENCE REGULATIONS OF THE CANADIAN DEPARTMENT OF COMMUNICATIONS LE PR SENT APPAREIL NUM RIQUE N MET PAS D...

Page 3: ...he unit in environments that are humid or dusty exposed to direct sunshine subject to frequent or continuous vibrations outside the temperature range between 5 C and 45 C 23 F and 113 F affected by ch...

Page 4: ...nment s National Institute of Standards and Technology and the microchip translates the time signal and adjusts the time display to the correct time The Model 1500E receives a 60 kilohertz low frequen...

Page 5: ...djuster The print position from the card edge is adjustable by pressing and sliding the print position button on outside bottom Cover Display Push bar Key hole AC adapter Display Ribbon cassette Print...

Page 6: ...our time clock follow next steps Step 1 Unlock the key and remove the cover Remove the PROTECTION PAD and plug the AC adapter into the time clock Replace the cover and lock Plug the AC adapter into th...

Page 7: ...ns SELECT You can select the desired program setting mode by pressing this SELECT button Selected program setting mode is indicated by the mark on the display CHANGE When you press the CHANGE button y...

Page 8: ...is time recorder contains a highly accurate quartz timer it will function with a very high level of accuracy between signal receptions The Model 1500E will operate as normal electronic time recorder w...

Page 9: ...our In case of the example press the SET button because the hour is not to be changed At that moment the flashing changes from Hour to Minute Step 1 TIME SELECT CHANGE SET Change the Minute Press the...

Page 10: ...LECT CHANGE SET DATE SELECT CHANGE SET DATE SELECT CHANGE SET DATE SELECT CHANGE SET Change the Month In case of the example press the SET button because the month is not to be changed At that moment...

Page 11: ...1 HOUR SELECT CHANGE SET After you finish setting the 12 24 hour press the SET button once again Now the 12 24 hour setting has been completed Replace the cover and lock IMPORTANT If you do not compl...

Page 12: ...e the cover and lock IMPORTANT If you do not complete Step 2 the clock will not print Step 2 1 2 3 4 5 6 7 8 9 10 11 12 13 14 15 16 17 18 Order Option M D H Min D M H Min M D Y H Min D M Y H Min Y M D...

Page 13: ...AR DIGIT SELECT CHANGE SET YEAR DIGIT SELECT CHANGE SET After you finish setting the year digit press the SET button once again Now the year digit setting has been completed Replace the cover and lock...

Page 14: ...1 2 Order Options 12 Hour 24 Hour Print Example JAN 31 PM3 00 JAN 31 15 00 After you finish setting the hour minute press the SET button once again Now the hour minute setting has been completed Repla...

Page 15: ...LEADING ZERO SELECT CHANGE SET SELECT CHANGE SET After you finish setting the leading zero press the SET button once again Now the leading zero setting has been completed Replace the cover and lock IM...

Page 16: ...ment setting has been completed Replace the cover and lock IMPORTANT If you do not complete Step 2 the clock will not print Step 2 1 2 3 4 5 6 7 8 9 10 11 12 13 Order Options RCVD SENT IN OUT CFMD FIL...

Page 17: ...ELECT CHANGE SET SELECT CHANGE SET After you finish setting the language press the SET button once again Now the language setting has been completed Replace the cover and lock IMPORTANT If you do not...

Page 18: ...Order Options of the print direction The flashing means it can be changed In case of the example press the CHANGE button to set at 2 And then press the SET button At that moment the flashing changes f...

Page 19: ...you do not complete Step 3 the clock will not print Step 3 PRINT DIRECTION PRINT ACTIVATION SELECT CHANGE SET 1 2 3 Order Options Automatic Semi automatic Manual Change the Print Activation Automatic...

Page 20: ...e unit setting of daylight saving time will return to the default value Example Start date Sunday April 2 2006 End date Sunday October 29 2006 If you set as the above the time clock remembers the star...

Page 21: ...T button once again Now the starting date of D S T setting has been completed Go on to the SETTING THE ENDING DATE OF DAYLIGHT SAVING TIME Step 4 D S T START SELECT CHANGE SET 21 19 Change the Month P...

Page 22: ...S T END SELECT CHANGE SET Change the Month Press the CHANGE button to set at 10 And then press the SET button At that moment the flashing changes from Month to Date Step 2 Change the Date Press the CH...

Page 23: ...lashing changes from Month to Date Step 2 Press the SET button again At that moment the flashing changes from 02 to Step 3 Press the SET button once again Now the D S T deleting has been completed Rep...

Page 24: ...ORTANT If you do not complete Step 3 the clock will not print Step 3 TIME ZONE SELECT CHANGE SET TIME ZONE SELECT CHANGE SET 22 The Model 1500E can be set to one of the four United States time zones B...

Page 25: ...SET In case of the example press the CHANGE button to set at 34 And then press the SET button Step 2 TU WE TH FR SA SU MO After you finish registering the password press the SET button once again Now...

Page 26: ...flashes The flashing means it can be changed In the example press the CHANGE button to set at 12 And then press the SET button At that moment the flashing changes to last two digits Step 1 SELECT CHAN...

Page 27: ...ashes The flashing means it can be changed In case of the example press the CHANGE button to set at 12 And then press the SET button At that moment the flashing changes to last two digits Step 1 TIME...

Page 28: ...ing changes to last two digits 34 Step 3 Press the CHANGE button to set at 00 And then press the SET button Step 4 After you finish canceling the password press the SET button once again Now the passw...

Page 29: ...s push the reset switch with a pointed implement NOTICE All your custom settings will be deleted and will revert to the factory defaults when the reset switch is pushed To make new settings please ref...

Page 30: ...d lock Step 3 WALL MOUNTING Caution The supplied screws are intended for use on a thick wooden wall or wooden column Do not use them on any other materials The time clock may come off if used on other...

Page 31: ...ection of the arrow to tighten the ribbon Step 3 REPLACING THE RIBBON CASSETTE Place the cassette inside the time clock as shown in the figure Keep on pushing in the cassette until the clasps at both...

Page 32: ...int head and the ribbon mask Printing will not come out properly if the ribbon is placed behind the ribbon mask Turn the knob of the cassette in the direction of the arrow to tighten the ribbon Step 5...

Page 33: ...t password D S T setting mistake Setting data you entered is not usable E 00 E 01 E 05 E 30 E 38 E 40 E 41 E 49 No Error contents Action OTHER FAILURES The time clock does not operate Ensure the AC ad...

Page 34: ...years of cumulative power failure hours after the date of shipment Temperature 5 to 45 C 23 to 113 F Humidity 20 to 80 no condensation The unit operates normally at temperatures of 5 C or below but th...

Page 35: ...paid Lathem will not assume any responsibility for any loss or damage incurred in shipping 6 WARRANTY DISCLAIMER AND LIMITATION OF LIABILITY Except only the limited express warranty set forth above th...

Page 36: ...36 Q7150 6120 2...

Reviews: