


2000 – 4000 Series Time Recorder User’s Guide
Page
4
If your model prints Tenths, (models with the 4
th
digit of 2 or 5), go to
the section “
Setting Decimal Wheel with Tenths
”.
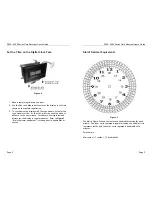
If your model prints Hundredths or 00-23 hours, refer to the
Dial of
Decimal Equivalents in Figure 3
(page 6) to determine the correct
setting.
Note: if your machine records in 1-12 hours, the PM hours are
underlined. AM hours are not underlined. Set time to the proper hour
of the day to avoid errors such as setting the day wheel to the next
day at noon rather than midnight.
3.
Rotate the Minute Wheels to show the current minute.
4.
Set the Hour Wheel to the current hour
5.
Rotate the
Clock Face
Setting Wheel – Figure 5.1 on page 8,
to set the hands to match the time set on the wheels.
6.
Rotate the
Main Setting Wheel – Figure 2, 2.1
to advance both
the Clock Face and Print Wheels together. Rotate until you
pass the actual time by one minute (each “click” indicates one
minute.)
7.
Hold the corner of the Clock Face and release the
Release
Latch – Figure 2, 2.2
by pushing it to the left. Slowly let the
Type Section down and press it firmly into the Type Section
Headlock.
8.
Make a sample registration and verify the time and date or day
is correct.
9.
Replace and lock the case cover.
Note: The month wheel and the date wheel must be reset manually at
the beginning of each month.
2000 – 4000 Series Time Recorder User’s Guide
Page 9
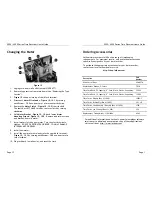
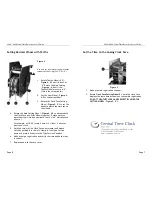
Changing the Ribbon
Lathem time recorders have self-reversing ribbons. With normal use, a
ribbon should last for many months or even years….and when the time
comes, it is easy to change.
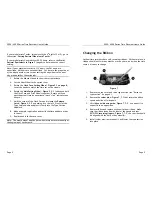
Figure 7
1.
Remove the top cover and raise type section (see “Raise the
type section” on page 4.)
2.
Remove the
cotter pins – Figure 7, 7.1
that retain the ribbon
spools and slide off old spools.
3.
Lift
ribbon hold-down guide – Figure 7, 7.2
– use a pencil to
support it in an up position.
4.
Remove ribbon and replace with new Lathem ribbon. Make
sure the ribbon feeds from bottom of the spools and runs
BETWEEN
reversing fingers – Figure 7, 7.3
, the red side should
be aligned with the date or day wheel(s).
5.
Install cotter pins; remove pencil, and lower the type section
into place.


