background image

2000 – 4000 Series Time Recorder User’s Guide


Page 

6


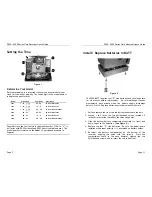
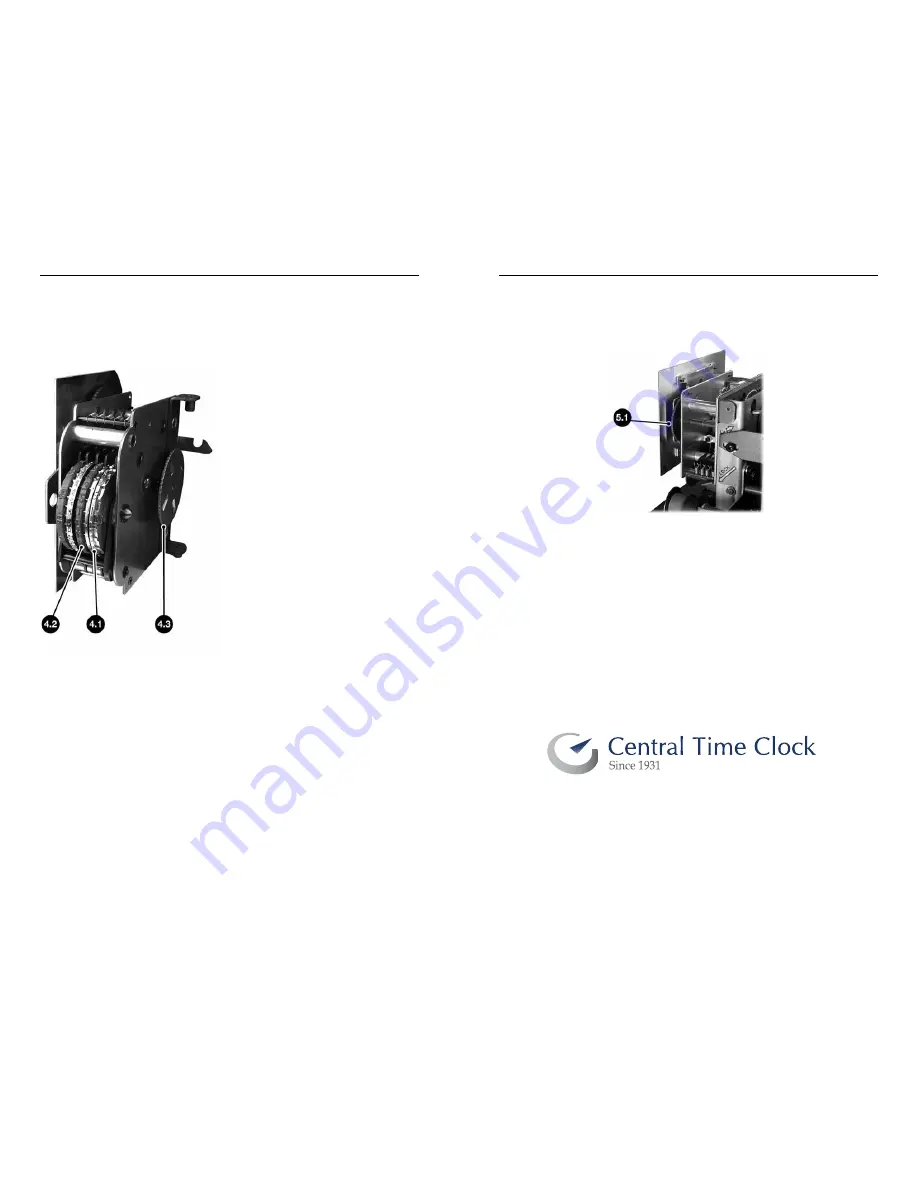
Setting Decimal Wheel with Tenths 


Figure 4


Use only for recorders printing in tenths 

(models with a 4

th

 digit of “2” or “5”) 


1   Rotate Tenths Wheel (0.9)

– 

    Figure 4, 4.1

 until it is set at 


“9” Rotate the Main Setting 


Figure 4, 4.3 

until the 


Tenths Wheel moves to a “0”. 


(This is the zero minute.) 

2.  Set the Hour Wheel 

– Figure 4,  


4.2 

to the current Hour. 


3.   Rotate the Clock Face Setting 


Wheel 

– Figure 5, 5.1

 to set the 


hands to match the time set on 


the wheels. 


4.  Rotate the Main Setting Wheel 

– Figure 4, 4.3 

to advance both 

the Clock Face and Print Wheels together.  Rotate until you 

pass the actual time by one minute (each “click” indicates one 

minute.) 


For example, at 10:05, rotate 5 times = 5 clicks = 5 minutes 

past ten o’clock. 

5.  Hold the corner of the Clock Face and release the Release 

Latch by pushing it to the left. Slowly let the Type Section 

down and press it firmly into the Type Section Headlock. 

6.  Make a sample registration and verify the time and date or day 

is correct. 

7.  Replace and lock the case cover 

2000 – 4000 Series Time Recorder User’s Guide


Page 7 

Set the Time on the Analog Clock Face 


Figure 5 

1.


Make a sample registration on paper. 

2.


Rotate 

Clock Face


Setting Wheel 5.1

 until the clock face 

displays the same time as shown on the sample registration.   

DO NOT TURN THECLOCK HANDS EXCEPT BY USING THE 

SETTING WHEEL – Figure 5, 5.1. 

5-23 50th Avenue | Long Island City, NY 11101

P: 718.784.4900 F: 718-472-9491

www.centraltimeclock.com

Summary of Contents for 2000 - 4000 Series

Page 1: ...Printed in USA P N OMOV0605A r 2000 4000 Series User s Guide...

Page 2: ...shall be limited to repair of this product or replacement thereof at the sole discretion of Lathem 5 If it becomes necessary to send the product or any defective part to Lathem or any authorized serv...

Page 3: ...ach Screw 10 2 one quarter of a turn clockwise 10 Plug cord back in wall outlet and reset the time 2000 4000 Series Time Recorder User s Guide Page 1 Ordering Accessories Lathem time recorders fulfill...

Page 4: ...corder User s Guide Page 11 Install Replace Batteries in BATT Figure 9 The 2000 BATT requires four D size batteries and should operate for six months before replacement An internal beeper sounds momen...

Page 5: ...to remove it 2 Note the position of the Release Latch and Face Setting Wheel used later in this process 3 Wait until you hear the clock click 4 Press either side of the Type Section Headlock Figure 1...

Page 6: ...ck Face and release the Release Latch Figure 2 2 2 by pushing it to the left Slowly let the Type Section down and press it firmly into the Type Section Headlock 8 Make a sample registration and verify...

Page 7: ...inute button to advance to the next minute Seconds are now synchronized Always set the display to regular minutes Refer to Figure 3 dial of decimal equivalent if wheels print in hundredths or tenths 2...

Page 8: ...one minute each click indicates one minute For example at 10 05 rotate 5 times 5 clicks 5 minutes past ten o clock 5 Hold the corner of the Clock Face and release the Release Latch by pushing it to t...

Reviews: