background image


2  

  Welcome  

  Embedded facial recognition system - Advanced DSP 

technology keeps the image processing and matching on the 
terminal.  

  Accurate and fast identification - The industries leading “Dual 

Sensor” facial recognition technology. 

  Reliable performance under different light environments - 

The terminal can work in different light conditions even in the 
dark. Over one year of market testing. 

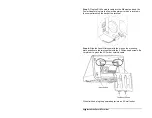
  Flexible I/O interfaces - Internet Protocol (TCP/IP) enables 

communications over the LAN. USB allows for employee 
data upload or punch download using a USB flash drive. The 
Ethernet Network Port is located on the back of the terminal 
and the USB Flash Drive Port is located on the bottom of the 
terminal. 

  User friendly design - 3.5 inch color LCD screen for face 

positioning with voice prompt. No-touch authentication for 
the ultimate in hygiene. 

Note:

 The proximity badge reader and access control relay are not 

available on the FR650 model. 

Accessories 

A number of accessories are offered to further enhance your 
PayClock system.  Visit 

http://shop.lathem.com

 to purchase 

additional accessories. 

Getting Help 

You can access the help desk and answers to your issues in a 
number of different ways.  In addition to resources within the 
PayClock software assistance may be accessed online, via email, 
via telephone, or through your dealer. Don’t forget annual support 
contracts are also offered. 

PayClock Help 

The Online Help allows you to search through an index of help topics 
to locate the answer you need. To launch the Help click the Help 
button on the ribbon bar. 

Troubleshooting 

For answers to Frequently Asked Questions refer to the 
Troubleshooting section of this User Guide. 

Summary of Contents for FaceIN FR650

Page 1: ...Face Recognition Terminal User s Guide...

Page 2: ...cordance with the instructions may cause harmful interference to radio communications However there is no guarantee that interference will not occur in a particular installation If this equipment does...

Page 3: ...the terminal 12 How do I change the terminal s volume 13 Add the Terminal 14 Add the terminal in PayClock 14 How do I add a FaceIN terminal 14 Updating the FaceIN Terminal 15 Updating the FaceIN Term...

Page 4: ...tion 32 Connecting the Terminal to an Electromagnetic Lock 33 Connecting the Terminal to an Electromagnetic Lock using a Wiegand Signal 33 Terminal 26 Bit and 34 Bit Wiegand Formats 34 Appendix C Expo...

Page 5: ...facial recognition system meaning that employees will punch in and out by presenting their face in front of the terminal s Dual Camera System The FaceIN terminal validates the face image and records...

Page 6: ...screen for face positioning with voice prompt No touch authentication for the ultimate in hygiene Note The proximity badge reader and access control relay are not available on the FR650 model Accesso...

Page 7: ...l call After that period you may purchase an Annual Support Agreement which will cover all calls for one year or you may pay a per call fee Annual Support Agreements Annual support contracts are desig...

Page 8: ...age Contents Package Contents Please verify that your package includes ALL of the following items If your package is missing an item please call our help desk at 800 241 4990 Recommended Installation...

Page 9: ...esome during the registration process Step 2 After selecting the appropriate installation site use the terminal to determine the appropriate height Have the shortest employee stand in front of the ter...

Page 10: ...Power Adapter port which is located in the compartment on the back of the terminal Step 4 Align the FaceIN terminal with the pins on the mounting plate and secure the two together with the 2 Philips h...

Page 11: ...must be configured to communicate with the PayClock software over the network You may have to contact your network administrator if you are unsure how to set up the network communications Press the ME...

Page 12: ...the face and the terminal The image collecting screen will start the face recognition enrollment Perform 2 small head circles to the right Perform 2 small head circles to the left Move the face closer...

Page 13: ...can be from 1 to 9999 Using the index numeric keys enter a name This should be the same as the first name you will enter into the PayClock software After pressing the desired index numeric key use th...

Page 14: ...The display will show the date in the MM DD YYYY format Tamper Alarm The alarm that will sound if the terminal is removed from the wall is enabled FR700 only Volume The sound level is set to medium C...

Page 15: ...menu and press OK FR700 Model Press 6 or select the Set Date and Time menu and press OK Press 2 or select the Set DST menu and press OK The screen will display Use DST press ESC This will disable the...

Page 16: ...e face for a facial scan The Functions Menu will display upon a successful verification Press 4 or select the System Setting menu and press OK FR650 Model Press 5 or select the Set Date and Time menu...

Page 17: ...anges to the terminals system settings or press ESC and ESC again to return to the normal time date screen How do I change the terminal s volume The terminals sound level is set to medium middle by de...

Page 18: ...to the PayClock system How do I add a FaceIN terminal Open PayClock and select the Terminal Manager tab on the ribbon bar Click the Add Terminal button The Select Terminal Type window will open Selec...

Page 19: ...FaceIN Terminal The Update button group is used to update a single terminal or all terminals After making changes to employees make sure to update the terminal s with the changes How do I update a sin...

Page 20: ...The FaceIN terminal is for use indoors do not position the terminal in direct sunlight Use normal facial expressions and avoid wearing sunglasses If glasses or a hat is worn please take the glasses a...

Page 21: ...e standing at the ready select the verification method to use for the employee Verification Methods Typically for a normal employee you would select Face recognition for a temporary employee select Ca...

Page 22: ...bottom of screen will display the process of the imaging When the face is enrolled the terminal will display Permit Open Door press ESC When Permit Attendance displays press OK Note You must press OK...

Page 23: ...s take the following into consideration Eye Glasses It is recommended for the employee to enroll with the eye glasses on for half the process then remove the eye glasses and complete the registration...

Page 24: ...les to the right if adjust positioning message is still displaying The progress bar at the bottom of screen will display the process of the imaging When the face is enrolled the terminal will display...

Page 25: ...registration process is complete To punch the employee will simply approach and look at the terminal Within seconds they are identified and punched In or Out Upon successful verification the terminal...

Page 26: ...will provide guidance for the employee such as Please Get Closer Please Get Farther or Adjust Your Action Upon successful verification the terminal will play a confirmation sound and the screen will...

Page 27: ...rminal and stop when within 9 25 inches the terminal will detect the employee and start the face recognition automatically With the face detected the screen will display a green radar screen rotating...

Page 28: ...l verification occurs Move the badge over the badge reader symbol on the front of the FaceIN When the badge is in close proximity to the FaceIN a confirmation beep will sound and prompt the employee t...

Page 29: ...single terminal or all terminals When a terminal is polled punch data will be added to the database allowing you to edit export and report on the data How do I poll a terminal Open PayClock and select...

Page 30: ...s terminal option To poll every X minutes Select the Poll Clock every option From the list choose to poll the clock every 1 2 3 4 5 10 15 30 45 or 60 minutes Set the time to begin the polling for the...

Page 31: ...ding the times the poll is to occur Select the days of the week to have the auto poll active The default is Monday through Friday Click Save to keep your changes The automatic polling will activate on...

Page 32: ...nected to an electrical outlet Make sure that the power supply is securely connected to the terminal and the unit is powered up FaceIN Troubleshooting The FaceIN terminal will not communicate with the...

Page 33: ...nts their face it is not recognized If the employee s facial appearance has changed re enroll the employee Make sure the employee is presenting their face within range of the terminal within 9 to 25 i...

Page 34: ...Position yourself and bend at the waist to bring your face 1 2 5 ft from the screen on the terminal The line of squares at the bottom of the screen indicate how much data is needed to complete the en...

Page 35: ...the while keeping you eyes centered on the screen Tilt the head down slightly chin lowered while keeping your eyes on the screen then tilt the head back slightly chin upward If you wear glasses all of...

Page 36: ...n employee make sure to select OK at the Permit Open Door prompt Terminal Access Control Relay Connector Configuration 1 D0 Output to Wiegand Controller 6 12V 12 volt output to external device 2 D1 Ou...

Page 37: ...Appendix B Access Control 33 Connecting the Terminal to an Electromagnetic Lock Connecting the Terminal to an Electromagnetic Lock using a Wiegand Signal FaceIN FaceIN...

Page 38: ...User ID 24 25bit X 0 1 1 0 0 1 0 0 X X X X X X X X X X X X X X X X X Site Code for Terminal 100 8 bits User ID 1 65536 16 bits Wiegand 34 0 1 Site Code 8 9 User ID 32 33 bit X 0 1 1 0 0 1 0 0 X X X X...

Page 39: ...le terminal or all terminals When a terminal is polled punch data will be added to the database allowing you to edit export and report on the data Press the ESC key to force the terminal to the normal...

Page 40: ...l time date display Unplug the USB Flash drive Import the data into PayClock Plug the USB Flash Drive into a USB port on your computer Open PayClock and select the Terminal Manager tab on the ribbon b...

Page 41: ...umbers are how the software identifies which punches go with which employee You should follow these recommended steps if adding the employees at the FaceIN terminal 1 Add and enroll the employee s fac...

Page 42: ...With the employee standing at the ready select the verification method to use for the employee Verification Methods Typically for a normal employee you would select Face recognition for a temporary em...

Page 43: ...ge is still displaying The progress bar at the bottom of screen will display the process of the imaging When the face is enrolled the terminal will display Permit Open Door press ESC When Permit Atten...

Page 44: ...m the eyes during the registration process When Please Swipe Card displays present the card at the terminal Position the employee so the face is in the middle of the two cameras with 9 to 25 inches be...

Page 45: ...cess of the imaging When the face is enrolled the terminal will display Permit Open Door press ESC When Permit Attendance displays press OK Note You must press OK otherwise punches will not be recorde...

Page 46: ...a successful verification Press 3 or select the Record Management menu and press OK Press 1 or select the Record Inquiry menu and press OK At the Input User No field enter the PIN for the desired empl...

Page 47: ...Functions Menu will display upon a successful verification Press 3 or select the Record Management menu and press OK Press 2 or select the Clear Record menu and press OK Warning Use extreme caution wh...

Page 48: ...1 or select the Capacity Info menu and press OK o Registered User Displays how many employees have been updated to the terminal o User Cap Displays how many employees are supported on the terminal o R...

Page 49: ...2 or select the Product Info menu and press OK o IP Displays the IP address configured for the terminal o Mask Displays the subnet mask address configured for the terminal o Gate Displays the gateway...

Page 50: ...ition FR700 Card Face Recognition FR700 Card Recognition ID IC card FR700 Verification Speed Less than 1 Second 500 Users Keyboard 4 x 4 Touch Keyboard LCD 3 5 inch TFT Color Screen 65 000 Bright Colo...

Page 51: ...t up the network communications set the time date and reset the terminal to the factory defaults Auto Poll When a terminal is automatically polled punch data is gathered and automatically added to the...

Page 52: ...Enrolling Employees 16 Enrollment Guide 30 Export the data to a USB Thumb Drive 35 Exporting Punches to a USB Drive 35 F FaceIN Record Management 42 FaceIN Troubleshooting 28 Features Specifications 1...

Page 53: ...System Information 44 T Terminal Setup 10 Terminal Specifications 46 Terminal Startup 7 Terminal s 26 Bit and 34 Bit Wiegand Formats 34 Terminals Access Control Relay Connector Configuration 32 Troub...

Page 54: ...t must be shipped in its original carton or equivalent fully insured with shipping charges prepaid Lathem will not assume any responsibility for any loss or damage incurred in shipping 6 WARRANTY DISC...

Reviews: