


Mechanical Time Recorder User’s Guide
Page 2
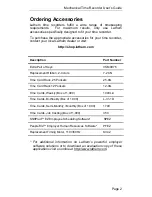
Ordering Accessories
Lathem time recorders fulfill a wide range of timekeeping
requirements. For maximum results, only use Lathem
accessories specifically designed to fit your time recorder.
To purchase the appropriate accessories for your time recorder,
contact your local Lathem dealer or visit:
http://shop.lathem.com
Description Part
Number
Extra Pair of Keys
VSM0976
Replacement Ribbon, 2-Colors
7-2CN
Time Card Rack, 25 Pockets
25-9G
Time Card Rack 12 Pockets
12-9G
Time Cards, Weekly (Box of 1,000)
1900L-C
Time Cards, Bi-Weekly (Box of 1,000)
L-31-1D
Time Cards, Semi-Monthly / Monthly (Box of 1,000)
1790
Time Cards, Job Costing (Box of 1,000)
350
ShiftPlan™ EZ Employee Scheduling Software*
SPEZ
PeopleFile™ Employer Human Resources Software*
PFEZ
Replacement Timing Motor, 110V/60Hz
K342
* For additional information on Lathem’s powerful employer
software solutions or to download an evaluation copy of these
applications visit us online at http://www.lathem.com.


