background image

800P TruAlign Time Recorder User Guide 

Page 31 


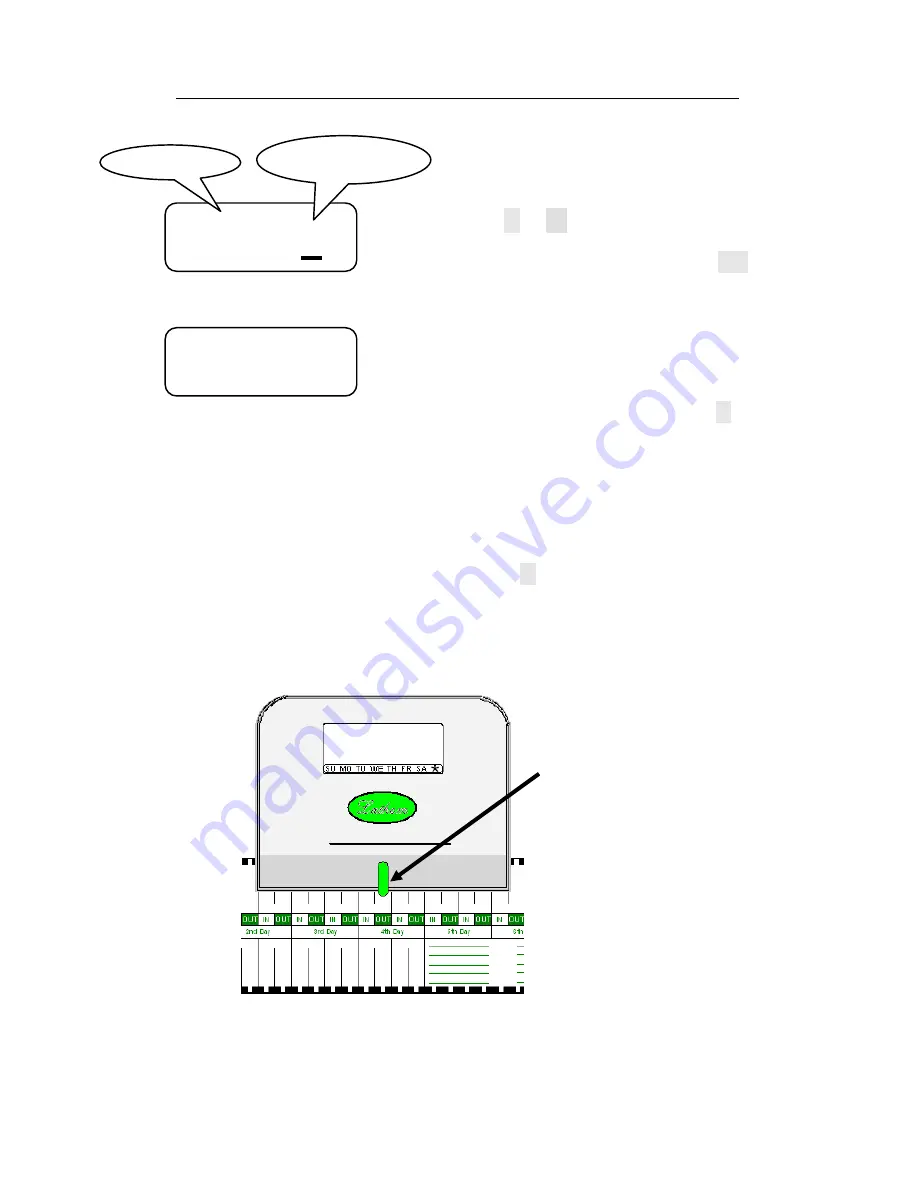
 CAL 1 

Figure 1 

Proper alignment 

when the indicator 

falls in the middle of 

print area. 

Press the 

 or 

 - 

 button until the display 

shows ‘1’. Selecting ‘1’ activates the 

TruAlign calibration mode. Press the 

SET


button. 

The display will show ‘CAL 1’, insert and 

visually align a timecard, see Figure 1.  


With the timecard fully inserted and 

properly aligned, press and hold the 


button to register the alignment.  


Note the value showing on the display. Shift 

the card slightly left and right, the value will 

increase or decrease.  


When the display is at the smallest value, 

release the 

 button, the display will show 

‘CAL2’.  


Remove the timecard. 

 C A L 1


 15:    1 


Function # 

TruAlign 

Calibration 

Summary of Contents for TruAlign 800P

Page 1: ...TruAlign Time Recorder Model 800P Installation User s Guide ...

Page 2: ...uraged to try to correct the interference by one or more of the following measures Reorient or relocate the receiving antenna Increase the separation between the equipment and receiver Connect the equipment into an outlet on a circuit different from that to which the receiver is connected Consult the dealer or an experienced radio TV technician for help This Class B digital apparatus complies with...

Page 3: ...Savings 18 Function 9 Set 12 24 Hr Display 19 Function 10 Set 12 24 Hr Print 20 Function 11 Set Print Minute Format 21 Function 12 Set Day Print Language 22 Function 13 Set Print Intensity 23 Function 14 Confirmation Beep Disable Enable 24 Function 15 TruAlign Calibration Print Head Test 25 Wall Mount 26 Mounting to a Wall 26 Using the Time Recorder 28 Appendix A Changing the Print Intensity 29 Ap...

Page 4: ...ng edge of the timecard on the timecard shelf of the 800P and aligns the timecard to the cell to be printed When the timecard is aligned correctly an automatic imprint with the day and time will be recorded on the timecard The indicator turns green when the printing is complete and the timecard can be removed The 800P TruAlign Time Recorder uses the Lathem timecard E8 The time and date programming...

Page 5: ...use trouble with the punching mechanism Lithium battery contains perchlorate material special handling may apply Please go to the web site http www dtsc ca gov hazardouswaste perchlorate for information about proper methods of disposal About this Manual This manual will guide you through the installation set up and use of your 800P TruAlign Time Recorder Optional Accessories E8 100 Weekly timecard...

Page 6: ... Driver Optional Power Drill Drill Bits 2 8 Philips Head screws for Wall Mount Bracket 2 8 Anchors use for masonry wall installation only 2 8 32 x Philips Head screws to install Back Plate to Wall Mount Bracket 800P Time Recorder with back plate Wall Mount Bracket Installation User s Guide AC Wall Adapter Sample pack of E8 timecards ...

Page 7: ...inutes Printed Time Format AM PM hours Minutes Day of Week Language English Confirmation Beep Disabled Step 3 Using the supplied 8 32 x Philips head screws install the back plate to the wall mount bracket Step 2 Install the wall mount bracket to the wall using the supplied wall mount screws Note For best visibility mount the 800P about 48 inches from the floor 48 inches Step 4 With the back plate ...

Page 8: ...e the bottom of the timecard shelf is over the edge of the back plate before securing the screw Place the 800P on a solid flat surface You are ready to begin using the 800P Note The time date and other settings are factory set See Factory Settings to the right If these settings are acceptable you are ready to begin otherwise see Page 11 Programming the 800P Factory Settings Time U S Eastern Time D...

Page 9: ...ck plate from the time recorder by removing the Philips head screw Retain the Philips head screw for later Connect the AC Power Plug the AC adapter into the time recorder and then plug the wall adapter into the AC outlet NOTE The time recorder has an internal battery that will retain the programming if the time recorder is unplugged from AC power ...

Page 10: ...ed environment is recommended when programming the timeclock Using the 3 programming buttons Plus When you press the button you increment or change the selected setting SET You can set the value of the selected setting on the display by pressing the SET button which also moves you to the next available setting Minus When you use the button you decrement or change the selected setting What if I pre...

Page 11: ...s on the display press the SET button Note The seconds will be zeroed when you press the SET button so it s recommended to set the time 1 or 2 minutes ahead of the actual time Wait until the actual time matches the time recorder and then press the SET button which will synchronize the time recorder time with the actual time Example Set the time from 11 00am to 1 00pm Step 1 Press the button to scr...

Page 12: ... available selections When you have the desired setting on the display press the SET button Factory Settings The time recorder has several settings that are pre set at the factory The factory default settings include Daylight Savings On Spring Daylight Savings Second Sunday in March Fall Daylight Savings First Sunday in November Displayed Time Format AM PM hours Minutes Printed Time Format AM PM h...

Page 13: ...e and other functions press the and SET buttons at the same time 1 Set Month 01 12 2 Set Date 01 31 3 Set Year 00 99 4 Change Factory Default Daylight Savings y n n 5 Set Spring DST Month 00 12 03 6 Set Spring DST Sunday 1 2 3 4 Last 02 7 Set Fall DST Month 00 12 11 8 Set Fall DST Sunday 1 2 3 4 Last 01 9 Set 12 24 Hr Display 12 24 12 10 Set 12 24 Hr Print 12 24 12 11 Set Print Minute Format 1 Min...

Page 14: ...ential order and you must pass through each setting to complete the programming Simply press the SET button to accept the settings that you do not wish to change Your time recorder may not be programmed as you desired if you do not pass through each setting Step 1 Press the or button until the display shows 10 Step 2 Press the SET button when the month is correct The month will be accepted go to t...

Page 15: ...e in February make sure you set the date correctly for example leap year has 29 days otherwise the daylight savings may not activate correctly Example Set the date from 21 to 05 Step 1 Press the or button until the display shows 05 Step 2 Press the SET button when the date is correct The date will be accepted go to the Set Year function Note If you scroll past the date you wish continue pressing t...

Page 16: ...on The Set DST function 4 will display next Example Set the year from 01 to 09 Step 1 Press the or button until the display shows 09 Step 2 Press the SET button when the year is correct The year will be accepted go to the Change Factory Default Daylight Savings function Note If you scroll past the year you wish continue pressing the or button until the desired date displays then press the SET butt...

Page 17: ...ost customers should use the factory settings for daylight savings The daylight savings setting are set at the factory for the Second Sunday in March and the First Sunday in November To use the factory settings for daylight savings press the SET button at Function 4 Note Normally you would use the default settings and by pass the Daylight Savings settings by pressing the SET button For more inform...

Page 18: ...12 Show hours on display as AM PM 1 00 in the afternoon will show as PM 1 00 24 Show hours on display as 0 23 1 00 in the afternoon will show as 13 00 Example Set the format from 12 to 24 Step 1 Press the or button until the display shows 24 Step 2 Press the SET button when the format selection is correct The format will be accepted go to the Set 12 24 Hr Print function Note If you scroll past the...

Page 19: ...rint hours on the timecard as AM PM 1 00 in the afternoon will print as 1 00 P 24 Print hours on the timecard as 0 23 1 00 in the afternoon will print as 13 00 Example Set the format from 12 to 24 Step 1 Press the or button until the display shows 24 Step 2 Press the SET button when the format selection is correct The format will be accepted go to the Set Print Minute Format function Note If you s...

Page 20: ... 30 minutes will print as 30 2 Print minutes on the timecard as hundredths of hour 0 99 30 minutes will print as 50 Note See page 38 for a minutes to 1 100s of hour conversion chart Example Set the format from minutes to hundredths of an hour Step 1 Press the or button until the display shows 2 Step 2 Press the SET button when the format selection is correct The format will be accepted go to the S...

Page 21: ...week abbreviation in English on the timecard S Print the day of the week abbreviation in Spanish on the timecard F Print the day of the week abbreviation in French on the timecard Example Set the day of week language from English to French Step 1 Press the or button until the display shows F Step 2 Press the SET button when the language selection is correct The language will be accepted go to the ...

Page 22: ...tensity of the imprint on the timecard press the SET button to accept the factory setting The Confirmation Beep Disable Enable function 14 will display next Note Normally you would press the SET button to by pass the Set Print Intensity function For more information see Appendix B Changing the Print Intensity ...

Page 23: ...sound after each imprint on a timecard and also when you press the time recorder programming buttons Setting Values n Confirmation beep disabled this is the factory setting y Confirmation beep is enabled Example Set the confirmation beep to enabled y Step 1 Press the or button until the display shows y Step 2 Press the SET button when the setting is correct The setting will be accepted go to the T...

Page 24: ...est press the SET button to accept the factory setting After pressing the SET button the time recorder will go to the normal time date display and will be operational Note Normally you would press the SET button to by pass the TruAlign calibration function For more information see Appendix C Calibrating the TruAlign Function Appendix D Testing the Print Head ...

Page 25: ... recommended to use a Molly Bolt or Toggle Bolt type of wall anchor Step 2 Remove the Philips head screw holding the back plate on the time recorder Be sure to retain the Philips head screw for later Step 1 Using the wall mount bracket as a guide mark the location on the wall of where the screws will be installed Run the AC wall adapter cord through hole in the wall mount bracket and then install ...

Page 26: ...cured to the wall mount bracket plug the AC wall adapter into the time recorder Align and place the time recorder on the back plate and secure the two together with the 8 32 x Philips head screw being careful not to pinch the AC cord Plug the wall adapter into the AC outlet Wall Note Make sure the bottom of the timecard shelf is over the edge of the back plate before securing the screw ...

Page 27: ... cell to be printed When the timecard is aligned correctly an automatic imprint with the day and time will be recorded on the timecard Next four dashes show on the display and the indicator turns green indicating the printing is complete and the timecard can be removed Front View Display Timecard shelf TruAlign LED Guide AM PM Indicator Day of Week Indicator Daylight Savings Indicator ...

Page 28: ...SET button through Function 14 and 15 The time recorder will go to the normal time date display with the changes to the print intensity applied Example Set the print intensity from 5 to 7 Step 1 Press the or button until the display shows 7 Step 2 Press the SET button when the setting is correct The setting will be accepted continue pressing the SET button through Function 14 and 15 The time recor...

Page 29: ... an example of a timecard when the TruAlign function needs to be recalibrated How to calibrate the TruAlign function To recalibrate the TruAlign function see the instructions below Note It is recommended when performing the calibration function to be in a sitting position with the timeclock on a stable flat surface in an undisturbed environment Enter the Setup Mode See Page 13 Press the SET button...

Page 30: ...on The display will show CAL 1 insert and visually align a timecard see Figure 1 With the timecard fully inserted and properly aligned press and hold the button to register the alignment Note the value showing on the display Shift the card slightly left and right the value will increase or decrease When the display is at the smallest value release the button the display will show CAL2 Remove the t...

Page 31: ...value will increase or decrease When the display is at the highest value release the button the display will show END Remove the timecard Subtract the smaller registration value from the larger the difference should be greater than 50 If the value is less than 50 you should repeat the TruAlign calibration Press the SET button to complete the calibration The time recorder will go to the normal time...

Page 32: ...splay shows 4 Note Any value between 2 and 9 puts the time recorder into print head test mode Step 2 Press the SET button when the setting is correct The time recorder will be in the print head test mode Note If you scroll past the setting you wish continue pressing the or button until the desired setting displays then press the SET button 15 4 15 0 Step 3 With the time recorder in a normal time d...

Page 33: ...ton to go to Function 6 Press the or button to scroll through and set the desired Sunday for the spring daylight savings Then press the SET button to go to Function 7 Setting Values 1 First Sunday 2 Second Sunday 3 Third Sunday 4 Fourth Sunday L Last Sunday Use the or button to scroll through and set the desired month for the fall daylight savings Then press the SET button to go to Function 8 Pres...

Page 34: ...orrection To disable the daylight savings correction see the instructions below Enter the Setup Mode See Page 13 Press the SET button until you get to Function 4 Press the or button until the display shows Y Then press the SET button to go to Function 5 Press the or button until the display shows 00 Then press the SET button to go to Function 9 Press the SET button through Function 9 10 11 12 13 1...

Page 35: ...ress the SET button to accept a setting the display shows Err the function number you are currently configuring What does this error mean Typically if you see Err it means you have selected an invalid entry For example if you see Err 4 this means you have entered an invalid setting for Function 4 Why is it when there is a power failure I have to reset the time and date on the 800P You may need to ...

Page 36: ... 220vAC 80mA typical 50 60 Hz Memory BR2325 Coin Cell Lithium Battery change the battery every 7 years recommendation Environment 32o to 140 o F 0 o to 60 o C 95 Relative Humidity non condensing Timecard Storage 150 o F 65 o C maximum temperature Note The E8 timecards are sensitive to temperature and should always be stored in a cool dry location preferably out of exposure to direct sun light Stor...

Page 37: ...rs 1 01 21 35 41 68 2 03 22 36 42 70 3 05 23 38 43 71 4 06 24 40 44 73 5 08 25 41 45 75 6 10 26 43 46 76 7 11 27 45 47 78 8 13 28 46 48 80 9 15 29 48 49 81 10 16 30 50 50 83 11 18 31 51 51 85 12 20 32 53 52 86 13 21 33 55 53 88 14 23 34 56 54 90 15 25 35 58 55 91 16 26 36 60 56 93 17 28 37 61 57 95 18 30 38 63 58 96 19 31 39 65 59 98 20 33 40 66 60 1 00 ...

Page 38: ...ton or equivalent fully insured with shipping charges prepaid Lathem will not assume any responsibility for any loss or damage incurred in shipping 6 WARRANTY DISCLAIMER AND LIMITATION OF LIABILITY Except only the limited express warranty set forth above the products are sold with no expressed or implied warranties of any kind and the implied warranties of merchantability and fitness for a particu...

Page 39: ...a Wall 26 P Packing Contents 7 Print Head Test 25 Print Intensity 23 Program the Time Recorder 11 programming buttons 11 Q Quick Easy Setup 8 9 R Recalibrating the TruAlign Function 30 S Set 12 24 Hr Display 19 Set 12 24 Hr Print 20 Set Date 16 Set Day Print Language 22 Set Month 15 Set Print Minute Format 21 Set up Functions 14 Set Year 17 Setup 10 Setup Mode for Date and other Functions 13 SPECI...

Reviews: