background image

8

4.   BATTERY AND CHARGING

Use only the 20V battery in the charger provided. Other battery types may cause personal injury and or damage. Please read the charging manual attached with this package for specific 

information regarding safety and charging.
4.1  Charge battery to full capacity prior to use.
4.2  Charging time will vary according to voltage supply, the amount of the charge needed for that battery and temperature.
4.3  Temperature will affect battery life. It is best to charge when temperature is between 60° – 80° F (15° – 27° C). Do not charge when temperature drops below 40°F (5°C) or 

above 105°F (40°C).

4.4  Estimate roughly 30 minutes to fully charge a battery

5.   TOOL SET UP AND LOADING

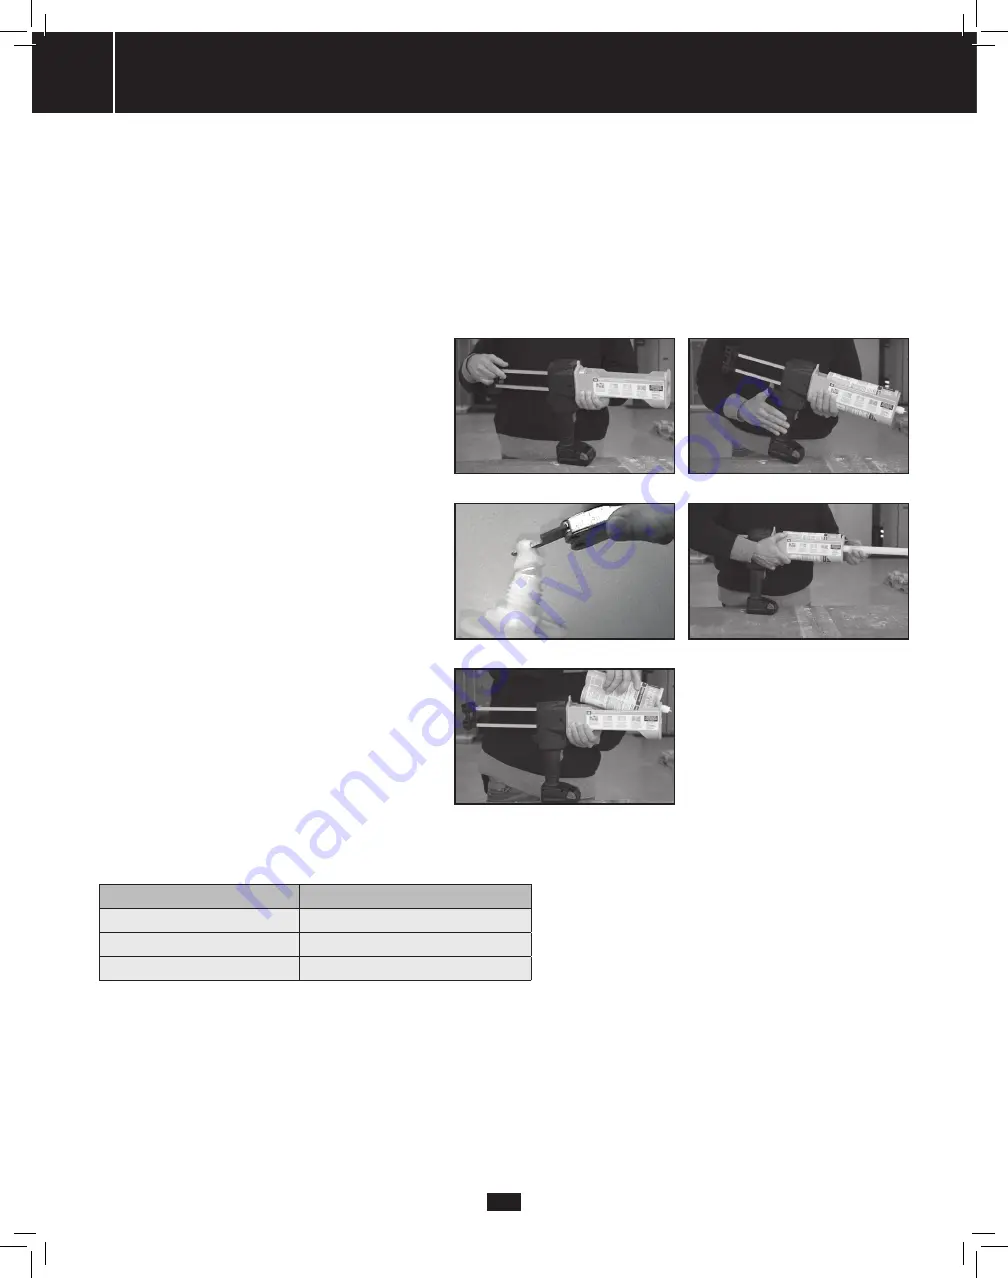
5.1  Open clutch lever, grasp rack handle and pull outward until fully open.
5.2  Remove protective tip by on top of cartridge and simply LATAPOXY

®


310 Stone Adhesive pry off to open both sides of cartridge.

5.3  Insert one LATAPOXY 310 Cartridge Pack into the Cartridge Housing,  

pushing tip through the hole at end of housing.

5.4  Push rack forward until pistons make contact with back of cartridge,  

close clutch.

NOTE: REMEMBER TO CONDITION THE MATERIAL TO AT  

LEAST 65° F (18°C) PRIOR TO USING!

5.5  Screw mixing nozzle onto the thread tightly and you are ready to apply!

6. DISPENSING

6.1  Squeeze trigger to begin dispensing material. Adjust the dispensing speed  

as desired by turning the dial on side of tool. You will see the pink and  

white components mix as they are pushed through the Mixing Nozzle.  

Make sure material is uniform in color when dispensed from the nozzle.

6.2  Hold the Cordless Mixer at an angle on the tile or stone to be adhered.  

Push the material into the stone by using a circle motion and using the  

edge of the nozzle to “key” the material as it is dispensing.  

Note: Cordless Mixer is equipped with an automatic reverse that engages  

after trigger is released to reduce any leakage. Build height of dab as  

needed to achieve plumb surface.

6.3  Apply dabs evenly distributed on back of the stone or tile; 5 dabs  

minimum, each corner and center. Cover at least 10% of the area of  

each piece (compressed dab). Finished dab thickness must be a  

minimum of 1/8" (3mm).

Approximate dab diameter required to achieve 10% coverage with 5 dabs:

TILE/STONE SIZE

DAB DIAMETER

12" x 12" (300 mm x 300 mm)

2" (50 mm) (each dab)

24" x 24" (600 mm x 600 mm) 

4" (100 mm) (each dab)

36" x 36" (900 mm x 900 mm)

6" (150 mm) (each dab)

NOTE: PULL OFF THE FIRST STONE INSTALLED TO MEASURE THE DIAMETER OF EACH DAB. ADJUST THE QUANTITY OF LATAPOXY

®

 310 STONE 

ADHESIVE TO ACHIEVE THE APPROPRIATE COVERAGE. ONCE THE CORRECT AMOUNT HAS BEEN DETERMINED, SET DOSING KNOB TO OBTAIN THE 

CONSISTENT LEVEL FOR ALL VENEERS.

6.4   Dispense all the material until the rack drive is completely at the end of the cartridge and can not move any longer. You are now ready to remove the used cartridge and replace with 

a new one.

TIP: EVALUATE THE WALL PRIOR TO INSTALLING THE VENEER, YOU’LL WANT TO SEE IF THERE ARE ANY AREAS SEVERELY OUT OF PLUMB. DROP A 

LINE FROM THE TOP AND IDENTIFY ANY HIGH POINTS OR “SUNKEN IN” AREAS. MAKE SURE YOUR FIRST COURSE OR TWO CAN BE FOLLOWED ALL 

THE WAY UP THE WALL, SO THAT YOU DON’T RUN INTO A HIGH POINT WHICH WILL BE OUT OF PLUMB WITH WHAT YOU JUST SET.

FIGURE 5.1

FIGURE 5.2

FIGURE 5.3

FIGURE 5.4

FIGURE 5.5

Summary of Contents for LATAPOXY 310

Page 1: ...s n Le mode d emploi du distributeur sans fil LATAPOXY 310 n Instructions fournies dans la FDS du produit distribu de la cartouche ANTES DE USAR LATAPOXY 310 MEZCLADOR INAL MBRICO LEA COMPRENDA Y GUAR...

Page 2: ...2 LATAPOXY 310 Cordless Mixer Instruction Manual 3 Mode d emploi de distributeur sans fil LATAPOXY 310 11 Manual de instrucciones de LATAPOXY 310 mezclador inal mbrico 19...

Page 3: ...he Variable Speed Power Trigger on invites accidents 4 4 Do not overreach Keep proper footing and balance at all times Proper footing and balance enable better control of the tool in unexpected situat...

Page 4: ...ernal components This may cause an unsafe condition 8 3 Use only mild soap for cleaning Other cleaning agents such as gasoline carbon tetrachloride ammonia etc may damage plastic parts Do not immerse...

Page 5: ...hown in figure 3 at left once the clutch lever is opened the racks are free to move and the tool will not be able to dispense The racks can also be manually moved forward with the clutch lever closed...

Page 6: ...harger for European Union Part number 1020 029 EU n 220 Volt AC Charger for Australia Part number 1020 029 AU FACTORY SERVICE CENTER Contact LATICRETE Technical Services at 800 243 4788 ext 1235 with...

Page 7: ...n Slate and other fissile stone may delaminate due to the nature of their layered composition Manufacturers of such stone must provide written approval to the installer that the stone is suitable for...

Page 8: ...pensed from the nozzle 6 2 Hold the Cordless Mixer at an angle on the tile or stone to be adhered Push the material into the stone by using a circle motion and using the edge of the nozzle to key the...

Page 9: ...l All batteries shall be disposed of safely in accordance with local laws and regulations 8 1 Always unplug Charger before cleaning and when it is not in use Failure to do so may result in shock or fi...

Page 10: ...isengaged n Cartridge tip not removed n LATAPOXY 310 Stone Adhesive too cold n Adhesive has cured in mixing nozzle n Cartridge failure blow by n Close clutch lever n Remove tip n Condition material to...

Page 11: ...Les v tements amples les bijoux et les cheveux longs peuvent tre pris dans les pi ces en mouvement 4 3 viter les d marrages accidentels S assurer que l interrupteur d alimentation vitesse variable est...

Page 12: ...i ci et pourrait l endommager de fa on ce qu il constitue un danger 8 ENTRETIEN 8 1 Ne pas d monter l outil ou la batterie Enlever la batterie de l outil lorsqu elle a atteint la fin de sa vie utile N...

Page 13: ...us une fois que le levier d embrayage est lev les supports peuvent bouger et par cons quent l outil ne pourra pas effectuer de distribution Les supports peuvent aussi tre avanc s manuellement en ferma...

Page 14: ...nne num ro de pi ce 1020 029 EU n Chargeur CA de 220 V pour le Royaume Uni num ro de pi ce 1020 029 UK n Chargeur CA de 220 V pour l Australie num ro de pi ce 1020 029 AU CENTRE DE SERVICE DE L USINE...

Page 15: ...en raison de leur nature stratifi e Les fabricants de telles pierres doivent fournir l installateur une approbation crite indiquant que la pierre convient l utilisation pr vue n Remarque Les surfaces...

Page 16: ...g chette pour commencer faire sortir le produit Pour ajuster la vitesse de distribution tourner le bouton sur le c t de l outil Le m lange des composants rose et blanc est visible travers la buse de m...

Page 17: ...r l outil la batterie ou le chargeur La batterie doit tre retir e de l outil avant que celui ci puisse tre mis au rebut Toutes les batteries doivent tre limin es en toute s curit selon les lois et les...

Page 18: ...310 trop froid n Adh sif durci dans la buse de m lange n Cartouche d fectueuse fuite de piston n Fermer le levier d embrayage n D tacher l embout n Amener le produit 18 C 65 F au minimum n Changer la...

Page 19: ...l arranque accidental Aseg rese de que el Interruptor de velocidad variable est en la posici n de cerrado o apagado antes de insertar la bater a Si usa herramientas con el dedo en el interruptor de ve...

Page 20: ...1 No desarme la herramienta o la bater a Al t rmino de su vida til extraiga la bater a de la herramienta Coloque la bater a intacta para reciclado y o des chela Desensamblar y volver a ensamblar pued...

Page 21: ...ra 3 una vez que la palanca de sujeci n se abre las rejillas pueden moverse libremente y la herramienta ya no podr distribuir Las rejillas tambi n pueden moverse manualmente hacia adelante con la pala...

Page 22: ...nido N mero de pieza 1020 029 Reino Unido n Cargador de CA de 220 voltios para Australia N mero de pieza 1020 029 AU CENTRO DE SERVICIO DE F BRICA Si experimenta problemas o desea hacer preguntas acer...

Page 23: ...27 m2 300 pies2 6 mm 1 4 pulg 6 mm 1 4 pulg de espesor 14 m2 150 pies2 12 mm 1 2 pulg 12 mm 1 2 pulg de espesor 7 m2 75 pies2 La cobertura se basa en pies cuadrados de piedra instalados 2 LIMITACIONE...

Page 24: ...DE LA HERRAMIENTA 5 1 Abra la palanca del seguro tome el asa de la rejilla y tire hacia afuera hasta que se abra por completo 5 2 Retire la punta protectora que se encuentra en la parte superior del c...

Page 25: ...AR 8 LIMPIEZA Y MANTENIMIENTO LATAPOXY 310 Mezclador sin Cable ha sido dise ado para brindar un funcionamiento seguro No requiere de mantenimiento regular sin embargo es importante mantener la herrami...

Page 26: ...ale material n El embrague se solt n La punta del cartucho no se retir n LATAPOXY 310 Adhesivo para Piedra est demasiado fr o n El adhesivo ha fraguado en la boquilla mezcladora n Falla del cartucho s...

Page 27: ...27...

Page 28: ...All trademarks shown are the intellectual properties of their respective owners LATICRETE International Inc One LATICRETE Park North Bethany CT 06524 3423 USA 1 800 243 4788 1 203 393 0010 www laticr...

Reviews: