13
5. Move the throttle trigger forward again to engage
reverse (Profile #1). The LED will turn off. Once full
reverse power is reached, the LED will shine RED.
6. To stop, return the throttle trigger to neutral. Note that
there is no programmed delay when changing from
reverse to forward. Use caution to avoid slamming the
speed control from reverse to forward. On high-traction
surfaces, this could result in transmission or driveline
damage.
7. To turn the ESC off, press and hold the EZ-Set button
until the red LED turns off.
8. The ESC is equipped with thermal shutdown protection
to guard against overheating caused by excessive
current flow. If the operating temperature exceeds safe
limits, the ESC will automatically shut down. The LED
on the face of the ESC will rapidly blink red, even if
the throttle trigger is moved back and forth. Once the
temperature returns to a safe level, the ESC will once
again function normally.
ESC Setup Programming
(Calibrating your ESC and transmitter)
Read through all of the programming steps before you
begin. If you get lost during programming or receive
unexpected results, simply unplug the battery, wait a few
seconds, plug the battery back in, and start over.
1. Elevate the model on a block or a stand so that all the
tires are off the ground. This is a precaution to prevent
runaway when the speed control in turned on before it
is programmed.
2. Connect a fully charged battery pack to the ESC.
3. Turn on the transmitter (with the throttle at neutral).
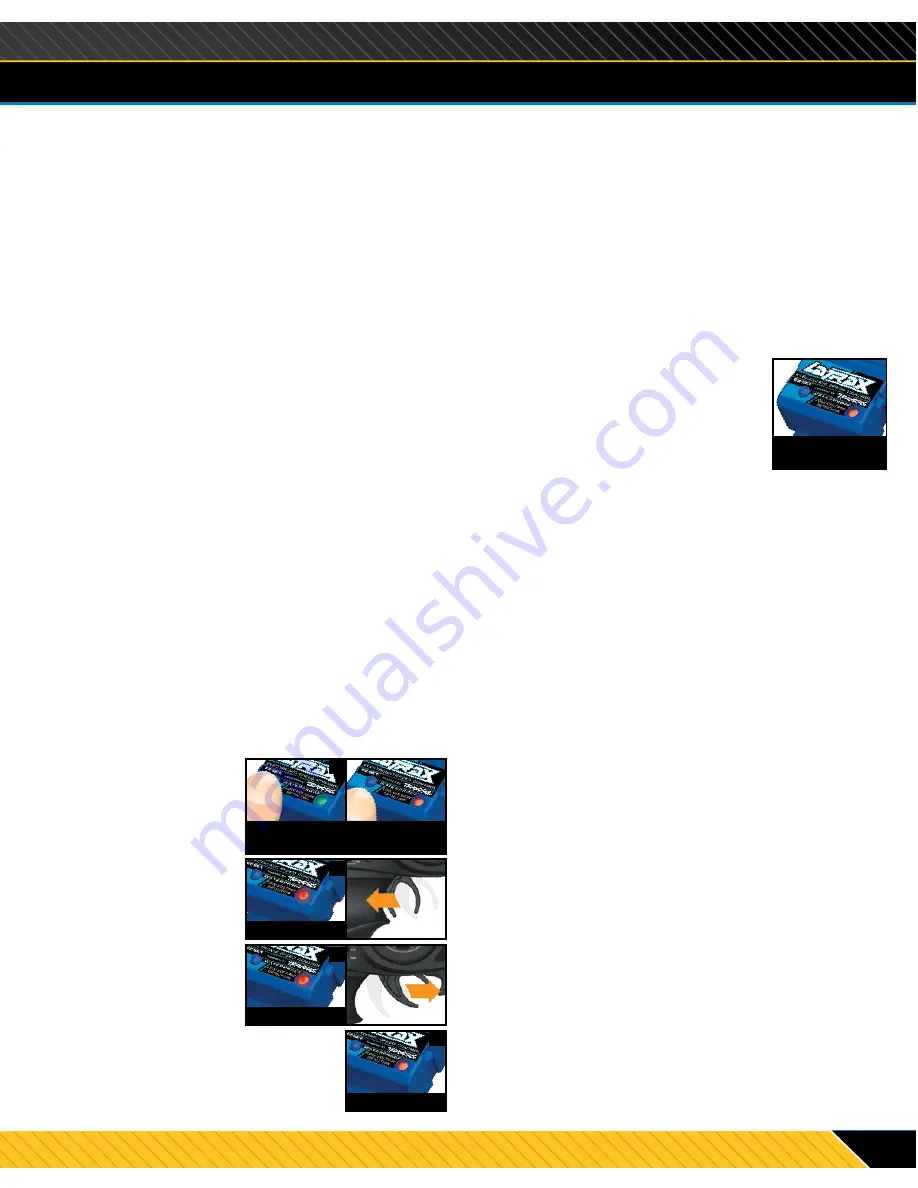
4. Press and hold the EZ-
Set button (A). The LED
will first turn green and
then red. Release the
button.
5. When the LED blinks
RED ONCE, pull the
throttle trigger to the full
throttle position and hold
it there (B).
6. When the LED blinks RED
TWICE, push the throttle
trigger to the full reverse
and hold it there (C).
7. When the LED blinks GREEN ONCE,
programming is complete. The LED will
then shine red, indicating the ESC is on
and at neutral (D).
ESC Battery Settings (Low-Voltage Detection Setting)
The ESC is equipped with a built-in Low-Voltage Detection
feature that constantly monitors the battery voltage when
activated.
This feature is not compatible with the NiMH
battery supplied with your model.
Low-Voltage Detection
has been DISABLED for best performance with your battery;
however, you should verify that the setting has not been
changed before each use.
Verify that Low-Voltage Detection is DISABLED:
1. Turn on the transmitter (with the throttle at neutral).
2. Connect a fully charged battery pack to the model.
3. Press and release the EZ-Set button
to turn the ESC on. If the LED is solid
red, then the Low-Voltage Detection
is DISABLED. If the LED is solid
green, then Low-Voltage Detection
is ACTIVATED (not safe for use with
NiMH batteries).
To disable Low-Voltage Detection (NiMH setting):
1. Make sure the LED on the ESC is on and GREEN.
2. Press and hold the EZ-Set button (the LED will turn off).
After ten seconds, the motor will beep three times and
the LED will shine RED. Release the button.
3. Low-Voltage Detection is now DISABLED.
ADJUSTING THE ELECTRONIC SPEED CONTROL
Solid Red LED
Safe for NiMH use
Green then Red,
Release
A
Once Red
B
Twice Red
C
Solid Red
D
LED Codes and Protection Modes
• Solid Red:
ESC power-on light.
• Fast Blinking Red:
The ESC is equipped with thermal
shutdown protection to guard against overheating caused by
excessive current flow. If the operating temperature exceeds
safe limits, the ESC will automatically shut down. Let the
ESC cool.
• Slow Blinking Red
(with Low-Voltage Detection on):
The ESC has entered Low-Voltage Protection. When the
battery voltage begins to reach the minimum recommended
discharge voltage threshold, the ESC will limit the power
output to 50% throttle. When the battery voltage attempts to
fall below the minimum threshold, the ESC will shut down all
motor output. The LED on the speed control will slowly blink
red, indicating a low-voltage shutdown. The ESC will stay in
this mode until a fully charged battery is connected.
• Fast Blinking Green:
The ESC’s LED will blink fast green if
the speed control is not receiving a signal. Make certain the
speed control is properly plugged into the receiver and the
transmitter is switched on.
• Flashing Red and Green:
The ESC has entered Over
Voltage Protection. If a battery with too high voltage is used,
the ESC will go into a failsafe mode.
Summary of Contents for 76054
Page 1: ...OWNER S MANUAL MODEL 76054...


