ECO Silver
105 / 124
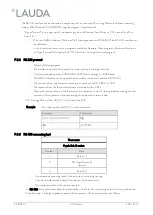
The RS 232 interface can be checked in a simple way with a connected PC running Microsoft Windows operating
system. With Windows
®
95/98/NT/XP using the program "HyperTerminal".
“HyperTerminal” is no longer part of the operating system in Windows Vista, Windows 7, Windows 8 and Win-
dows 10.
–
With the LAUDA software “Wintherm Plus” (catalogue number LDSM2002) the RS 232 interface can
be addressed.
–
In the Internet there are terminal programs available as freeware. These programs offer similar functions
as “HyperTerminal” (for example PuTTY). Search for “serial port terminal program”.
–
Note the following aspects:
–
The interface operates with one stop bit, no parity bit and with eight data bits.
–
Transfer speed alternatively: 2400, 4800, 9600 (factor setting) or 19200 baud.
–
The RS 232 interface can be operated with or without hardware-handshake (RTS/CTS).
–
The command from the computer must be terminated with a CR, CRLF or LFCR.
–
The response from the thermostat is always terminated with a CRLF.
–
After each command sent to the thermostat, it is necessary to wait for the reply before sending another
command. This ensures that the sequencing of inquiries and answers is clear
CR = Carriage Return (Hex: 0D); LF = Line Feed (Hex: 0A)
Example:
Set-value transfer of 30.5 °C to the thermostat
Computer
Thermostat
„OUT_SP_00_30.5“CRLF
„OK“CRLF
Thermostat
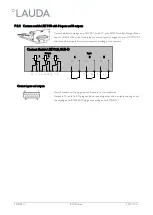
9-pole Sub-D socket
Contact
Data
1
Data A (-)
5
SG (Signal Ground)
optional
6
Data B (+)
–
Use screened connecting leads. Connect screen to the plug housing.
–
The wires are electrically isolated from the rest of the electronics.
–
Non-assigned pins should not be connected.
An RS 485 bus requires essentially a bus termination in the form of a terminating network, which provides a de-
fined idle state in the high impedance phases of bus operation. The bus termination is as follows:
F.
3
.2
RS 232 protocol
F.
3
.3
RS 485 connecting lead
Summary of Contents for ECO Silver E 10 S
Page 1: ...ECO Silver Operation manual ...
Page 2: ......
Page 4: ......
Page 78: ...78 124 ECO Silver 10 2019 i ...
Page 79: ...10 2019 i ECO Silver 79 124 ...
Page 80: ...80 124 ECO Silver 10 2019 i Appendix with settings ...
Page 111: ...10 2019 i ECO Silver 111 124 5 Click on Continue installation 6 Click on the key Finish ...
Page 113: ...10 2019 i ECO Silver 113 124 ...
Page 120: ...120 124 ECO Silver 10 2019 i Blank page ...
Page 121: ...10 2019 i ECO Silver 121 124 Blank page ...
Page 122: ...122 124 ECO Silver 10 2019 i ...
Page 125: ......
Page 126: ......
Page 127: ......


