background image

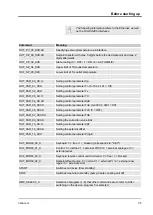
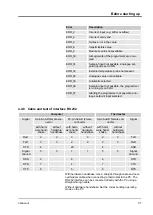
3.6  Type plate

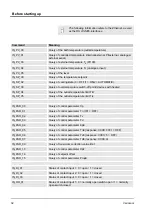
The type plate information is explained in detail in the following

table. Certain information is dependent on installed equipment.

Specification

Description

Type

Device type

Catalogue No.

Catalogue number of the

device

Serial No.

Serial number of the device

Refrigerant I

Refrigerant that is used in the

cooling unit of the device

Fill quantity I

Fill quantity of the refrigerant

PS high pressure I

maximum permitted operating

pressure on the refrigerant high

pressure side (compression,

liquefaction)

PS low pressure I

maximum permitted operating

pressure on the refrigerant low

pressure side (expansion,

evaporation)

Power consumption

Power consumption of the

device

Power consumption with heater Power consumption of the

device; only applicable for

devices with heater

Type of protection

IP type of protection of the

device

Fuse

Fuse used in the device

Heater fuse

fuse used in the device; only

applicable for devices with

heater

Class according to DIN

12876-1

Device class according to

DIN 12876-1

Fig. 6: Type plate (example)

Device description

Variocool


22

Summary of Contents for VC 10000

Page 1: ...erating instructions Read the instructions prior to performing any task Variocool VC 1200 W VC 2000 W VC 3000 W VC 5000 W VC 7000 W VC 10000 W Circulation chiller The right temperature worldwide V07REV04 ...

Page 2: ... CO KG Pfarrstrasse 41 43 97922 Lauda Königshofen Germany Phone 49 0 9343 503 0 Fax 49 0 9343 503 222 E Mail info lauda de Internet https www lauda de Variocool 2 YAWD0032 6 en_GB 23 03 2020 To replace issues V6R18 V5R19 V5R18 V5R16 V5R12 V5R05 V4R22 V3R101 V3R100 LAUDA 2012 ...

Page 3: ...nal protective equipment 11 1 14 Product safety label 11 1 15 Structure of warnings 11 2 Unpacking 13 3 Device description 14 3 1 Device types 14 3 2 Design of the device 15 3 3 Operating elements 17 3 3 1 Mains switch 17 3 3 2 Screen buttons 17 3 4 Functional elements 18 3 4 1 Hydraulic circuit 18 3 4 2 Refrigeration unit 18 3 4 3 Interfaces 19 3 5 Equipment 20 3 6 Type plate 22 4 Before starting...

Page 4: ...quids 40 5 2 Establishing power supply 41 5 3 Switching on device for the first time and filling with water 42 5 3 1 Fill mode 42 5 3 2 Switching on and filling device 43 5 4 Setting pump pressure 45 6 Operation 46 6 1 General safety instructions 46 6 2 Operating modes 46 6 3 Menu structure overview 46 6 4 Switching on the device 49 6 5 The display 49 6 5 1 Basic window 49 6 5 2 Menu window 51 6 5...

Page 5: ...of the internal actual temperature calibration 67 6 14 Restoring factory calibration internal temperature sensor 67 6 15 Restoring factory settings 68 6 16 Device status 69 6 16 1 Retrieving device status 69 6 16 2 Read Errorstore 70 6 16 3 Retrieving device data 70 6 16 4 Retrieving software version 70 6 16 5 Displaying device type 71 6 16 6 Displaying serial numbers 71 6 17 Programmer 71 6 17 1 ...

Page 6: ...aining condenser 90 10 Disposal 92 10 1 Disposing of refrigerant 92 10 2 Device disposal 92 10 3 Disposing of packaging 92 11 Technical Data 93 11 1 General data 93 11 2 Cooling capacity 95 11 3 Refrigerant and filling quantity 95 11 4 Filling volume and characteristics of the pumps 96 11 5 Heater 99 11 6 Equipment voltage independent 100 11 7 Line fuse 100 12 Accessories 101 13 General 102 13 1 C...

Page 7: ...by the design in accordance with the applicable standards Residual haz ards are reduced using any of the following measures n If relevant there are safety fittings for the device These devices are essential for the safety of the device Their func tionality must be ensured by carrying out the appropriate main tenance activities The safety fittings of the device are described in this Safety chapter ...

Page 8: ...eable misuse Misuse of the device must always be prevented Among other things the following uses are considered to be fore seeable misuse n Operation of the device without heat transfer liquid n Incorrect connection of hoses n Setting the device up on a tabletop surface n Setting an incorrect pump pressure 1 5 EMC requirements Tab 1 Classification in accordance with EMC requirements Device Interfe...

Page 9: ...ents for the heat transfer liquid n Heat transfer liquids are used for temperature control Only LAUDA heat transfer liquids are approved for use in the device LAUDA heat transfer liquids are tested and approved by LAUDA DR R WOBSER GMBH CO KG n In each case the heat transfer liquids cover a specific tem perature range This temperature range must match the tem perature range of your application n T...

Page 10: ...p ment n Ambient temperature range from 5 to 40 C Ambient temperature range with outdoor installation from 20 to 40 C n Maximum relative air humidity 80 for temperatures up to 31 C decreasing linearly to 50 relative air humidity at 40 C n Altitude up to a maximum of 2 000 m above sea level n Mains voltage fluctuations up to 10 of the rated voltage n Overvoltage category II n Contamination level 2 ...

Page 11: ...ivities These protec tive goggles must comply with the legal requirements for personal protective equipment of the European Union 1 14 Product safety label The graphic symbol Hot surface is applied to the device This symbol warns about hot surfaces on the device These surfaces must not be touched during operation To be able to touch these surfaces during other life cycles such as e g during mainte...

Page 12: ...e 1 Measure n A warning of the type Caution indicates a potentially haz ardous situation n This can result in minor reversible injuries if the warning is disregarded CAUTION Type and source Consequences in the event of non compliance Measure 1 Measure A notice warns about possible property or environmental damage NOTICE Type and source Consequences in the event of non compliance Measure 1 Measure ...

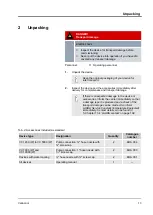
Page 13: ... the device or accessories inform the carrier immediately so that a damage report is produced and a check of the transport damage can be made Also inform LAUDA Service Constant Temperature Equipment immediately Contact details can be found in Ä Chapter 13 4 LAUDA contact on page 102 Tab 2 Accessories included as standard Device type Designation Quantity Catalogue number VC 1200 W to VC 5000 W Pump...

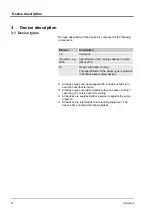
Page 14: ...n in the device type is optional It identifies water cooled devices n All device types can be equipped with a heater ex factory to heat the heat transfer liquid n All device types are also available without a heater in which case they can only be used for cooling n All devices are equipped with a bypass to regulate the pump pressure n All devices are intended as floor standing equipment The device...

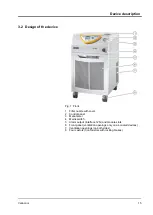
Page 15: ... Control panel 3 Manometer 4 Mains switch 5 Alarm output interface 12N and module slots 6 Front panel ventilation openings only on air cooled devices 7 Ventilation openings on both sides 8 Four castors front castors with locking brakes Device description Variocool 15 ...

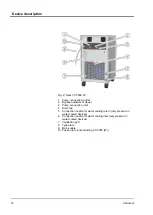
Page 16: ...esent on water cooled devices 7 Ventilation grid 8 Type plate 9 Mains cable 10 Fuses up to and including VC 3000 W Device description Variocool 16 1 Pump connection outlet 2 Bypass adjustment wheel 3 Pump connection inlet 4 Drain tap 5 Connection nozzle for water cooling return only present on ...

Page 17: ...ositions n In position I the device is switched on n In position O the device is switched off The mains power switch can be turned to the following positions n In position I the device is switched on n In position O the device is switched off 3 3 2 Screen buttons 1 Arrow buttons 2 ENTER button 3 Soft keys Functions on the screen of the device can be controlled using the screen buttons Control pane...

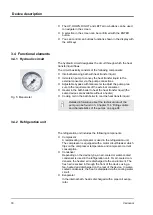
Page 18: ...il in the bath boiler to cool the heat transfer liquid Detailed information about the technical data of the pump can be found in Ä Chapter 11 4 Filling volume and characteristics of the pumps on page 96 3 4 2 Refrigeration unit The refrigeration unit includes the following components n Compressor A reciprocating compressor is used in the refrigeration unit The compressor is equipped with a motor c...

Page 19: ...dates are installed on the device via this interface only for updaters no process interface The devices are equipped with an alarm output as standard equip ment This changeover contact is switched if the device changes to the standby state or if an alarm is triggered Reverse flow protec tion can be activated in this way or faults can be registered on a system Devices can be supplemented with addit...

Page 20: ...te control can be used with the constant temperature equipment via the LiBus connection It is also possible to con nect additional modules such as the LRZ 918 but without Pt100 interface A solenoid valve for cooling water control reverse flow protection or a flow through cooler can for example be connected in this way n Ethernet USB module catalogue number LRZ 921 The module provides the customer ...

Page 21: ...maining pre heating time required before the compressor can be started The compressor is preheated using its own heater The other components pump and heater are started immediately when the device is switched from standby to operation n Outdoor installation is not configured the following warning is shown 349 Preheat device The display shows this warning for 10 seconds after switching on the devic...

Page 22: ...erating pressure on the refrigerant high pressure side compression liquefaction PS low pressure I maximum permitted operating pressure on the refrigerant low pressure side expansion evaporation Power consumption Power consumption of the device Power consumption with heater Power consumption of the device only applicable for devices with heater Type of protection IP type of protection of the device...

Page 23: ...MC requirements on page 8 Operation outdoors at outdoor temperatures below 5 C A warning is displayed on the screen indicating the duration of the preheating time for the compressor and whether the compressor needs preheating Increased wear or damage to the compressor may result if the compressor is not preheated Further information can be found at Ä Outdoor installation on page 21 Personnel n Ope...

Page 24: ...ump pressure 4 2 1 Thermostatic hoses and hose clips CAUTION Discharge of heat transfer liquid during operation caused by use of unsuitable tubes Scalding frostbite Use tubes with temperature resistance that is appropriate for the operating temperature range of the device Use hoses with a temperature resistance of at least 100 C for devices with a heater CAUTION Contact with hot or cold tubes Burn...

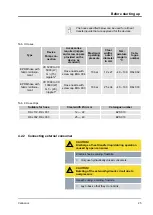
Page 25: ...40 100 RKJ 032 EPDM hose with fabric reinforce ment VC 7000 to VC 10000 W G 1 20 nipple 1 Hose nozzle with screw cap EOA 003 10 bar 25 x 34 40 100 RKJ 033 Tab 4 Hose clips Suitable for hose Clear width Ø in mm Catalogue number RKJ 112 RKJ 031 12 22 EZS 013 RKJ 032 RKJ 033 25 40 EZS 016 4 2 2 Connecting external consumer CAUTION Discharge of heat transfer liquid during operation caused by open cons...

Page 26: ...pe and become a danger for persons and material 4 3 Cooling water 4 3 1 Requirements for the cooling water This section is relevant for the following n For water cooled devices NOTICE Schema cooling circuit starts leaking due to corro sion Device damage Do not use corrosive cooling water There are specific requirements concerning the purity of the cooling water A suitable process for treating and ...

Page 27: ...biological content bacteria that may settle in the cooling water circuit Data Value Unit pH value 7 5 9 0 Hydrogen carbonate HCO3 70 300 mg l Chlorides 50 mg l Sulphates SO4 2 70 mg l Ratio of hydrogen carbonate HCO3 sulphates SO4 2 1 Total water hardness 4 0 8 5 dH Electrical conductivity 30 500 μS cm Sulphite SO3 2 1 mg l Free chlorine gas Cl2 0 5 mg l Nitrates NO3 100 mg l Ammonia NH3 not permi...

Page 28: ... the drain area so that spraying out of hot cooling water is not possible n Prevent kinking or crushing of the hoses n We recommend using a leak detector with water shut off to prevent damage due to cooling water system leaks n Ensure that the cooling water meets the required criteria n In the case of leaks in the condenser there is the danger that refrigerating machine oil and refrigerant from th...

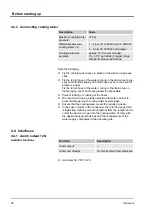
Page 29: ...ound state when no faults occur n Pins 1 and 2 are closed n Pins 3 and 2 are open Information on the settings for the alarm output can be found in Ä Chapter 6 12 7 Configuring alarm output on page 66 Note the following n The equipment connected to the low voltage inputs and low voltage outputs must have be safely separated from dangerous voltages according to DIN EN 61140 For example using double ...

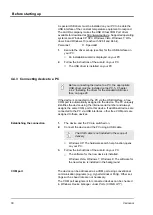
Page 30: ...terface a free COM port is automatically assigned to the device The PC uniquely identifies the device using the internal serial number and always assigns the same COM port to this device If additional devices are connected to the PC via USB interfaces other free COM ports are assigned to these devices 1 The device and the PC are switched on 2 Connect the device and the PC using a USB cable The USB...

Page 31: ...unit DANGER Contact with live parts Electric shock Disconnect the device from the mains power supply before installing modules 1 Touch the grounded bare metal stainless steel rear side of the circulation chiller to discharge any electrostatic charge 2 Remove the module from the packaging 3 Switch off the circulation chiller and unplug the mains plug 4 The module slots are protected with a cover Re...

Page 32: ...e limit TiL IN_PAR_00 Query of control parameter Xp IN_PAR_01 Query of control parameter Tn 181 OFF IN_PAR_02 Query of control parameter Tv IN_PAR_03 Query of control parameter Td IN_PAR_04 Query of control parameter KpE IN_PAR_05 Query of control parameter TnE response XXXX 9001 OFF IN_PAR_06 Query of control parameter TvE response XXXX 5 OFF IN_PAR_07 Query of control parameter TdE response XXXX...

Page 33: ...number of RS 232 485 module VERSION_Y Query of software version number of Ethernet module VERSION_Z Query of software version number of EtherCAT interface VERSION_D Query of software version number of digital interface VERSION_M_0 Query of software version number of solenoid valve cooling water VERSION_M_3 Query of software version number of solenoid valve shut off valve 1 VERSION_M_4 Query of sof...

Page 34: ...onse e g 20_14_12_20 day 20 14 12 20 LOG_IN_03 Query of recording interval from data logger response in seconds Please note n For _ space character is also permitted n Unless otherwise specified for the command the reply is always in fixed decimal format XXX XX or XXX XX for neg ative values or ERR_X RS 485 interface e g A015_XXX XX or A015_ERR_X n The command from the control centre must be termi...

Page 35: ...rol parameter TnE 0 9000 s 9001 Off OUT_PAR_06_XXXX Setting control parameter TvE 5 OFF OUT_PAR_07_XXXX X Setting control parameter TdE OUT_PAR_09_XXX X Setting the correction value limit OUT_PAR_10_XX X Setting control parameter XpF OUT_PAR_14_XXX X Setting the setpoint offset OUT_PAR_15_XXX Setting control parameter PropE OUT_MODE_00_X Keyboard 0 free 1 blocked corresponds to KEY OUT_MODE_01_X C...

Page 36: ...l centre must be terminated with CR CRLF or LFCR n The response from the constant temperature equipment is always terminated with CRLF n After every command sent to the constant temperature equip ment it is necessary to wait for a response before the next command can be sent This way the allocation of queries and responses is clear CR Carriage Return hex 0D LF Line Feed hex 0A XXXX XX XXXX X XXXX ...

Page 37: ...Cable and test of interface RS 232 Computer Thermostat Signal 9 pin Sub D female con nector 25 pin Sub D female connector 9 pin Sub D female con nector Signal with hard ware hand shake without hardware handshake with hard ware hand shake without hardware handshake with hard ware hand shake without hardware handshake RxD 2 2 3 3 2 2 TxD TxD 3 3 2 2 3 3 RxD DTR 4 20 4 DSR Signal Ground 5 5 7 7 5 5 S...

Page 38: ...minal program 4 4 9 Protocol RS 232 Please note n Connection to SUB D 9 pin socket n The interface operates with 1 stop bit no parity bit and 8 data bits n Selectable transmission speed 2400 4800 9600 factory set ting or 19200 baud n The RS 232 interface can be operated with OR without hard ware handshake RTS CTS To do so pin 4 DSR and pin 6 DTR as well as pin 7 CTS and pin 8 RTS must be con necte...

Page 39: ...can be activated using jumpers 4 4 11 Protocol RS 485 Please note n The interface operates with 1 stop bit no parity bit and 8 data bits n Selectable transmission speed 2400 4800 9600 factory set ting or 19200 baud n The device address always precedes the RS 485 commands Up to 127 addresses are possible The address must always have three digits A000_ to A127_ n The command from the computer must b...

Page 40: ...n in mm s for temperature Container size Catalogue number 5 l 10 l 20 l Kryo 30 Monoethy lene glycol and water mixture 30 90 4 50 at 25 C LZB 109 LZB 209 LZB 309 Aqua 90 decalcified water 5 90 1 LZB 120 LZB 220 LZB 320 Note the following for Kryo 30 n The water content is reduced during long operating at higher temperatures and the mixture becomes flammable flash point 119 C Check the mixture rati...

Page 41: ...evices must be fused with a circuit breaker of max 16 amperes Exception Devices with 13 ampere UK plugs n Three phase devices Three phase devices must be fused according to the power consumption The value can be found on the type plate Always select the fuse that is immediately higher The use of an excessively high fuse is not permitted Personnel n Specialist The pump of the device types VC 5000 W...

Page 42: ...he filling at the latest now If a continuous tone sounds the device is overfilled and cannot be started You must drain some heat transfer liquid from the device to be able to start it again To fill an external consumer press the Standby softkey when there is sufficient fill level to start the pump The heat transfer liquid now pumped into the external consumer can be refilled immediately If the fil...

Page 43: ...ny heat transfer liquid Use a funnel for filling 1 Close the drain tap Turn the lever to the left for this 2 Switch on the device using the mains power switch For devices VC 3000 W and lower turn the mains switch to Position 1 For devices VC 5000 W and higher turn the mains switch to Position 1 A signal tone sounds 3 The type designation and version numbers of the software installed on the device ...

Page 44: ...e audible signal of the device If necessary use a funnel for filling The filling mode can be invoked again at any time using the menu 8 Close the filler nozzle with the cover 9 End the filling mode by selecting and confirming End filling After ending the filling mode the device starts the temperature control thermostating provided the starting state is not set to off Changing the starting mode can...

Page 45: ...t wheel on the back of the device To do so turn the adjustment wheel anticlockwise Personnel n Operating personnel CAUTION Bursting of the external consumer due to overpres sure Scalding frostbite cutting Use a pressure relief device on pressure sensitive consumers e g glass reactors CAUTION Bursting of the external consumer due to overpres sure Scalding frostbite cutting For consumers with a maxi...

Page 46: ...with a heater may reach temperatures of up to 100 C 6 2 Operating modes Two operating modes are supported for the devices n During operation the components of the device are operated n In the standby operating mode all components of the device are switched off Only the screen of the device is supplied with power For example this operating mode is suitable for making extensive settings 6 3 Menu str...

Page 47: ...Fig 13 Menu structure part 1 Operation Variocool 47 ...

Page 48: ...Fig 14 Menu structure part 2 Menu structure for Graph Clock and Standby Operation Variocool 48 ...

Page 49: ...g on the device The basic window contains different components depending on the state 1 Expanded status display 2 Status display 3 Internal actual temperature Tint depending on set control vari able the external actual temperature Text is also displayed here 4 Softkey bar 1 Level indicator 2 Heater is active and heats with the displayed percentage of total power This display is only available if t...

Page 50: ...in this bar Unlike devices with a heater there is no field with heat output infor mation available in the expanded status display During standby operation the expanded status bar shows Standby instead of the status of the components The Standby area also has a dark blue background in the softkey bar Fig 18 Status display Fig 19 Softkey bar During normal operation device without heater Fig 20 Basic...

Page 51: ...ctions cannot be adjusted The currently selected entry is highlighted with colour The structure of submenus basically corresponds to that of the main menu The softkey bar is shown in the lower display area For example the following functions can be selected using the softkeys The ESC softkey takes you back to the basic window The Standby softkey puts the device in the standby state The OK enter bu...

Page 52: ...elected setting is accepted by pressing the OK enter button n The value to be entered is shown in large characters The cursor under the value flashes n Individual digits can also be selected and changed by pressing the RIGHT and LEFT arrow buttons n The value can be changed using the UP and DOWN arrow but tons The change is accelerated if one of the two arrow buttons is pressed for a longer period...

Page 53: ...are replaced by The entry function is now locked The display can be switched between basic window and graphic display Personnel n Operating personnel 1 Press and hold down the ENTER button 2 Press and hold down the Up arrow button within 4 seconds 3 Hold down both buttons for 4 seconds In the display the descriptions of the buttons show up again The device can be operated again 6 6 Specifying temp...

Page 54: ...ge to the main menu 2 Select the Set temperature item in the main menu An input window is displayed The cursor under the value flashes The set temperature can be adjusted within the displayed limit values 3 Adjust the set temperature accordingly 4 Confirm with the OK button 6 8 Activating and deactivating standby During standby operation the components of the device such as the pump are switched o...

Page 55: ...g capacity is required 4 Confirm with the Enter button The cooling unit on devices without heating might show prolonged standstill periods several minutes in Automatic mode Fig 29 Basic window in Standby Fig 30 Configuring cooling Operation Variocool 55 If the consumer load is extremely low the cooling unit automati cally switches off as soon as the temperature is 2 K below the set point On the ot...

Page 56: ...e temperature that is predefined by the external temperature sensor and then process it as a set point For example the bath temperature can be 15 C below the temperature of a reactor that the external temperature sensor measures Personnel n Operating personnel 1 Change to the main menu 2 Select the menu item Setup Control Setpoint offset 3 Select one of the following options n With Offset source y...

Page 57: ...iff set actual value in the Setpoint offset menu An input window is displayed 2 Adjust the offset value within the displayed limit values 3 Confirm with the OK button 6 11 Control The internal and external control parameters are preset at the fac tory for operation as circulation chiller with water as heat transfer liquid Depending on the application adjustments of the control parameters can be ne...

Page 58: ...l is damped As rule of thumb the following applies Tv Tn x 0 75 An important prerequisite for acceptable control quality is well designed hydraulics Therefore an as good as possible connection between the application to be temperature controlled and the con stant temperature equipment must be established This means n Only use approved heat transfer liquids water or water glycol mixture n Use short...

Page 59: ...100 for longer Therefore the actual value approaches the set point more quickly and the I part has less time to integrate the con trol difference The overshooting is reduced If the proportional range selected is too small the P part on the control value is at 100 for a very long time This value then reduces more quickly within the proportional range i e the control value reduces rapidly and the ap...

Page 60: ...al range appears to be well adjusted The approach to the setpoint becomes significantly slower for diminishing control deviation The strong reduction of the propor tional part P part must be compensated for by the integration part I part In this case the I part integrates too slowly The parameter Tn which specifies the integration interval must be reduced The lead time parameter Tv should also be ...

Page 61: ...with fixed factors from Tn The temperature limits Tih and Til also influence the control 6 11 4 Adjusting internal control parameters Personnel n Operating personnel 1 Select the menu item Control parameter intern Pt1000 in the Control menu 2 Select one of the following options n You can select any of the listed control parameters n With Tv manual auto you can define whether the control parameters...

Page 62: ...rature with the external temperature consumer temperature and uses this information to calculate the set temperature set point_internal for the slave controller internal controller n The slave controller compares the set temperature set point_internal with the outflow temperature and calculates the actuating signal i e the demand for heating or cooling Tab 8 The following control parameters can be...

Page 63: ...cannot be selected In this case Tve and Tde are derived with fixed factors from Tne 3 Confirm with the ENTER button Selection of the menu item Tv manual auto activates manual or automatic control depending on the previous setting An input window is displayed when the other menu items are selected 4 Adjust the value accordingly 5 Confirm with the ENTER button 6 12 Basic settings 6 12 1 Invoking bas...

Page 64: ...em Setup Basic setup Display Brightness 3 The following options are available in the input window n The brightness is adjusted automatically with the automatic default setting n The brightness can be set manually using the Stage entries The brightness is increased from Stage 1 The corre sponding brightness becomes visible on the display n The backlighting for the display can be completely switched...

Page 65: ...e fuse is below 16 A the current consumption can be gradually reduced from 16 A to 8 A For devices with a heater the output of the heater is reduced accordingly Take account here whether other consumers are still connected to the same fused cir cuit or whether your device is the only consumer Personnel n Operating personnel 1 Change to the main menu 2 Select the menu item Settings Basic settings C...

Page 66: ... level is reached 4 Confirm with the OK button 6 12 7 Configuring alarm output Appropriate configuration must be performed if standby of the device as well as alarms should be output at the alarm output Return flow protection for the device can be activated with this Personnel n Operating personnel 1 Change to the main menu 2 Select the menu item Setup Basic setup Alarm output 3 You have the follo...

Page 67: ...atic circulator with a calibrated reference thermometer shows such a deviation The probe of the reference thermometer must be installed in the outflow of the device in accordance with the specifications in the calibration certificate Personnel n Operating personnel 1 Change to the main menu 2 Select the menu item Setup Calibration Calibration 3 Adjust the value accordingly The value displayed on t...

Page 68: ...alibration 6 15 Restoring factory settings Personnel n Operating personnel 1 Change to the main menu 2 Select the menu item Setup Factory settings Personnel n Operating personnel 1 Select the menu item Control This takes you to a list using which you can reset the parameters individually Fig 51 Factory calibration setting Fig 52 Restoring factory calibration Navigating to the factory settings Rest...

Page 69: ...the OK button Personnel n Operating personnel 1 Select the menu item Reset all 2 Select one of the following options n Selecting no returns to the previous display without making any changes n Selecting yes restores the factory settings if you confirm this with the OK button 6 16 Device status 6 16 1 Retrieving device status Personnel n Operating personnel 1 Change to the main menu 2 Select the me...

Page 70: ...levant module which causes the message is dis played under Source n Code is the coded alarm warning or error description n Type specifies alarm warning or error n The exact time of the message is displayed with Date and Time A list of the possible alarms warnings and errors can be found in Ä Procedure in the event of alarms on page 84 6 16 3 Retrieving device data 1 Select the menu item Device dat...

Page 71: ...mbers of connected modules are also displayed if they are available 6 17 Programmer 6 17 1 Programme example The programmer function allows storage of temperature time pro grammes The program consists of several temperature time seg ments and details about their repetition Ramps temperature jumps time is zero or temperature holding phases with identical start and end temperature in the segment are...

Page 72: ... be programmed here Contact modules are available as accessories The graphic shows an example of reprogramming a setpoint tem perature profile Fig 61 Program example The cool down time in the graph varies according to the device type consumer etc The sample segment No 2 is aimed at reaching 50 C within 20 minutes The original values in the Before table provided below are shown by a solid line whil...

Page 73: ...S2 S3 Start 30 00 0 1 off off off 2 50 00 0 20 0 0 off off off 3 50 00 0 20 0 1 off off off 4 70 00 0 20 0 0 off off off 5 70 00 0 10 0 8 off off off 6 60 00 0 30 0 0 off off off 7 30 00 0 0 0 0 off off off The entered tolerance can have a great influence with external bath control The graph on the side of the edited profile clarifies the possible overrun of the actual temperature in the bath vess...

Page 74: ...low ramps should be programmed with a tolerance range as needed Steep ramps that are close to the maximum possible heating or cooling rates of the device may be severely delayed 4 if the tolerance range here in segment 2 is too narrow No time specification is possible in the starting segment No 1 The temperature of the first segment is reached as quickly as pos sible to change to segment 2 after r...

Page 75: ...e continued as the required tolerance is never reached n The default setting for contact modules is off The entry for contact modules stands for no changes to the previous seg ment i e if is in all fields the contact position of the starting setting or the setting before the program start is main tained 1 You have the following options n You can display additional columns of the program using the ...

Page 76: ...ing program n Modifications of the existing temperature values and segment times are possible in a running program The segment is con tinued as if the change had been valid since the segment was started n If the new segment time is shorter than the already elapsed segment time the program jumps to the next segment Personnel n Operating personnel 1 In the basic window press the Prog x y softkey in ...

Page 77: ...nnel 1 Select the Loops menu item for the selected program An input window is displayed The loops can be defined within the displayed limits 2 Adjust the number of loops accordingly Press the LEFT arrow button to enter two or three digit numbers Another digit is displayed and can be adjusted If 0 is entered the program is repeated continu ously 3 Confirm with the OK button Fig 66 running program C...

Page 78: ...ogram 2 You have the following options n Select the Start option to start the program n If the program is started it can be interrupted using Pause An interrupted program can be continued using Continue n Select the Stop option to end the program Fig 69 Setting program status Fig 70 Specifying program status Operation Variocool 78 ...

Page 79: ...sories and heat transfer liquid Burns scalding frostbite Ensure device parts accessories and heat transfer liquid are at room temperature before touching them NOTICE Contact with rotating part Severed parts of the body Repairs must only be performed by specialist per sonnel Also note the following n Before all maintenance work you should ensure that decon tamination of the device has been performe...

Page 80: ...perating time half yearly Inspection of the heat transfer liquid 7 3 Cleaning device Personnel n Operating personnel WARNING Ingress of cleaning agents in the device Electric shock Use a moist cloth for cleaning Also note the following n Only clean the control panel with water and detergent Do not use acetone or solvents The consequence would be perma nent damage of the plastic surfaces 7 4 Check ...

Page 81: ...up the heat transfer liquid The liquid level rises on the display 4 Unlock the display with the Enter button The device restarts 7 5 Cleaning air cooled condenser Personnel n Operating personnel 1 Switch off the device 2 Remove the front panel carefully Pull the panel to the front by gripping the recess and lift the panel out of the guide for this The front panel is held in place by a magnetic cat...

Page 82: ...g unit and should be directed into a container with sufficient storage capacity at least 10 litres Personnel n Operating personnel 1 Switch off the device using the mains power switch 2 Dissolve the decalcifying agent in a bucket of water Decalcification requires LAUDA decalcifying agent catalogue number LZB 126 5 kg packaging Read the safety instructions and the instructions for use on the packag...

Page 83: ...in the condenser afterwards Further information about draining the condenser can be found in Ä Chapter 9 2 Draining con denser on page 90 9 Thoroughly flush the cooling water circuit with clean water Allow at least 10 litres of water to flow through the device 10 Reconnect the device to the cooling water supply 7 8 Checking heat transfer liquid Contaminated or diluted heat transfer liquid must be ...

Page 84: ...s In the case of an error switch off the device at the mains power switch If the error occurs again after restarting the device note the error code and the associated description and contact LAUDA Constant Temperature Equipment service Contact details can be found in Ä Chapter 13 4 LAUDA contact on page 102 Errors are displayed with the appropriate description and an error code in the form of a se...

Page 85: ...ump are switched off by the electronics Personnel n Operating personnel 1 Refill lacking heat transfer liquid 2 Unlock the display with the OK button The device restarts 8 4 Overtemperature alarm This alarm can only occur for devices with heater n The message 3 Overtemperature is shown on the screen if the temperature monitor trips n The electronics switch off the components of the device n The de...

Page 86: ...nected 010 SW Control too old Software version of control system too old 011 SW Safety too old Software version of safety system too old 012 SW Command too old Software version of remote control unit Command too old 013 SW Cool too old Software version of cooling module too old 014 SW Analogue too old Software version of analogue module too old 015 SW Serial too old Software version of serial inte...

Page 87: ...50 Level very low Level too low top up heat transfer liquid 051 Level high Level too high fill level of the heat transfer liquid too high risk of bath overflow 055 CAN buff overflow Buffer overflow for CAN reception 8 6 Warnings safety system All warnings of the safety system start with the prefix 1 The prefix is followed by two other digits These digits are listed in the following table Code Engl...

Page 88: ...re version of pump 0 too old 123 SW Pump 1 old Software version of pump 1 too old 124 SW Pump 2 old Software version of pump 2 too old 125 SW Pump 3 old Software version of pump 3 too old 126 SW HTC old Software version of high temperature cooler too old 127 SW Ext Pt100 old Software version of external Pt100 too old 128 SW Ethernet old Software version of Ethernet too old 129 SW EtherCAT old Soft...

Page 89: ... version of solenoid valve 3 too old 321 SW Valve 4 old Software version of solenoid valve 4 too old 322 SW Pump 0 old Software version of pump 0 too old 323 SW Pump 1 old Software version of pump 1 too old 324 SW Pump 2 old Software version of pump 2 too old 325 SW Pump 3 old Software version of pump 3 too old 326 SW HTC old Software version of high temperature cooler too old 327 SW Ext Pt100 old...

Page 90: ...f the used heat transfer liquid 1 Switch off the device 2 Let the device and the heat transfer liquid cool down or heat up to room temperature 3 Position a container with appropriate capacity directly under the drain tap Several draining processes are required for devices with high fill capacity 4 Open the drain tap Turn the lever to the right for this 9 2 Draining condenser This section is releva...

Page 91: ...n be found in Ä Chapter 7 6 Cleaning water filter on page 81 5 Clean the water filter of the device Then reinsert it into the inlet connection spigot 6 Leave the cooling water hose for the return flow screwed to the device Insert the other end of the hose into a drain or a large container 7 Switch on the device and set the setpoint on the device to 10 C 8 After starting the compressor immediately ...

Page 92: ...Disposal must be performed by specialist per sonnel Type and fill quantity of the refrigerant can be seen on the rating plate Repair and disposal may only be performed by a refrigeration tech nology specialist 10 2 Device disposal The following applies in member states of the EU The device must be disposed of in accordance with Directive 2012 19 EU WEEE Waste of Electrical and Electronic Equipment...

Page 93: ...ature range with heater Dimensions W x D x H Weight Unit C C K mm kg VC 1200 20 40 20 80 0 05 450 x 550 x 650 54 VC 1200 W 20 40 20 80 0 05 450 x 550 x 650 51 VC 2000 20 40 20 80 0 05 450 x 550 x 650 57 VC 2000 W 20 40 20 80 0 05 450 x 550 x 650 54 VC 3000 20 40 20 80 0 05 550 x 650 x 970 93 VC 3000 W 20 40 20 80 0 05 550 x 650 x 970 89 VC 5000 20 40 20 80 0 05 550 x 650 x 970 98 VC 5000 W 20 40 2...

Page 94: ...20 2500 VC 5000 W 20 20 0 0 VC 7000 50 50 20 20 4500 VC 7000 W 20 20 0 0 VC 10000 50 50 20 20 4500 VC 10000 W 20 20 0 0 Tab 12 Power consumption VC 1200 W to VC 3000 W Alternating current VC 1200 W VC 2000 W VC 3000 W Unit 230 V 50 Hz 1 1 1 6 1 8 kW 200 V 50 60 Hz 1 3 2 0 2 2 kW 208 220 V 60 Hz 1 4 2 2 2 3 kW Tab 13 Power consumption VC 5000 W to VC 10000 W Three phase current VC 5000 W VC 7000 W ...

Page 95: ...se temperature values are shown in brackets The ambient temperature for the measurement is 20 C ethanol was used as heat transfer liquid The cooling water temperature is 15 C and the cooling water differential pressure is 3 bar for the measurement of water cooled devices All water cooled Variocool circulation chillers have the following cooling water connection n external connection thread 11 3 Re...

Page 96: ...52A R 452A Maximum filling weight kg 2 0 2 0 2 0 2 0 GWP 100a 2140 2140 2140 2140 CO2 equivalent t 4 28 4 28 4 28 4 28 Global Warming Potential GWP comparisons CO2 1 0 Time horizon 100 years in accordance with IPCC IV 11 4 Filling volume and characteristics of the pumps Tab 18 Device Maximum minimum filling volume Pump connection Drain tap l VC 1200 W 15 8 G 15 hose nozzle G VC 2000 W 15 8 G 15 ho...

Page 97: ... 3 2 bar 37 L min 4 8 bar 37 L min 1 Characteristics at 200 V 60 Hz 1 2 bar 28 L min Three phase current VC 5000 W VC 7000 W VC 10000 W 400 V 3 N PE 50 Hz 3 2 bar 37 L min 4 8 bar 37 L min 5 0 bar 60 L min 3 2 bar 37 L min 4 8 bar 37 L min 5 0 bar 60 L min 3 2 bar 37 L min 4 8 bar 37 L min 5 0 bar 60 L min 208 220 V 3 PE 60 Hz 3 2 bar 37 L min 4 8 bar 37 L min 5 0 bar 60 L min 3 2 bar 37 L min 4 8...

Page 98: ...Fig 77 Characteristic curves of the pumps Fig 78 Characteristic curves of the pumps Characteristic curves of the pumps Technical Data Variocool 98 ...

Page 99: ... output and power consumption Three phase current VC 5000 W VC 7000 W VC 10000 W Unit 400 V 3 N PE 50 Hz Heat output 4 5 4 5 7 5 kW Power consumption with heater 7 8 8 8 11 1 kW 208 220 V 3 PE 60 Hz Heat output 3 65 4 1 3 65 4 1 6 1 6 9 kW Power consumption with heater 4 5 5 7 7 7 kW 200 V 3 PE 50 60 Hz Heat output 3 4 3 4 5 7 kW Power consumption with heater 4 3 5 4 7 6 kW Tab 22 Stronger heating...

Page 100: ... VC 2000 W VC 3000 W 230 V 50 Hz T10 A T16 A T16 A with heater T16 A T16 A T16 A 200 V 50 60 Hz T16 A T16 A T16 A with heater T16 A T16 A T16 A 208 220 V 60 Hz T16 A T16 A T16 A with heater T16 A T16 A T16 A Three phase current VC 5000 W VC 7000 W VC 10000 W 400 V 3 N PE 50 Hz T16 A T16 A T16 A with heater T16 A T16 A T16 A 208 220 V 3 PE 60 Hz T16 A T20 A T25 A with heater T16 A T20 A T25 A 200 V...

Page 101: ... 914 Tab 25 Connector Accessories Catalogue number External temperature sensor with connector and shielded connection cable ETP 059 Coupling connector 6 pin for analogue inputs outputs EQS 057 Connector SUB D 9 pin EQM 042 RS 232 cable 2 m for PC EKS 037 RS 232 cable 5 m for PC EKS 057 Coupling connector 3 pin for contact input EQS 048 Coupling socket 3 pin for contact output EQD 047 Tab 26 Flow r...

Page 102: ...e the right to assert further claims 13 2 Technical changes Manufacturer reserves right to make technical modifications 13 3 Warranty conditions LAUDA provides a warranty of one year on equipment as standard 13 4 LAUDA contact Contact LAUDA Service Constant Temperature Equipment in the following cases n In the event of faults on the device n For technical questions about the device n For spare par...

Page 103: ...General Variocool 103 ...

Page 104: ... Code Alarms 84 Warnings control system 86 Warnings safety system 87 Warnings SmartCool 88 Condenser 18 Configuring alarm level for fill level 66 Configuring alarm output 66 Conformity EU 103 Control Warnings 86 Control menu 60 Control parameters Access 60 Adjusting external 63 External overview 62 Internal overview 61 Cooling water Connecting information 28 Pressure 28 Requirements 26 Temperature...

Page 105: ...ters 61 F Factory calibration internal actual temperature Restoring 67 Factory settings restoring 68 69 Filler nozzle position 16 Filling 43 Flow pressure 97 Flow rate 97 G GWP 96 H Heat transfer liquid Checking 83 Overview approved 40 Removing 90 Hose clips 25 Hoses 25 Hydraulic circuit Description 18 I Input window Design 52 Inputting value 52 Selecting options 52 Intended Use 8 Interfaces Overv...

Page 106: ...2 Protective equipment personal overview 11 Pump Connection position 17 Pump characteristic curve 99 R Read memory error 70 Refrigerant Filling quantity 96 Filling weight 96 Refrigeration unit Description 18 Setting 55 Reset time 61 62 Retrieving configuration data device 70 Retrieving status device 69 RS 485 module Connecting 39 S Safety instruction General 7 Safety system warnings 87 Screen Actu...

Page 107: ...menu Access 51 Navigation 51 Switching on 49 T Td 61 Tde 62 Technical data Pump characteristic curve 99 Technical Data Flow pressure 97 Flow rate 97 Three phase motor Direction of rotation 41 Tih 53 Til 53 Tn 61 Tne 62 Tolerance range 71 Tv 61 Tve 62 Type plate position 17 U Unpacking 13 USB interface Establishing the connection 30 Install driver 30 V Version software 70 W Warning 84 Control syste...

Page 108: ...EMC Directive 2014 30 EU RoHS Directive 2011 65 EU The equipment is not covered by the Pressure Equipment Directive 2014 68 EU as the maximum classification of the equipment is Category 1 and it is covered by the Machinery Directive The protective objectives of the Machinery Directive with regard to electrical safety are complied with in accordance with Annex I Paragraph 1 5 1 in conformity with t...

Page 109: ...e also enclose this fully completed declaration RMA number Product serial number Customer operator Contact name Contact email Contact telephone Zip code Place Street house number Additional explanations The customer operator hereby confirms that the product returned under the above mentioned RMA number has been carefully emptied and cleaned that any connections have been sealed to the farthest pos...

Page 110: ......

Page 111: ......
Page 112: ...LAUDA DR R WOBSER GMBH CO KG Pfarrstrasse 41 43 97922 Lauda Königshofen Germany Phone 49 0 9343 503 0 Fax 49 0 9343 503 222 E Mail info lauda de Internet https www lauda de ...

Reviews: