background image

to confirm the value. 

D. The distance will flash and then press UP DOWN to set up the desired distance value. 

Press ENTER to confirm the value. 

E. The calories will flash and then press UP DOWN to set up the desired calories to be 

consumed. Press ENTER to confirm the value. 

G. When the target heart rate control program flash.  the computer will display the users target 

heart rate according to users age. 

H. Press START

STOP to begin exercise. 

 HEART RATE CONTROL PROGRAM 

TARGET HEART RATE 

The user can set any target heart rate to do the exercise. 
A. Press UP DOWN to select TARGET HEART RATE program. 
B. Press ENTER to confirm your choice and enter time setting window. 

C. The time display will flash and then press UP DOWN to set the desired time to do the 

exercise. Press ENTER to confirm the value. 

D. The distance will flash and then press UP DOWN to set up the desired distance value. 

Press ENTER to confirm the value. 

E. The calories will flash and then press UP DOWN to set up the desired calories to be consumed. 

Press ENTER to confirm the value. 

F. The target heart rate will flash and then press UP DOWN to set up your target heart rate. Press 

ENTER to confirm the value. 

G. Press START

STOP to begin exercise. 

NOTE


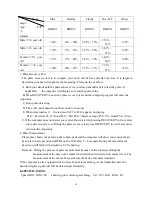
During exercise the user’s heart rate value depends on resistance level and speed. 

The heart rate control program is to ensure your heart rate within the preset value. When the 
computer detect your current heart rate is this higher than preset it will decrease the resistance 
level automatically or you may slow down exercise. If your current heart rate is lower than 
preset it will increase resistance and you may speedup. 

 User Profile Program

CUSTOM1

CUSTOM4 

A. Press UP DOWN to select the user 
B. Press ENTER to confirm your choice and enter into time setting window. 

C. The time display will flash and then press UP DOWN to set up the desired time to do the 

exercise. Press ENTER to confirm the value. 

D. The distance will flash and then press UP DOWN to set up the desired distance value. 

Press ENTER to confirm the value. 

E. The calories will flash and then press UP DOWN to set up the desired calories to be consumed. 

Press ENTER to confirm the value. 

F. The first resistance level will flash      and then press UP DOWN to set the desired load 

resistance. Press ENTER to confirm. Then repeat above operation to set the resistance from 2 


14

Summary of Contents for PROSPORT XPC 700

Page 1: ...PROSPORT XPC 700 ELLIPTICAL TRAINER INSTRUCTION MANUAL ...

Page 2: ...uccess during training Please note and follow the enclosed safety and assembly instructions carefully If you have questions please do not hesitate to contact us Table of Content as blew 1 Safety Instruction 2 Exploded Drawing 3 Parts List 4 Assembly Instruction 5 Computer Instruction 6 Training Instruction 1 ...

Page 3: ...e first training and every 1 2 month that all connecting elements are tight fitting and are in the correct condition Replace defective components immediately and or keep the equipment out of use until repair For repairs use only original parts In case of repair please ask your dealer for advice Avoid the use of aggressive detergents when cleaning the home exerciser Ensure that training starts only...

Page 4: ...XCESSIVE TRAINING CAN CAUSE HEALTH INJURIES Please follow the advice for correct training as detailed in training instructions The load work level can be adjusted by turning the adjustment knob on the handle bar stem The safety level of this equipment can be maintained only if it is check regularly for all assembly procedure mentioned in the assembly instruction sheet Please check regularly for th...

Page 5: ...EXPLODED DRAWING 4 ...

Page 6: ... 20 Screw 2 12 Plastic Cover F B 1 set 13 Plastic Cover F B 1 set 14 Plastic Cover L R 2 sets 15 Screw 14 16 Hand Sponge 2 17 Hand Bar 1 18 Pedal L R 2 19 M8 35 Screw 2 20 M6 Screw 4 21 Plastic Cover 1 set 22 Nylon Nut 4 23 8 15 8 10 Tube 2 24 8 24 2T Washer 2 25 M8 30 Screw 2 26 Junction 2 27 φ8 16 15mmT Washer 2 28 M5 15 Washer 15 29 M4 10 Washer 2 30 knob 4 31 6 14 1 5Washer 4 32 M8 48 Screw 2 ...

Page 7: ... cover 1 45 Motor 1 46 M5 15 Screw 4 47 Screw 1 48 Sensor set 1 set 49 Main frame 1 set 50 Screw 8 51 Crank L R 2 52 Chain cover L R 2 53 M8 Screw 2 54 Plastic cover 2 55 C Ring 2 56 Tube 1 57 Bearing 4 58 10 19 Washer 1 59 M10 40 Screw 1 60 Main cover L R 1 set 61 Rear end cap L R 2 62 Rear stabilizer 1 63 DC cable 1 64 Computer cable 1 65 10 88mml Screw 4 66 10 24 2T washer 4 67 M10 Nut 4 68 Fly...

Page 8: ...ic cover 1 set 78 Front end cap 2 79 Front stabilizer 1 80 Lower computer cable 1 81 Plastic cover 1 82 Lute 1 83 Upper computer cable 1 84 Bottle 1 85 Bottle fix 1 86 Upper support 1 set 87 19 38 0 5 washer 2 88 Nylon tube 6 89 Axle 1 90 Plastic cover F B 1 set 91 Screw 4 92 M5 15 Screw 2 93 Belt wheel 1 94 Adapter 1 95 5mm Wretch 1 96 Wretch 2 7 ...

Page 9: ... with 2 bolts from the underside of stabilizer and secure it with 2 washers and 2 cap nuts STEP 2 I Take the plastic cover F B 13 from the upper support 86 II Connect the upper computer cable 83 to the lower computer cable 80 And install the plastic cover 81 lute 82 and the upper support 86 on the main frame 49 III Fasten them with the washers 8 sping washer 41 and screw 8 ...

Page 10: ...tly STEP 4 I Put the Upper swing bars R L 3 with screws from right lower swing bars 38 and secure it with screws 7 washers 8 nuts 9 II Fasten pedal bars R L 18 from the crank 51 with bolts 25 washers 24 tube 23 III Fasten pedal bars R L 18 to the lower swing bars 38 with bolts 35 and secure it with nuts 40 washers 39 9 ...

Page 11: ... 1 and fix it into bracket of upper support III Fasten the bottle fix 85 to the upper support 86 and screw it put the bottle 84 into the bottle fix STEP 6 I Fasten the plasic cover L R 12 to the lower swing bar 38 with screw 15 II Fasten the plasic cover F B 13 to the upper support 86 with screw 15 Now your machine is ready for use 10 ...

Page 12: ...ve ECG measuring the heart rate 5 Display Speed RPM TIME DIST CAL WATT PULSE LEVEL at the same time 6 The computer will turn off automatically if there is no operation speed signal and pulse signal over 4 minutes Meanwhile it will store your current exercise data and turn the loading resistance to the minimum Once you press any button or in motion the computer will turn on automatically BUTTONS 1 ...

Page 13: ...ss this button to increase the value During the start mode display START press this button to increase the training resistance 4 DOWN In stop mode and the dot matrix character flash press this button to select the program down If the related window value flash press this button to decrease the value During the start mode display START press this button to decrease the training resistance 5 RECOVER...

Page 14: ...h and then press UP DOWN button to set up the desired time Press ENTER to confirm the value D The distance will flash and then press UP DOWN to set up the desired distance value Press ENTER to confirm the value E The calories will flash and then press UP DOWN to set up the desired calories to be consumed Press ENTER to confirm the value F The watt display will flash and then press UP DOWN to set u...

Page 15: ... flash and then press UP DOWN to set up your target heart rate Press ENTER to confirm the value G Press START STOP to begin exercise NOTE During exercise the user s heart rate value depends on resistance level and speed The heart rate control program is to ensure your heart rate within the preset value When the computer detect your current heart rate is this higher than preset it will decrease the...

Page 16: ...in testing your body fat NOTE 1 During the body fat measurement place both your palms on the contact pads The test result are FAT BMR Basal Metabolic Rate BMI Body Mass Index BODY and body shape FAT The total body fat our body measured by percentage BMR Basal Metabolic Rate metabolism is the energy measured in calories expended by the body at rest to maintain normal bodily function BMI means Body ...

Page 17: ...he test and return to the stop status 4 Pulse Measurement Please place both your palms on the contact pads and the computer will show your current heart beat rate in beats per minute BPM on the LCD after 3 4 seconds During the measurement heart icon will flash with simulative ECG showing Remark During the process of pulse measurement because of the contact jamming the measurement value may not be ...

Page 18: ...e range 1 0 99 0 999 When the distance reaches0 the program will stop and the computer will alarm CALORIE the exercise accumulative calories burnt Range 0 0 99 9 999 the preset calories range 10 0 90 0 990 When the calorie reaches 0 the program will stop and the computer will alarm PULSE showing the exercise heart rate value Range 30 240BPM beat per minute RESISTANCE LEVEL showing resistance level...

Page 19: ...e of thumb the following formula is commonly used Maximum pulse rate 220 Age While exercising the pulse rate should always be between 60 85 of the maximum pulse rate When starting to exercise you should keep your rate at 60 of your maximum pulse rate in the first couple of weeks With increasing improvement of fitness the pulse rate should be slowly increased to 85 of your maximum pulse rate FAT BU...

Page 20: ...your maximum pulse rate This can be done by increasing the resistance a higher frequency or longer training period TRAINING QRGANIZATION Warm up Before every training you should warm up for 5 10 minutes Here you can do some stretching and training with low resistance Training session During the actual training a rate of 70 85 of the maximum pulse rate should be chosen The time length of your train...

Page 21: ...otice that you constantly have to increase the resistance to reach your optimum pulse rate The units will be continuously easier and you will feel a lot fitter during your normal day For this achievement you should motivate yourself to exercise regular Choose fixed hours for your training session and do not start training too aggressively An old quote amongst sportsman says The most difficult thin...

Reviews: