background image

LAUNCH                             KWA-300 3D Wheel Aligner                Operation Instructions


4-8 


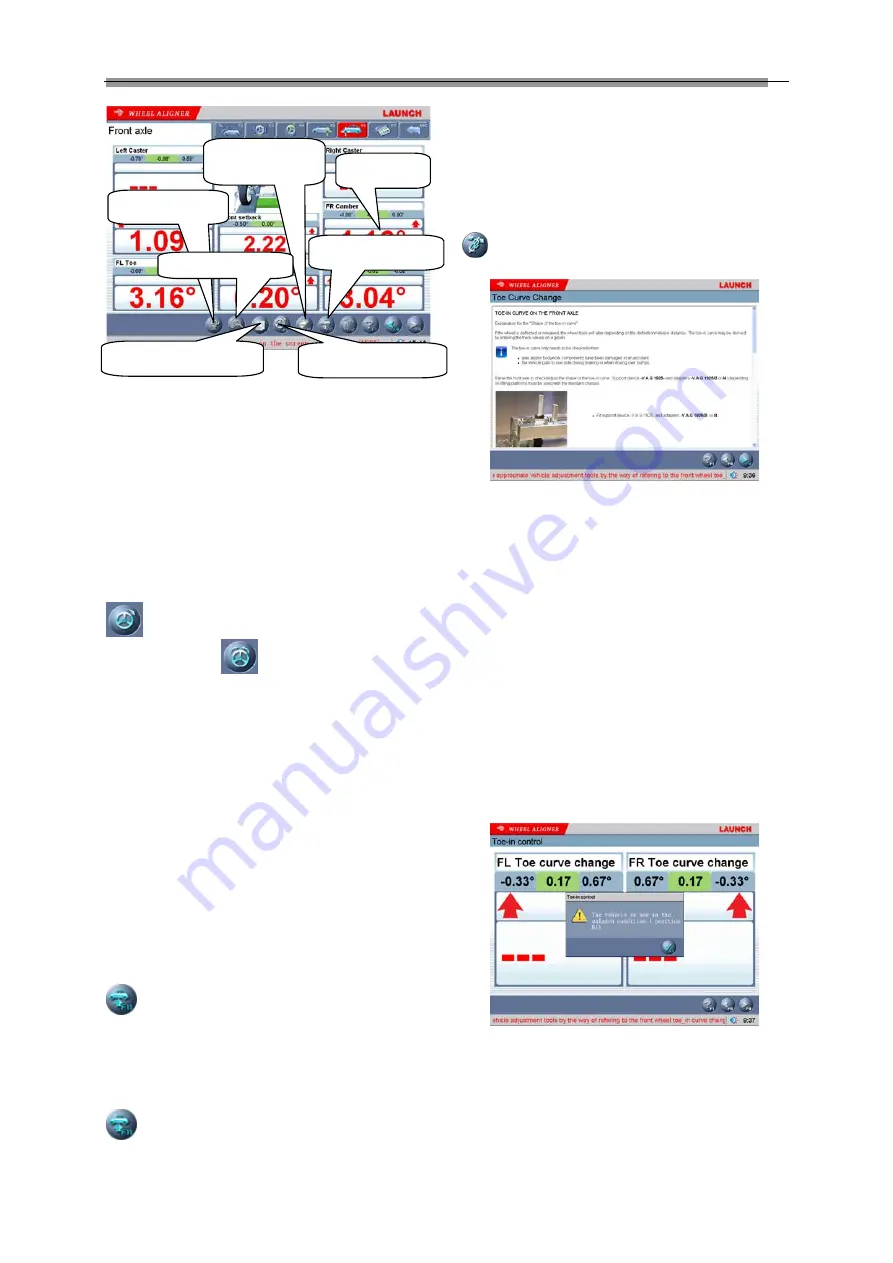
Fig.4.26 


[Double click]: Double click (with left key of the mouse) 
on the data display forms for camber and toe-in of FL 
and FR wheels, the corresponding displayed data will be 
enlarged. 
[Additional measurement]: This interface provides an 
operating platform for special measurement, which can 

measure and display left lateral offset, right lateral offset, 
axle offset, front setback, rear setback, track width 
difference and wheelbase difference, etc. 
[Toe-in adjustment for the front wheel steering]: Click 

 to perform toe-in adjustment for front wheel 

steering, and click 

  to center the steering wheel 

(Note: When using two probe rods to perform the 
measurement operation, only total toe-in is displayed, 

and individual toe-in is not displayed). 
 
[HELP for vehicle adjustment]: Click this button, the 
screen will pop up an interface of [HELP for vehicle 
adjustment], the different adjusting methods for various 
vehicle models have been enumerated in this interface 

for vehicle adjustment, the operator can perform the 
vehicle adjustment operation according to the operating 
methods in the HELP interface. 
[Lift up vehicle body]: Sometimes it is required to lift the 
vehicle body up in order to be convenient to adjust 

front/rear camber and caster. When the vehicle wheels 
are lifted up, the inclinometers will move, and the 
corresponding measured values will change, too. In this 
case, please use Lifting Adjustment function. Click 

  button, and then lift up the vehicle body according 

to the prompts on the screen. The software will 
automatically compensate the offset of inclinometer in 
order to realize accurate adjustment. 


Attention: After adjustment, please remember to click 

 button, and then put down the vehicle body 

according to the prompts on the screen. 

[Toe-in curve change] provides the special measurement 

methods relative to some vehicle models of 
VOLKSWAGE and AUDI, etc. First, the operator must 
adjust the toe-in curve changes of these kinds of 
vehicles to the standard range, and then Front Axle 
Measurement can be performed normally. When [Toe-in 

Curve Change] is activated, please click the icon of 

  , the screen will display the interface as shown in 

Fig.4.27. 


Fig.4.27 


Operating Methods: 

1.


Click [Toe-in Curve Change] on the interface of 
[Front Axle Measurement] to enter Toe-in Curve 
Change interface as shown in Fig.4.25. 

2.


According to the prompts on the screen, please 
select the appropriate vehicle adjustment tools by 

the way of referring to the vehicle adjustment 
HELP information for the front toe-in curve change 
regulator. Please perform the next operation 
procedure after finished. 

3.


The vehicle is now in put-down status (position B1). 

Adjust the vehicle front toe-in to the allowed scope 
according to the standard specifications (see 
Fig.4.24). Put up the vehicle with the special tools 
equipped according to the prompts on the screen. 
Click [NEXT] button, the screen will display the 

interface as shown in Fig.4.28.   


Fig.4.28 


4.


Put up the vehicle (to position B2) according to the 
requirements of the manufacturer. The screen 

display the interface as shown in Fig.4.29: 

Double click 

HELP for vehicle 

adjustment 

Lift up vehicle body 

Additional measurement 

Toe-in curve change 

Compensate 

Detailed data 

Summary of Contents for KWA-300

Page 1: ......

Page 2: ...ten permission to use Materials on this manual for purposes or for all other questions relating to this manual Copyright Information Copyright 2010 by LAUNCH TECH CO LTD All rights reserved No part of...

Page 3: ...tion z The precision position calibration has been performed for the cameras after first installation the user can not move or wobble the camera post during or after using it z Without approval of the...

Page 4: ...e of the safety signs exists in the prevention of personal injuries If the warning triangle with the wording danger is on a safety notice hazards for the machine material and the environment are not e...

Page 5: ...el with key tools Never spray the housing of electrical equipment with a hose when cleaning Observe environmental regulations The legal regulations for waste prevention and proper recycling disposal m...

Page 6: ...e Model 4 1 Rolling Run out Compensation 4 4 Caster Swing 4 4 Rear axle measurement 4 6 Front axle measurement 4 7 Print Report 4 9 Quick Measurement 4 10 Additional Measurement 4 10 System Management...

Page 7: ...toe out on turns wheelbase difference track width difference etc They are designed mainly to improve the steering performance and driving stability of the vehicle and reduce tire wear Toe in and Toe o...

Page 8: ...steering will normally be designed with positive caster Toe out on Turns Toe out on turns is defined as the difference of the steering angle between the two front wheels when turning left or right by...

Page 9: ...is negative The angle between the bisector of the track width difference angle and the thrust line is axle offset angle Axle offset angle The relative offset in lateral direction between front and re...

Page 10: ...t animation and HELP information z Provide real time help with help system z Provide the function of data back up and restoration and of software upgrade Specification Item Resolution Test Range Total...

Page 11: ...WA 300 3D It consists of a computer power supply system and interfaces Its function is to execute the operation commands process the data and display the information together with the original data of...

Page 12: ...inside the computer and the keyboard is installed on the keyboard drawer The power supply assembly includes power lead power socket and the power supply master switch The power supply master switch bu...

Page 13: ...herwise distortion may be caused and the test result may be influenced Communication Cables There are 4 signal cables and 2 power supply cables for infrared light between the main unit and the cameras...

Page 14: ...LAUNCH KWA 300 3D Wheel Aligner Structures 2 3 Brake Pedal Depressor KWA 300 3D has a brake pedal depressor as shown in Fig 2 7 It is used to hold the brake pedal down Fig 2 7 Brake pedal depressor...

Page 15: ...e rod end and steering mechanism for any looseness or wear Then check to see if the tire pressure tire track widths of the left and right wheels are alike Wheel Alignment Checking Perform the wheel al...

Page 16: ...lling accidentally Please see Fig 4 1 Fig 4 1 5 Insert the power plug of the wheel aligner into the standard 3 pole power receptacle Program Operation Turn on the power switch start the computer and e...

Page 17: ...t operating procedure 2 The form currently provided is the same form with Commonly Used Data Management in the System Management interface in the same way you can click button to add the standard data...

Page 18: ...re not within the standard range please check the vehicle status and adjust the corresponding components to keep 4 Height Measurement Values within the standard range Click NEXT after finished 4 When...

Page 19: ...when performing Rolling run out compensation operation causing the unstable axis 3 The line of sight of any camera cannot be blocked during pulling and pushing vehicle 4 Keep the force for pushing an...

Page 20: ...ase center the steering wheel The system will automatically return to the next page to check the measurement result The interface is as shown in Fig 4 14 Fig 4 14 Measurement for Max steering angle Ac...

Page 21: ...indicates that this measured parameter has not the standard specification Rear axle measurement This interface can provide the real time result related to rear axle measurement the operator can compar...

Page 22: ...ding to the operating methods in the HELP interface The interface is as shown in Fig 4 23 Fig 4 23 Lift up the vehicle body Sometimes it is required to lift the vehicle body up in order to be convenie...

Page 23: ...e prompts on the screen The software will automatically compensate the offset of inclinometer in order to realize accurate adjustment Attention After adjustment please remember to click button and the...

Page 24: ...r the interface of Client Management and then the corresponding Client information can be selected If information of this client is not available in Client Management it must be added first before sel...

Page 25: ...ed to Figure Format The fig format data display interface provides the display for thrust angle The interface is as shown in Fig 4 34 Fig 4 34 Note 1 This interface provides only the functions of the...

Page 26: ...the information of maintenance station be displayed on the report form printed out and is convenient for your data management and tracing operation The interface is as shown in Fig 4 39 Fig 4 39 Sett...

Page 27: ...e world and the contents in database can be updated in time via system upgrade In addition this interface provides the function of adding the user defined data The operator can add by him self or her...

Page 28: ...r the first time Special version for experienced operator too much HELP information will on the contrary become encumbrance so this version provides the necessary HELP information only to make the ope...

Page 29: ...information The interface is as shown in Fig 4 49 Fig 4 49 Operating procedures 1 Backup Click button find the position of the file you expect to save in pop up dialogue box The interface is as shown...

Page 30: ...ularly too so as to be convenient to repair and maintain the equipment Target Monitoring Target monitoring needs to be performed before test click the icon of Target Monitor the screen will display th...

Page 31: ...t This list can display the alignment test records for one time or many times of the client selected from Client list Print To print the alignment data of the vehicle under test with form or figure fo...

Page 32: ...r when you turn the steering wheel and block the rear target It is normal The test result will not be influenced without tip box but please do not block any one of the front targets when you test the...

Page 33: ...h dipped with an appropriate amount of the neutral detergent or the absolute alcohol to wipe the surface of target lightly if there are some smuts on it z Don t disassemble the targets and clamps to a...

Page 34: ...entation or warranty concerning LAUNCH automotive meters except as stated herein Disclaimer THE ABOVE WARRANTY IS IN LIEU OF ANY OTHER WARRANTY EXPRESSED OR IMPLIED INCLUDING ANY WARRANTY OF MERCHANTA...

Reviews: