1
Operating Checklist
Before Starting Setup
1.
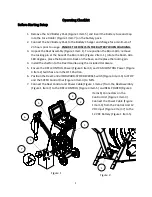
Remove the 12V Battery Pack (Figure 1 Item 5) and insert the Battery Fuse and Cap
into the Fuse Holder (Figure 1 Item 7) on the battery pack.
2.
Connect the 12V Battery Pack to the Battery Charger and charge for a minimum of
24 hours prior to usage.
ENSURE THE FUSE IS IN THE BATTERY WHEN CHARGING.
3.
Unpack the Reel Assembly (Figure 1 Item 1). To reposition the Boom Arm: remove
the locking pin at the base of the Boom Arm (Figure 2 Item 1), rotate the Boom Arm
180 degrees, place the Boom Arm back on the base, and replace the locking pin.
4.
Install the shelf on to the Reel Handle using the included Hardware.
5.
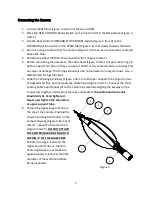
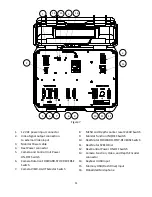
Ensure the REEL CONTROL Power (Figure 4 Item 1) and CAM CONTROL Power (Figure
4 Item 2) Switches are in the OFF Position.
6.
Position the Reel Control FORWARD-STOP-REVERSE Switch (Figure 4 Item 3) to STOP
and the SPEED Control Dial (Figure 4 Item 4) to MIN.
7.
Connect the Reel Control and Power Cable (Figure 1 Item 2) from the Reel Assembly
(Figure 1 Item 7) to the REEL CONTROL (Figure 4 Item 5) and REEL POWER (Figure 4
Items 6) Connectors on the
Control Unit (Figure 1 Item 3).
Connect the Power Cable (Figure
1 Item 4) from the Control Unit 12
VDC input (Figure 4 Item 7) to the
12 VDC Battery (Figure 1 Item 5).
1
0
Figure 2
1
0
Figure 1
2
0
3
0
4
0
5
0
6
0
7
0

