background image

9

EN

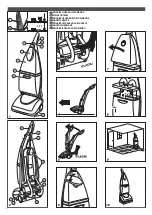
-  Press button 3 (fig.1) to suck up dirt water and 

detergent solution applied to the floor.

-  Move  the  machine  slowly  forward  and  back, 

following a washing pattern as shown in figure 
9 if possible. 

-  Keep using the rotating brush in the most difficult 

points to remove the most stubborn dirt.


WARNING

-  Before  starting  to  wash  the  floor,  users  are 

advised to try out the machine on a small area to 
check whether the detergent about to be used 
is suitable for the surface to be cleaned and to 
perfect the method of use.

-  Do  not  leave  the  machine  stationary  with  the 

rotating brush on.  This might damage the floor.

-  The detergent solution dosage must ensure that 

the squeegee blades do not work dry. 

MAINTENANCE

AFTER WORK

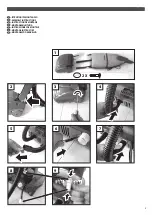
-  After  disconnecting  the  plug  from  the  mains 

socket, wind the lead around the hooks provided 
(fig.2)  and  move  the  machine’s  handle  to  the 
vertical position, until the pedal catch is heard.

-  Empty  both  the  tanks  and  rinse  and  dry  them 

carefully.

-  Return  the  tanks  to  the  handle  and  place  the 

machine  in  a  protected  place,  where  it  is  not 
at  risk  of  knocks,  frost,  humidity  or  water.   The 
machine must be placed on the stand provided 
to avoid damaging the squeegee blades (fig.10).

CLEANING THE BRUSH

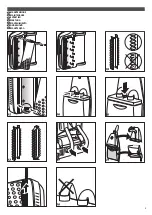
-  With  the  aid  of  a  screwdriver,  unscrew  the  2 

screws shown in fig.11.

-  Free the brush by taking hold of it from the side 

of the 2 screws just removed and extract if from 
the pin on the opposite side

-  Clean the brush under running water, taking care 

to dry it perfectly before putting it back in place.

-  To reconnect the brush, turn the drive pin to the 

position shown in fig.12. 

-  Place the brush on the drive pin.
-  Bring the bearing towards its seat.
-  Turn the brush by hand while free to position the 

bearing correctly.

-  Re-close by tightening the 2 screws, taking care 

not to trap the bristles of the brush.

CLEANING THE SQUEEGEE BLADES

-  To  remove  the  squeegee  blades,  they  must 

be  separated  by  releasing  the  retainers  at  the 
ends  (fig.13)  and  extracting  them  in  opposite 
directions (fig.14)

-  Clean them under running water with the aid of 

a  non-aggressive  detergent  and  insert  them  in 
the guides, remembering to re-engage the end 
retainers.

TROUBLESHOOTING

THE BRUSH DOES NOT TURN

-  Check  that  the  plug  is  connected  to  the  mains 

socket.

-  Check that the switch is pressed correctly..
-  If you are using a power lead extension, make sure 

that it complies with the minimum dimensions 
stated in the safety precautions section.

-  The  brush  motor  has  accidentally  overheated: 

check  that  the  air  intakes  in  the  base  have  not 
become  blocked  and  wait  for  the  overload 
cutout to reset.

-  Check  that  there  are  no  jammed  objects 

preventing the brush from rotation

-  If  the  problem  persists  contact  the  nearest 

Service Centre

THE MACHINE DOES NOT DELIVER DETERGENT

-  Check that there is detergent in the tank
-  The  tank  has  not  been  fitted  correctly  and  the 

delivery  valve  is  not  working.    Reposition  the 
tank.

-  After removing the brush, clean the 4 detergent 

delivery nozzles with the pin provided (fig.15)

-  If  the  problem  persists  contact  the  nearest 

Service Centre 

THE MACHINE DOES NOT DRY

-  Check  that  the  suction  squeegee  blades  are 

properly positioned and that their end retainers 
are closed (see maintenance section) (fig.13).

-  Empty the dirty detergent collection tank.
-  Check that the hoses are connected (figs.16 and 

17) and not bent at an acute angle (fig.18).

-  Check the wear of the pattern on the squeegee 

blades  (fig.19).  If  necessary  replace  them, 
referring to the maintenance section.

-  Check the wear of the pattern on the squeegee 

blades  (fig.19).  If  necessary  replace  them, 
referring to the maintenance section.

-  If  the  problem  persists  contact  the  nearest 

Service Centre 

THE MACHINE DOES NOT CLEAN PROPERLY

-  Check that the brush and the squeegee blades 

have  been  fixed  correctly  (see  maintenance 
section).

-  Check the brush for wear (the min. bristle length 

is 20mm). If necessary replace them, referring to 
the maintenance section.

-  If  the  problem  persists  contact  the  nearest 

Service Centre 

EXCESSIVE FOAM PRODUCTION

-  Too much detergent in the water. 
-  If  the  problem  persists  contact  the  nearest 

Service Centre  

THE  DETERGENT  SOLUTION  IS  NOT  EVENLY 

DISTRIBUTED

-  After removing the brush, clean the 4 detergent 

delivery nozzles with the pin provided (fig.15) 

-  If  the  problem  persists  contact  the  nearest 

Service Centre 

THE MACHINE LEAKS WATER

-  Empty the dirty detergent collection tank (fig.8). 
-  Check  that  the  O-ring  seal  is  present  and 

undamaged (fig.20) 

-  If  the  problem  persists  contact  the  nearest 

Service Centre 

WARRANTY

All our appliances have undergone thorough checks 
and  are  covered  by  a  12-month  warranty  against 
manufacturing defects.  The warranty period starts 
from the date of purchase.  If the machine is repaired 
during the warranty period, a copy of the purchase 
document must be enclosed. 

The warranty is only valid if:

-  The  defects  are  of  material  or  manufacturing 

(defects  which  cannot  be  clearly  attributed  to 
the  material  or  manufacture  will  be  examined 
by  one  of  our  technical  service  centres  or  on 
our premises, and the charges will be allocated 
depending on the results).

-  The  instructions  in  this  manual  have  been 

followed to the letter.

-  The repairs have been carried out by authorised 

repairers.

-  The machine has not been subjected to overloads 

such as knocks, dropping or frost.

-  Suitable detergents have always been used.
-  The machine has not been hired or has not been 

used  for  commercial  /  professional  purposes  in 
any other way.

The warranty does not cover:
-  Parts  subject  to  normal  wear  and  tear  (brush, 

squeegee blades, paintwork).

-  Accidental  damage,  damage  during  transport, 

damage  due  to  negligence  or  improper 
treatment, or damage due to use or maintenance 
not in accordance with the instructions provided 
in the this instruction manual.

-  The cleaning of functional parts.

A repair under warranty includes the replacement
of  faulty  parts,  while  shipment  and  packaging  are 
not included.  Any replacement of the appliance and 
extension of the warranty further to work done on 
defects is not possible.  The repair is carried out at 
one of our authorised technical service centres or on 
our premises and the machine must reach us freight 
prepaid, i.e. with freight costs paid by the user.  The 
manufacturer declines any liability for any injury or 
damage  caused  by  poor  installation  or  imperfect 
use of the appliance.


DISPOSAL  

As the owner of electrical or electronic equipment, 
the law (in accordance with the EU Directive 2002/96/
EC  of  27  January  2003  on  waste  from  electrical 
and  electronic  equipment  and  the  national  laws 
of  the  EU  Member  States  that  have  implemented 
this Directive) prohibits you from disposing of this 
product  or  its  electrical  /  electronic  accessories  as 
municipal solid waste and obliges you to make use 
of the appropriate waste collection facilities.
The  product  can  be  disposed  of  by  returning  it  to 
the  distributor  when  a  new  product  is  purchased. 
The  new  product  must  be  equivalent  to  that 
being  disposed  of.  Disposing  of  the  product  in 
the  environment  can  cause  great  harm  to  the 
environment itself and human health.
The symbol in the figure indicates the urban waste 
containers and it is strictly prohibited to dispose of 
the equipment in these containers. Non-compliance 
with  the  regulations  stipulated  in  the  Directive 
2002/96/EC  and  the  decrees  implemented  in  the 
various  EU  Member  States  is  administratively 
punishable.

Summary of Contents for 8.501.0508

Page 1: ...ias antes el uso de aparado LET OP vóór gebruik de gebruiksaanwijzing aandachtig lezen ATENÇÃO ler atentamente as instruções antes da utilização CRYSTAL CLEAN LAVASCIUGAPAVIMENTI ad acqua calda e fredda IT FLOOR SCRUBBER DRIER hot and cold water EN AUTOLAVEUSES eau chaude et froide FR SCHEUERSAUGMASCHINE kalt und Warmwasser DE FREGADORA SECADORA DE PAVIMENTOS agua caliente y fría ES SCHEUERSAUGMAS...

Page 2: ...ATTENTIE Uit veiligheidsoverwegingen goed opletten ATENÇÃO Informação importante a ser tida em consideração por motivos de segurançã LAVASCIUGAPAVIMENTI ad acqua calda e fredda pag 6 IT FLOOR SCRUBBER DRIER hot and cold water pag 8 EN AUTOLAVEUSES eau chaude et froide page 10 FR SCHEUERSAUGMASCHINE kalt und Warmwasser Seite 12 DE FREGADORA SECADORA DE PAVIMENTOS agua caliente y fría pág 14 ES SCHE...

Page 3: ...UZIONI DI MONTAGGIO ASSEMBLY INSTRUCTIONS INSTRUCTION DE MONTAGE MONTAGEANLEITUNG INSTRUCCIONES DE MONTAJE MONTAGE INSTRUCTIES MONTAGEM DO APARELHO 1 3 4 8 5 2 9 6 7 click click 2 X base da cod 7 504 0184 rev 00 ...

Page 4: ...4 90 C max 2b 2 PRINCIPALI ORGANI DI COMANDO MAIN CONTROLS PRINCIPAUX ORGANES DE COMMANDE HAUPTSCHALTER PRINCIPALES ÓRGANOS DE CONTROL HOOFDSCHAKELAAR PRINCIPAIS ÓRGÃOS DE COMANDO ...

Page 5: ...5 MANUTENZIONE MAINTENANCE ENTRETIEN WARTUNG MANTENIMIENTO ONDERHOUD MANUTENÇÃO ...

Page 6: ...parecchioèstatoprogettatoperessere utilizzato con il detergente fornito o prescritto dal costruttore L impiego di altri detergenti o sostanze chimiche può compromettere la sicurezza dell apparecchio Se viene utilizzata una prolunga la spina e la presa dovranno essere impermeabili all acqua È sconsigliato l uso di prolunghe elettriche Qualora fosse necessario l impiego assicurarsi che la sezione de...

Page 7: ... e fig 17 e non piegati ad angolo acuto fig 18 Verificare lo stato di usura della zigrinatura delle gomme tergipavimento fig 19 Se necessario procedere alla loro sostituzione riferendosi al capitolo della manutenzione Se il problema persiste contattare il Centro di Assistenza più vicino LA MACCHINA NON PULISCE BENE Controllare che la spazzola e i tergipavimento siano stati fissati correttamente ve...

Page 8: ...nufacturer The use of other detergents or chemicals may put the appliance s safety at risk If an extension cord is used the plug and socket must be of watertight construction The use of electrical power lead extensions is not recommended If their use is necessary make sure that the wire gauges and length correspond to the values stated in the table below and that the cable is completely unwound 16...

Page 9: ...ntenance section If the problem persists contact the nearest Service Centre THE MACHINE DOES NOT CLEAN PROPERLY Check that the brush and the squeegee blades have been fixed correctly see maintenance section Check the brush for wear the min bristle length is 20mm If necessary replace them referring to the maintenance section If the problem persists contact the nearest Service Centre EXCESSIVE FOAM ...

Page 10: ...gner les enfants et les animaux de la machine lors de son fonctionnement Ne pas laver la machine à l aide de jets d eau directs Ne pas transporter la machine lorsqu elle est allumée Éviter que des enfants ou des personnes incompétentes n utilisent la machine Cet appareil a été conçu pour être utilisé avec le détergent fourni ou préconisé par le fabricant Le recours à d autres détergents ou d autre...

Page 11: ...e LA MACHINE NE SÈCHE PAS Contrôler que les caoutchoucs d aspiration sont bien positionnés et que leurs arrêts d extrémité sont bien fermés voir chapitre entretien fig 13 Vider le détergent sale du réservoir collecteur Vérifier que les tubes sont raccordés fig 16 et fig 17 et qu ils ne sont pas pliés à angle aigu fig 18 Vérifier l état d usure du moletage des caoutchoucs raclettes fig 19 Les rempl...

Page 12: ...icht in der Nähe der in Betrieb befindlichen Maschine aufhalten Maschine nicht mit direktem Wasserstrahl reinigen Eingeschaltete Maschine nicht transportieren Maschine darf auf keinen Fall von Kindern oder nicht angemessen vorbereiteten Personen bedient werden Dieses Gerät wurde für den Einsatz mit dem vom Hersteller beigestellten oder vorgeschriebenen Reinigungsmittelentwickelt DieVerwendungander...

Page 13: ...entleeren Überprüfen dass die Schläuche angeschlossen sind Abb 16 und Abb 17 und nicht abgeknickt wurden Abb 18 Abnutzungsgrad der Rändelung der Bodenwischgummis überprüfen Abb 19 Sollte ein Ersatz erforderlich sein bitte wie im Kapitel Wartung beschrieben vorgehen Kann die Störung nicht beseitigt werden sich mit dem nächsten Kundendienstzentrum in Verbindung setzen DIE MASCHINE REINIGT NICHT KORR...

Page 14: ...s niños o personas incapaces Este aparato ha sido proyectado para ser utilizado con il detergente suministrado o prescripto por el constructor tipo champú detergente neutro a base de tensioactivos biodegradables aniónicos El uso de otros detergentes o sustancias químicas puede perjudicar la seguridad del aparato Si se utiliza una prolongación el enchufe y la toma deben ser impermeables al agua y e...

Page 15: ...ificar que los tubos estén conectados fig 16 y fig 17 y no plegados como un ángulo agudo fig 18 Verificar el estado de desgaste de la granulosidad de las gomas limpiapavimentos fig 19 Si es necesario sustituirlas según cuanto indicado en el capítulo relativo al mantenimiento Si el problema persiste contactar el Centro de Asistencia más cercano LA MÁQUINA NO LIMPIA BIEN Controlar que el cepillo y l...

Page 16: ...niet als de machine aan staat Laat de machine niet door kinderen gebruiken of door personen die er geen verstand van hebben Dit apparaat is ontworpen voor gebruik met het meegeleverde reinigingsmiddel of met het reinigingsmiddel dat voorgeschreven wordt door de fabrikant Het gebruik van andere reinigingsmiddelen of chemicaliën kan de veiligheid van het apparaat in gevaar brengen LET OP Als er een ...

Page 17: ...het hoofdstuk over het onderhoud afb 13 Leeg het vergaarreservoir van het vuile water Controleer of de slangen aangesloten zijn afb 16 en afb 17 en er geen knikken in zitten afb 18 Controleer de mate van slijtage van de ribbels van de vloerreinigingsrubbers afb 19 Als zij aan vervanging toe zijn handel dan zoals beschreven in het hoofdstuk over het onderhoud Als het euvel niet verholpen kan worden...

Page 18: ...uina seja usada por crianças ou pessoas incapazes Este aparelho foi desenvolvido para ser utilizado comosprodutosdelimpezafornecidosouindicados pelo fabricante A utilização de outros produtos de limpeza ou de outras substâncias químicas pode pôr em causa a segurança do aparelho Sempre que for utilizado um cabo de prolongamento deverão ser utilizadas tanto uma tomada como uma ficha estanques Caso s...

Page 19: ...ejam bem posicionadas e estejam com as travas de extremidade fechadas ver capítulo manutenção fig 13 Esvaziar o reservatório de coleta de detergente sujo Verificar que os tubos estejam conectados fig 16 e fig 17 e não estejam dobrados em angulo agudo fig 18 Verificar o estado de desgaste do serrilhado das borrachas para secar pisos fig 19 Se necessário proceder à substituição das mesmas fazendo re...

Page 20: ... est conforme aux directives CE et aux modifications successives ainsi qu aux normes EN den Richtlinien EG den nachfolgenden Änderungen sowie den Normen EN está en conformidad con las directivas CE y sus sucesivas modificaciones y también con la norma EN in overeenstemming is met de Richtlijnen EG en latere wijzigingen daarop en de normen EN está em conformidade com as directrizes EC e as suas suc...

Reviews: