background image

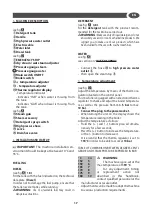
>   MACHINE DESCRIPTION

see fig.

A

① 

Detergent tank 

② 

Handle

③ 

High pressure water outlet

④ 

Electric cable

⑤ 

Water inlet


⑥ 

Diesel tank

see fig.

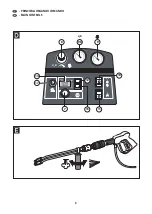
D

 EMERGENCY STOP

⑧ 

dry steam / wet steam adjuster

⑨ 

Pressure gauge steam

9b

  Pressure gauge water

⑩ 

Main switch ON/OFF

⑪ 

Boiler switch 

⑫ + 

temperature adjuster

⑬ 

-  temperature adjuster

⑭ 

Thermo regulator display 

  - Temperature indicator

  - Indicates "H2O” when water is missing from 

the tank.

   - Indicates "GAS" when diesel is missing from 

the tank.

see fig.

A

⑮ 

Steam gun

⑯ 

Steam accessory

⑰ 

Detergent spray switch

⑱ 

High pressure hose

 Lance

 Drain hose valve

>  INSTALLATION AND START-UP

 IMPORTANT: The machine installation en-

vironment should be kept at between 10°C and 

35°C.

FUELLING

DIESEL

(see fig. 

A) 

18 l

Fill the tank with the fuel indicated on the technical 

data plate  (Diesel)

In order not to damage the fuel pump, ensure that 

the tank never empties while running.

 WARNING: Use of unsuitable fuel may result in 

dangerous situations.

DETERGENT

(see fig. 

A) 

4,8 l

Fill the detergent tank with the product recom-

mended for the task to be carried out.

 WARNING: Make use only of liquid detergent, do not 

absolutely use acid or too much alkaline products. We 

suggest you to make use of our products, which have 

been studied for the use with  washer machines.

WATER

see fig. 

A)

see section on "WATER SUPPLY"

-  Connect the hose 

 to high pressure water 

outlet 

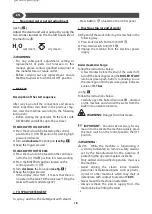
-   then open the steam tap 

.

>   Temperature adjustment

(see fig. 

D)

Adjust the temperature by means of the thermo re-

gulator situated on the control panel.

This machine is equipped with an electronic thermo 

regulator to check and adjust the boiler temperatu-

re as well as the pressure from min. 5 bar to max. 

10 bar.

-  Connect the plug to the power socket.

-  When turning the unit on, the display shows the 

temperature reading in the boiler. 

Adjust the temperature as follows:

-  Hold the ( + ) and ( - ) buttons pressed simulta-

neously for a few seconds;

-   Press the ( + ) button to increase the temperature, 

or the ( - ) button to decrease it.

  It is essential that the thermo regulator is set to 

190°C in order to be able to work at 10 bar.

TABLE OF COMPARISON BETWEEN DEGREES CENTI-

GRADE AND STEAM PRESSURE EXPRESSED IN BAR

° C

bar

152

5

159

6

165

7

170

8

175

9

180

10


  WARNING: 

-  

The machine is pre-set at the 

max temperature of 190 °C.

-   For any adjustment, timing 

or replacement action not 

described in this handbook, 

contact qualified personnel at the 

manufacturer or resale outlet.

-   Adjustments can be made to adapt the machine 

to various production requirements.

EN

17

Summary of Contents for Fuji

Page 1: ...istruzioni prima dell utilizzo WARNING read the instructions carefully before use Fuji MANUALE DI ISTRUZIONI Generatore di Vapore Pag 4 INSTRUCTION MANUAL Steam generator Page 13 Technical data plate...

Page 2: ...8 19 16 15 In base al modello si possono verificare delle differenze nella fornitura Depending on the model there are differences in the scopes of delivery A C Diesel Detergent DESCRIZIONE DELL APPARE...

Page 3: ...H2 O H2 O H2 O 9 9b 7 14 17 13 11 10 12 8 PRINCIPALI ORGANI DI COMANDO MAIN CONTROLS E D 3...

Page 4: ...ne o animali entro un raggio di 5 metri 05c operate sempre con abbigliamento ade guato per proteggersi contro l eventuale rim balzo di materiale asportato dal getto d acqua ad alta pressione 05d non t...

Page 5: ...ubrificante in caso contrario il grasso verr disciolto e disperso sul terreno I pneumatici e le valvole d aria dei pneumatici devono essere lavati mantenendo una distanza minima di 30 cm in caso contr...

Page 6: ...i danneggiamento disinserire la macchina dalla rete V12 Qualsiasi impiego diverso da quello per cui la macchina stata costruita rappresenta una con dizione anomala e pu arrecare danno al mezzo di lavo...

Page 7: ...acchina posizionando l interruttore generale in posizione OFF effettuare il riempimento del serbatoio ATTENZIONE si raccomanda l utilizzo di acqua demineralizzata ALIMENTAZIONE ELETTRICA Il collegamen...

Page 8: ...onsigliati adatti al tipo di lavaggio da effettuare ATTENZIONE Usaresolamentedetergentiliquidi evitare assolutamente prodotti acidi o molto alcalini Vi consigliamo di usare i nostri prodotti che sono...

Page 9: ...ere la leva della pistola PER LAVARE A VAPORE vedi fig D 1 Premere l interruttore generale posto sul pannello di comando in posizione II ON funzionamento a vapore 2 Premere il pulsante di ACCENSIONE C...

Page 10: ...una pulizia esterna del corpo della macchi na con idonei prodotti detergenti INCONVENIENTI E RIMEDI VEDI TABELLA 22 ATTENZIONE Per garantire la sicurezza della macchina usare solo pezzi di ricambio or...

Page 11: ...rizzato 2 Controllo visivo 2 Macchinario pistola 2 Settimanale Utilizzatore 2 Parti elettriche 2 Tenuta condotte vapore e acqua pistola 2 Mensile Utilizzatore 3 Pulizia brucia tore 3 Elettrodi accensi...

Page 12: ...A VALVOLA DI SICUREZZA SI APRE RIPETUTA MENTE 3 1 Carica acqua continuamente 3 Sonda livello acqua caldaia 3 Pressostato 3 Valvola di sicurezza 3 Pulire la sonda scaricando la pressione in caldaia 3 S...

Page 13: ...ot allow other people or animals within a range of 5m when operating the machine 05c Always wear suitable protective clothing in order to protect yourself against ricocheting parts 05d Do not touch th...

Page 14: ...rience and knowledge unless they have been given supervision or instruction concerning use of the appliance by a person responsible for their safety 17WARNING Childrenshouldbesupervised to ensure that...

Page 15: ...ot be cut and tampered with De energise the machine in case of damages K12 Any use of the machine other than the one it has been built for represents an anomalous condition and can cause serious damag...

Page 16: ...MPORTANT Before connecting the appliance make sure that the nameplate data are the same as those of the electrical mains and that the socket is protected by a differential security breaker with trippi...

Page 17: ...ine products We suggest you to make use of our products which have been studied for the use with washer machines WATER see fig A see section on WATER SUPPLY Connect the hose to high pressure water out...

Page 18: ...water and detergent TO SPRAY DETERGENT To spray and mix the detergent with steam Press button situated on the control panel Machine stop at end of work At the end of the work shift stop the machine in...

Page 19: ...spare parts supplied or approved by the manufacturer Machine noise level Determination of the resonant level 75 dB A IMPORTANT the machine shows no adverse indications if used throughout the working...

Page 20: ...ctronic pro duct you are not allowed by law according to EU Directive 2002 96 EC of 27 January 2003 on waste electrical and electronic equipment and the particular national laws of the EU Member State...

Page 21: ...After Sales Service The user 3 THE SAFETY VALVE OPENS REPEATEDLY 3 1 It keeps on loading water 3 1Boiler water level probe 3 1Pressure switch 3 1Safety valve 3 1Clean the probe dischar ging boiler pr...

Page 22: ...22...

Page 23: ...23...

Page 24: ...tore generale General manager Pegognaga 20 04 2015 2006 42 EC 2014 35 EU 2014 30 EU 2000 14 EC 2005 88 EC 97 23 CEE 2011 65 EU Giancarlo Lanfredi EN 61000 3 11 2000 EN ISO 12100 2010 EN 12953 3 EN 303...

Reviews: