32
wiring from the Anderson connector of the machine
wiring (Photo D - 7) (Photo F - 8) . Always hold the con-
nectors with the hands and never pull on the cables.
Photo H show connection diagram of the batteries
for B - BT machines.
•
Attach the battery wiring to the battery, connect-
ing the terminals only on the poles marked with the
same symbol (red wiring “+”, black wiring “-“)!
A battery short-circuit may cause an explosion!
After checking that all the controls on the panel are in
position “0” or at rest, connect the battery connector
to the machine connector.
•
Close the battery compartment making sure not
to crush any wires.
Photo I - 3 show the correct connection of the batter-
ies for B - BT machines.
4.1.5. CIRCUIT BOARD SETTINGS
CONFIGURATION
The machine is equipped to GEL battery circuit board
configured. If the operator whish to use e Pb-Acid bat-
tery, it is necessary to set the electronic circuit board
as follows:
Model “B” (DC 24V)
•
TO ENTER THE BATTERY THRESHOLD CONFIGURA-
TION MODE:
1) Press simultaneously the push buttons “BRUSH
MOTOR SWITCH” (Photo C - 1) and “SUCTION MOTOR
SWITCH” (Photo C - 2) within 2 seconds after switching
on the machine with the key switch (Photo D - 1). The
three LED of the battery power test (Photo C - 3A, 3B,
3C ) will be ON.
2) Press “SUCTION MOTOR SWITCH” key within 5 sec-
onds from the previous action; you have now entered
in the configuration mode: the green and yellow LED
of the battery power test (Photo C - 3A, 3B ) will be ON.
•
CONFIGURATION SETTINGS ARE DISPLAYED ON THE
BRUSH LED (Photo C - 1A) and on the SUCTION LED
(Photo C - 2A):
Gel:
BRUSH LED (Photo C - 1A) on.
SUCTION LED (Photo C - 2A) off.
Pb-Acid:
BRUSH LED (Photo C - 1A) off.
SUCTION LED (Photo C - 2A) off.
Li-Lithium:
BRUSH LED (Photo C - 1A) off.
SUCTION LED (Photo C - 2A) on.
•
TO MODIFY CONFIGURATION SETTINGS:
Press the “BRUSH MOTOR SWITCH” (Photo C - 1)
•
TO SAVE THE SETTINGS AND EXIT THE MODE:
Press the “SUCTION MOTOR SWITCH” (Photo C - 2)
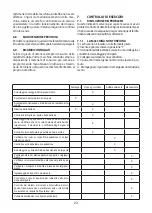
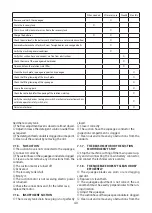
Once the settings have been set, we have different
battery discharge levels with differentiated interven-
tion on the machine functions as specified in the fol-
lowing table:
Battery discharge indicator and functions - Model “B” (DC 24V)
Volts
Battery Type
Battery power
test indicator
LED
Brush opera-
tion indica-
tor LED
Pb-
Acid
GEL
Li
Signaling
Signaling
Action
24,0
24,0 >25,4
Green
LED ON
LED ON
All working
21,5
22,5 >23,5
Yellow
LED ON
LED ON
All working
20,5
21,5 >22,6 Red LED ON
LED
FLASHING
Brush motor
is not wor-
king
20,0
21,0 <22,6
Red LED
FLASHING
LED
FLASHING
Brush and
suction mo-
tors are not
working
Model “BT” (DC 24V with traction)
•
TO ENTER THE BATTERY THRESHOLD CONFIGURA-
TION MODE:
1) Press simultaneously the push buttons “REDUCE
SPEED” (Photo E - 3) and “SUCTION MOTOR SWITCH”
(Photo E - 6) within 2 seconds after switching on the
machine with the key switch (Photo F - 1). The second
LED of the speed indicator (Photo E - 3B ) will be ON.
2) Press “INCREASE SPEED” (Photo E - 4)” key within 5
seconds from the previous action; you have now en-
tered in the configuration mode.
•
THE CONFIGURATION SETTINGS ARE VISIBLE ON
THE SPEED INDICATOR LED:
1) The first two LEDs (Photo E - 3A, 3B) indicate the
type of setting of the indicator intervention threshold
an both must be ON;
2) The third and fourth LEDs (Photo E - 3C, 3D) indicate
the battery type: for the PB-Acid battery only the third
LED (Photo E - 3C ) should be ON, while for the GEL
battery both should be ON (Photo E - 3C, 3D)
3) To select Li batteries, press the "BRUSH ON" button
(Photo E - 5) for 2 seconds together with the "SUCTION
ON" button (Photo E - 6) until the third LED (Photo E -
3C) and the fourth LED (Photo E - 3D) switch off.
Summary of Contents for Clean Track NANOscrub Evo 50 cbt
Page 3: ...3 2 1 3 A B 6 1 3 4 5 2 E AC 230V...
Page 4: ...4 C D 2 2A 3A 3B 3C 1A 1 3 6 3 4 5 1 8 2 B DC 24V 7...
Page 6: ...6 H G 1 2 1 3 2 I...
Page 7: ...7 1 2 L M 1 1 4 4 3 2 5 7 6 5 2 6...
Page 8: ...8 N O 1 1 2 3 3 2 4...
Page 9: ...9 P 1...
Page 95: ...95 1 1 1 1 2 2 10 1 3 1 4...
Page 96: ...96 1 5 2 2 1 4 35 10 50 30 95 2 10...
Page 97: ...97 2 2...
Page 98: ...98 3 3 1 3 2 3 3 C C 3 4...
Page 99: ...99 4 4 1 4 1 1 20 20 20h 5 5 5h 5 5 20 20 24 4 1 2 4 1 3 I 2 G 1 3 I 1 I 2...
Page 104: ...104 5 4 M 6 M 6 M 3 5 5 M 6 5 6 6 5 M 4 M 6 M 4 M 6 6 4 5 7 M 2 45 M 2 M 7 5 8 5 9...
Page 105: ...105 1 1 5 10 50 C 3 4 2 2 2 P 1 5 11 3 1...
Page 106: ...106 5 D 6 F 7 3 5 12 AC 230V AC230 AC 230V 5 13 230V 1 1 ON 2 B 5 A 3 3 2 4 DC 24V D 7 D 1 3 1...
Page 108: ...108 5 14 5 6 11 6 6 1 50 6 2 M 3 6 3 6 4 6 5 6 6...
Page 109: ...109 6 7 6 8 6 8 1 6 8 2 6 8 3 6 9...
Page 110: ...110 7 7 1 7 1 1 1 C 7 1 2 5 7 1 3 7 1 4 7 1 5 7 1 6 7 1 7 7 1 8...
Page 111: ...111 7 1 9 7 1 10 100 20 30 8 12 8 1 2013 56 EU 8 2...
Page 112: ...112 2012 19 EU 2012 19 EU...
Page 130: ...130 8...
Page 131: ...131 7 3 12...
Page 132: ...132 6...
Page 133: ...133 5 2 10...
Page 134: ...134 4 4 35 10 50 30 95...
Page 135: ...135 3 5 1 CE CE 2 1 2...
Page 136: ...136 2 3 1 CE 4 1...
Page 137: ...137 1 1 1 1 1 2...
Page 246: ...246 1 1 1 1 2 2 10 1 3 a 1 4...
Page 247: ...247 1 5 2 2 1 4 C 35 C 10 C 50 C 30 95 2 10...
Page 248: ...248 2 2 3 3 1 3 2 3 3...
Page 249: ...249 3 4 4 4 1 Ah 20 C20 20h 5 C5 5h C5 C20...
Page 254: ...254 1 Pb Pb 5 4 M 6 6 M 3 5 5 6 5 6 6 5 M 4 M 6 M 4 M 6 6 4 5 7 M 7 2 45 M 2 M 7 5 8...
Page 255: ...255 5 9 OFF 1 cm 1 cm OFF 5 10 L 50 C N 4 N 3 2 N 2 2 L Q 1 5 11 N 3 0 1...
Page 258: ...6 11 6 258 6 1 50 X X X X X X X X X X X X X X X X X X...
Page 259: ...259 6 2 3 6 3 6 4 6 5 6 6 BPb 3 AGM 6 6 7...
Page 260: ...260 6 8 6 9 7 7 1 7 1 1 ON 7 1 2 5 7 1 3 7 1 4 7 1 5 7 1 6 7 1 7...
Page 261: ...261 7 1 8 7 1 9 7 1 10 100 20 30 8 12 8 1 2013 56...
Page 262: ...262 8 2 WEEE 2012 19 2012 19 EU...
Page 264: ...264 1 1 1 1 2 2 2 10 1 3 1 4...
Page 265: ...265 1 5 2 2 1 4 C 35 C 10 C 50 C 30 95 2 10...
Page 266: ...266 2 2 134 3 3 1 3 2 3 3...
Page 267: ...267 3 4 4 4 1 4 1 1 Ah 20 C20 20h 5 C5 5h C5 C20...
Page 273: ...273 5 8 5 9 1 cm 1 cm 5 10 50 C N 4 N 3 G 2 N 2 2 cm 5 11...
Page 276: ...6 13 6 14 3 5 14 5 276 6 11 6 X X X X X X X X X X X X X X X X X X...
Page 277: ...277 6 1 50 6 2 M 3 6 3 6 4 6 5 6 6...
Page 278: ...278 3 AGM 6 6 7 6 8 6 9 7 7 1 7 1 1 1 30 7 1 2 5 7 1 3...
Page 279: ...279 7 1 4 7 1 5 7 1 6 7 1 7 7 1 8 7 1 9 7 1 10 100 20 30...
Page 280: ...280 8 12 8 1 2013 56 E 8 2 2012 19 2012 19...
Page 284: ...7 504 0357 rev 01 01 2022...

