9.5 INSUFFICIENT SUCTION
The recovery tank cover was not correctly tighte-
ned.
Tighten it correctly.
The recovery tank drain hose plug is not perfectly
closed.
Close it correctly.
The suction hose, the squeegee conduit or the
inspection compartment is clogged.
Clean out and remove any obstructions from the
conduits.
9.6 THE BRUSH MOTOR OR THE SUCTION MOTOR
DOESN’T STOP
Stop the machine, cutting off the main power sup-
ply and disconnecting the main battery connector,
and contact the technical service centre.
9.7 THE SQUEEGEE DOESN’T CLEAN OR DRY EFFI-
CIENTLY
The squeegee blades are worn or are dragging solid
dirt.
Replace or clean them.
The squeegee adjustment is not correct; the
advancement must be exactly perpendicular to the
running direction.
Adjust the squeegee.
The suction hose or the squeegee conduit are
clogged.
Clean out and remove any obstructions from the
conduits.
9.8 THE BATTERY CHARGER DOESN’T WORK
The battery charge doesn’t start.
Check that the battery charger is connected to the
battery. Consult the battery charger manual.
9.9 THE BATTERIES DO NOT CHARGE OR DO NOT
HOLD A CHARGE
At the end of the charging process, the battery is
not correctly charged (see the battery manufacturer’s
instruction-maintenance manual)
Check the battery charger error message and check
the data indicated on the display (see the battery
charger’s instruction manual).
The batteries are new and do not generate 100% of
34
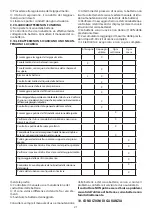
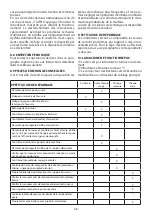
When
needed
After
every use
Weekly
Monthly
Remove and wash the squeegee
X
Drain the recovery tank
X
Drain, rinse with clean water or sanificate the reco-
very tank
X
Charge the batteries
X
X
Check the acid level in the battery cells (if batteries are
not maintenance-free)
X
Check the wear of the squeegee rubber blades
X
Open and clean the suction filter
X
Remove brushes and check for brush wear, foreign bo-
dies and wrapped belts
X
Verify the machine general conditions.
X
Open and clean the solution water filter
X
Verify that suction hose and conduct are free from
obstructions
X
Check and clean the pivoting wheels
X
Check wear and function of traction drive belt or chain; if
necessary, adjust belt or chain tension
X
Clean the brush plate, squeegee support and
squeegee
X
Check the lifting/lowering of the brush plate.
X
Check the lifting/lowering of the squeegee.
X
Grease the moving parts.
X
Check the control cable for the opening of the solution
water tap.
X
Descale water hoses.
X
Summary of Contents for SIGMA 1-R 66BTR
Page 3: ...3 A 3 1 4 8 7 6 2 5...
Page 4: ...4 B 2 3 5 6 8 4 9 7 1 10...
Page 5: ...5 D C 1 4 5 6 3 2 A B 3 4 5 1 6 7 8 9 2...
Page 6: ...6 F E 1 2 3 1 2 3...
Page 7: ...7 H G I 1 2 3 2 1...
Page 8: ...8 4 3 6 5 4 3 6 2 7 7 5 1 1 2 1 L M N...
Page 96: ...96 96 8...
Page 97: ...97 7 3 12...
Page 98: ...98 6...
Page 99: ...99 5 2 10...
Page 100: ...100 4 4 35 10 50 30 95...
Page 101: ...101 3 5 1 CE CE 2 1 2...
Page 102: ...102 2 3 1 CE 4 1...
Page 103: ...103 1 1 1 1 1 2...
Page 105: ...105 2 2 1 2 2 2 10 2 3 2 4...
Page 106: ...106 2 5 3 3 1 4 35 C 10 50 C 30 95 2 10...
Page 107: ...107 3 2 4 4 1...
Page 108: ...108 4 2 4 3 4 4...
Page 109: ...109 5 5 1 5 1 1 15 6 8 10 20 15 100 7 8 5 1 2 20 20 20 5 C5 5 C5 20...
Page 112: ...112 2 7 7 1 c 7 2...
Page 114: ...114 0 7 4 50 C 2 7 5 O 1...
Page 115: ...115 7 6 7 7 7 7 1 7 7 2 7 7 3 7 7 4...
Page 116: ...116 7 7 3 7 7 5 7 4 7 5 7 4 7 5 7 8 AC 230V AC 230V AC 230V 8...
Page 117: ...117 8 1 50 9 X X X X X X X X X X X X X X X X X X...
Page 118: ...8 2 8 3 8 4 8 5 8 6 8 6 1 8 6 2 8 7 118...
Page 119: ...119 8 8 8 9 9 9 1 N 7 9 2 9 2 1 1 9 2 2 5 9 2 3 9 2 4 9 2 5...
Page 120: ...120 9 2 6 9 2 7 9 2 8 9 2 9 9 2 10 100 20 30 10 12...
Page 121: ...121 10 1 2013 56 EU 10 2 2012 19 EU 2012 19 EU...
Page 151: ......

