background image


Table of contents


NOTE 

Battery, Scorecard holder and Wheels may vary from each market. 

SAVE THIS MANUAL FOR FUTURE REFERENCE.


- 1 -   

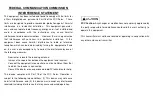
REMOTE CONTROL IMPORTANT 

(For Distance Remote model) 


 Keeping extra care while use this distance remote caddy, be careful 

to avoid mis-press from the buttons of remote transmitter and always 
dis-connect main battery connector while not in use. 

 Read this manual before you start to use this trolley. 
 This remote control was preset in factory for full speed. 
 Do not operate around cars or building with remote control. 
 Do not direct trolley towards to other players or carts with remote 

control. 

 Always keep watch while operating remote control. 
 Don’t operate remote control while unattended.   
 The remote distance may be reduced by possible effected of 

Electromagnetic Interference on your remote golf trolley. 

 Do not operate remote control when up and down slopes. 
 Use manual mode in car parks, down steep hills, confined space or 

where there are lots of peoples. 

 Do not operate in indoor with remote control. 
 It is recommend to use remote control within 50 yards, this trolley is 

designed to operate within range of 50 yards. 

 The remote distance may be reduced by possible effected of 

Interference on your remote golf trolley. Interference can be included 
electromagnetic, high voltage power lines, cellular phones or CB 
radios, or certain obstructions such as mounds, clusters of trees, will 
possible reduce the distance of transmission.   

 Keep shipping carton in dry place after unpacking your unit for in case 

should need to be shipped for service.   


- 2 -


Contents                                                                                        Pages 

Remote Control Important - - - - - - - - - - - - - - - - - - - - - - - - - - -2 

Electromagnetic Interference - - - - - - - - - - - - - - - - - - - - - - - - -3 

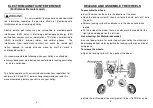
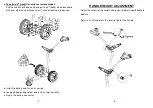
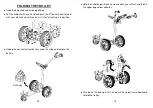
Release and Assemble the Wheels - - - - - - - - - - - - - - - - - - - - 4 

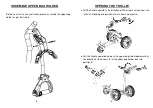
Assemble Upper Bag Holder - - - - - - - - - - - - - - - - - - - - - - - - -5 

Opening the Trolley    - - - - - - - - - - - - - - - - - - - - - - - - - - - - - - - - 6 

Handle Height adjustment- - - - - - - - - - - - - - - - - - - - - - - - - 8 

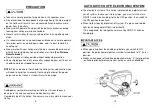
Precaution - - - - - - - - - - - - - - - - - - - - - - - - - - - - - - - - - - - - - 9 

Auto. Switch Off / Electronic System - - - - - - - - - - - - - - - -- - 10 

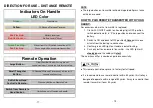
Direction for use - Distance remote - - - - - - - - - - - - - - - - - 11 

How to pair remote transmitter with your caddy- - - - - - - - - - - - 12 

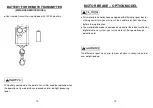
Battery for remote transmitter - - - - -  - - -  - - - - -  - - -  - - -  - 13 

Motor  brake  –  option  model  -  -  -  -  -  -  -  -  -  -  -  -  -  -  -  -  14 

Folding the trolley- - - - - -    - - - - - - - - - - - - - - - - - - - - - - - - - 15 

Battery and Charger- - - - - - - - - - - - - - - - - - - - - - - - - - - - - - 18 

Battery Charger - - - - - - - - - - - - - - - - - - - - - - - - - - - - - - - - - 19 

Battery Care & Maintenance    - - - - - - - - - - - - - - - - - - - - - - - 20 

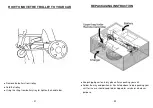
How to Move the Trolley to Your Car - - - - - - - - - - - - - - - - -- - 21 

Repackaging Instruction - - - - - - - - - - - - - - - - - - - - - - - - - - - 22 


Summary of Contents for Ezyplay 89061

Page 1: ...DIRECTIONS FOR USE Distributor MODEL 89061 P N 906116 ...

Page 2: ...ipment off and on the user is encouraged to try to correct the interference by one of the following measures Reorient or relocate the receiving antenna Increase the separation between the equipment and receiver Connect the equipment into an outlet on a circuit different from that to which the receiver is connected Consult the dealer or an experienced radio TV technician for help This device compli...

Page 3: ... there are lots of peoples Do not operate in indoor with remote control It is recommend to use remote control within 50 yards this trolley is designed to operate within range of 50 yards The remote distance may be reduced by possible effected of Interference on your remote golf trolley Interference can be included electromagnetic high voltage power lines cellular phones or CB radios or certain obs...

Page 4: ...e leaving your trolley or while unattended This trolley complies with current telecommunications regulations for conforms to CE and FCC but we strong recommend you read this manual completely before you start to use your trolley 3 RELEASE AND ASSEMBLE THE WHEELS To assemble the wheels Insert the wheel on the axle in the direction of the arrow Open the locking system B then insert onto the axle put...

Page 5: ... illustrated 5 OPENING THE TROLLEY Pull the handle upward in the direction of the arrow until you hear the click of it locking into position of main frame mechanism Pull the handle upward and press the upper bag holder downward in the direction of the arrow to let the upper bag holder lock into position E 6 ...

Page 6: ...until you hear it click of locking into position Install the battery and fasten it securely Load golf bag on bag holder and fasten straps correctly Plug in the battery connector 7 HANDLE HEIGHT ADJUSTMENT Adjust the height of the handle where you find most comfortable to operate Adjust nut Q and press the lever to tighten the handle 8 ...

Page 7: ...t should the trolley hit any obstruction you will need to help it out manually Continuing to attempt the power output when the trolley is stuck will result in damage Avoid power spray water washing on trolley as this could cause damage to the wire connectors and electronic system Completely dry off the trolley if necessary use a dry cloth to clean your trolley 9 AUTO SWITCH OFF ELECTRONIC SYSTEM T...

Page 8: ...OTE The large button on transmitter will be disregarded if press twice within one second HOW TO PAIR REMOTE TRANSMITTER WITH YOUR CADDY For occasions where the transmitter is replaced 1 Start with ON OFF switch on handle grip in OFF position switch potentiometer in 0 zero position and re connect the battery 2 Switch to ON and back to OFF position 3 times within one minute from the battery re conne...

Page 9: ...coming lower 13 MOTOR BRAKE OPTION MODEL This motor brake trolley have equipped with differential gear box for making easier turn you must push the handle to let front wheel up before turning direction The motor brake model is equipped and control the brake function by digital electronic system you just need to set the speed through potentiometer The differential gear may easier to wear off when i...

Page 10: ...your other hand until you hear it click of locking into position Unplug the connector from battery undo the strap and remove the battery 15 Hold the handle up with one hand and have your other hand to pull the upper bag holder upwards Push down the locking lever T and push the upper frame downward to fold the trolley 16 Pull away ...

Page 11: ...right position for recharging To ensure that the battery is fully charged it is recommended to leave the charger connected to the battery with the mains switched on until the battery is needed Study charger instruction on back side of charger before charging your battery IMPORTANT NOTICE Please DO NOT leave your battery near metal parts in the free position which might touch on the positive and ne...

Page 12: ... span of the battery Before the first time use of your battery put it on charge for 24 hours even if the battery is already fully charged Do not place the battery on a concrete floor for charging have the battery raised off the floor on wooden blocks or place the battery on a shelf For fully charge the battery choose a place where ambient temperature is above 10 degrees Celsius 10ºC Always recharg...

Page 13: ...g the strap from battery tray for tighten the handle bar 21 REPACKAGING INSTRUCTION Keep shipping carton in dry place after unpacking your unit Follow the way and position as illustrated above to do repacking your unit for in case should need to be shipped for service or whatever purpose 22 ...

Reviews: